
Leaderboard


Popular Content
Showing content with the highest reputation on 05/28/20 in all areas
-
With the lock down continuing it’s been hard to keep our enthusiasm levels up without the required supplies to continue any major projects. It’s been a case of “what can we do today” picking off tasks. The gas boiler needed to be plumbed in, nice easy job as screwfix and toolstation were operating click and collect. Good to get a job ticked off. Our electrics had got to pretty much second fix stage, so we ordered an 12 way RCBO consumer unit, sockets and isolator switches and set about wiring it all up. We had been in contact with a very helpful electrician Lee, who had agreed to do testing and certification of our wiring. Lee came round a couple of months ago and did a visual inspection of our first fix work before agreeing to take the job on. Happy with what we were doing he agreed he would come and do the testing and certification. The testing went well and it only took half a day to test all circuits and get the consumer unit connect. Boy it’s good to say goodbye to the temporary supply and extension leads. Our lights wiring consists of two 16amp supplies to a central area and from that all the lights wiring is radial. After a bit of indecision we had decided to not have any “wired” switches. There are lots of options out there for simple wireless solutions and for wi-fi. Using wi-fi did not appeal, having it all controlled from you phone was a step to far so we have used battery powered wireless switches located where we would have place wired switches. Simple to use and we can move them easily if we find out the positioning is not ideal. We had thought all the wiring after the wireless switches would be low voltage, but we installed mains 1.5mm cable to give the option of using 220v to the fitting. This was a fortunate choice as we already have four circuits that are using 220v. The lighting is working out well, we have about half the lights in and it’s bringing the house to life at night. With the painting done we decided to install one of the doors we had ordered from Germany, always a bit concerning distance ordering and dimensions are not a good combination. The doors we ordered are from Hormann and the architrave/frame and door come as a single unit. As well as specifying the width and height you have to specify the wall thickness. The frames are easily assembled and have to be foam fixed into the wall door opening, taking care to keep everything square. It’s very satisfying to be able to put up a house door with what are automotive tolerances, lovely solid feel to the doors. It was not all plain sailing though. Our doors are all the same size with the exception of the attic storage/plant room, this door need to be smaller to allow for the roof pitch. It turned out not to be the size ordered, after a few phone calls it looks as though it was a picking error on Hormann’s part as the paperwork on their system agrees with the ordered size. We’re waiting on a resolution, I expect Hormann will replace the door and we’ll have to pick up the shipping. Next job...We’ve been planning on framing the window reveals with ply having seen the rather nice results shown on the buildhub Buildhub has been a god sent for us, well mostly, the post should have come with a “don’t try this at home” caveat. Throwing caution to the wind we decided it looked a nice idea. After a bit of phoning around we found out a timber yard in Southampton was operational, so we measured all our window reveals, simple depth, width, height etc. At this point it dawns on you just how many windows you have and the fact that a they are all set at different depths, not to mention not being 100% on the plane of the wall. Once we had done our measurement and produced a cut list. We contacted the timber yard. It’s amazing how much material you can get through on a job like this, there is the main reveal board, then two 20mm edging/framing strips. The framing strips came out at 230m total. A whole 1524x3050 sheet! An awful lot of sawdust added to the 34 reveal boards. The quote was pretty much what I had anticipated, the 1200 x 2400 sheets were £56 each and the 1524x3050 sheets £101. Bill for sheets £530, bill for cutting £30 which was a surprise, even with some clever electronic saw gear I consider that very reasonable. We’ve done just two windows so far, it’s an exacting task, but the results look good. Plaster board lifter coming in for more abuse very helpful for getting the frame into place.4 points
-
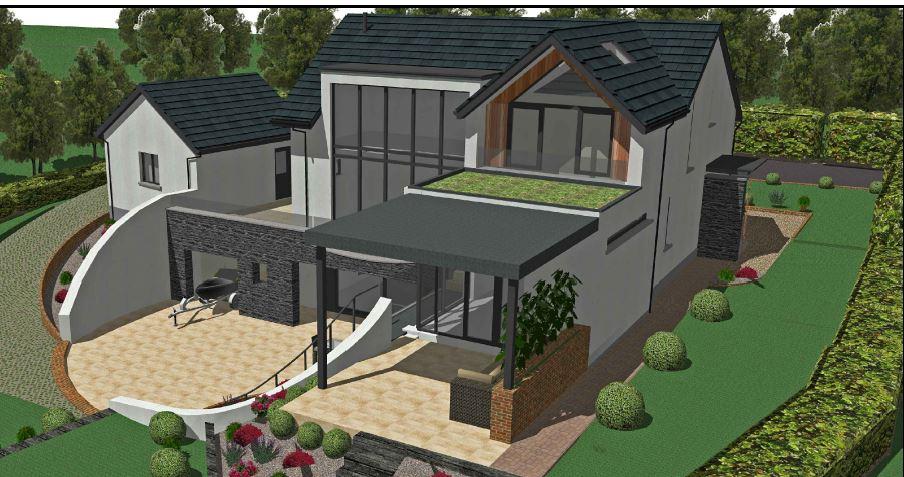
Yes. Should have started already as we've done demolition and recovery of materials from the original house. I'll have to do it retrospectively. Sounds good - after I posted I spotted micro optimisers that replace the control boxes in Perlite panels and seems like a good option. Using them brings the whole installation in at about £5.5k. FYI rear view of house attached. Won't be putting the skylights in to the bedroom outshoot, so have chance to fit 4 panels on each side. Main roof with dormer faces due south. Other option is the flat roof, but I'm not sure on the aesthetics.
 2 points
 -
It has been 3 weeks since the last Blog post and in some ways it feel an eternity and in others it seems only yesterday since Plot 1 TF was done - which is where we left the story. So lots and lots has happened since then so this entry will cover 'lots of stuff' in one go. Our main aim is to get both shell buildings up and then get them wind and watertight as soon as possible. The heavy rain we had just after Plot 1 was finished showed that the MBC OSB roof is not in any way watertight as water poured in through the roof and down the stairs - so we tarpaulined this one and then it hasn't rained since - typical. Anyway a huge push to get to a point where we can (hopefully) draw breath in two watertight houses - hence LOTS OF STUFF (good, bad and ugly!) PLOT 2 Timber Frame So MBC finished Plot 1 and moved over to Plot 2 - another big crane day and the lower floor went up in one day and the joist went on the next and then the boys left us for a long weekend back to Ireland as we fitted the UFH pipes. Having done it once already the UFH pipes went in just fine and this time we didn't have to cut all the metal plates so it was a bit easier. Then the MBC team came back and fitted the floor deck and the sole plate for the top floor and then the crane came back for the top floor walls and roof. The wind came up and so we had to have the crane back the next day to finish off as wind is not your friend when you have to lift big panels up and over a three story building! The boys cracked on and decided to work the Bank Holiday weekend and try to finish by the Sunday. We had already had some comments on the noise and weekend working and had talked to our BCO so we posted a polite notice to say because of CV19 guidance we were trying to reduce travel of our contractors so they would be working through. A couple of neighbours were supportive and sympathetic and one of them even invited the boys for a socially distanced beer after work. We had them stop work for 2 minutes at 11:00 on VE day so exactly at that point one of the neighbours switched on his pressure washer - you cant make this stuff up!. Everything pretty much went to plan and after a heroic effort the MBC crew finished on the Sunday evening as promised and both houses finished to shell level in under 5 weeks - and they look amazing. We did our best to look after the MBC crew as they were in local B&B without the Breakfast (or any food component) - its never ceases to amaze us how well simply treating contractors like human beings goes down. We guess that some of their clients must treat them badly - but why on earth would you want to? After MBC left we had a call from Environmental Health and it seems that some noise complaints had been received - it seems that the latest Government edict on allowing longer working hours on construction to get the economy moving only apply to Planning and not Environmental Health so we were suitably humble and promised to be good in the face of some very vague guidance. Given that we have been working on site since August and these are the first noise complaints its obviously not a serious problem, and as we are self building under loads of pressure we will continue to do DIY at weekends - though as quietly as possible. Yet again we find we really do have one or two vile neighbours. Roofing As we have a flat roof to keep the roof height at the same level as the original bungalow it has an EPDM (plastic / rubber single ply) membrane roof. This sits on a 24mm plywood deck on top of the MBC flat 12mm OSB roof and the MBC firring strips - which slope the roof slightly to get the water to run off. Sounds pretty simple but as with all these things its not so simple. First you need airflow in the gap between the two deck layers so there is no condensation to rot the timber - for this you need plastic soffit vents around the edge to stop the bugs and birds getting in so Joe and Chris fitted all these. Then you need to think how you get over 4 tonnes of plywood 9m up and onto the roof (plus all the rolls of membrane etc) and our roofers said they would do the roofing but not the lifting. Simple solution here was a tele-handler which is a huge forklift that makes short work of this kind of thing - just hire one - simple. But then you need a driver - again simple: one of Joe's colleagues Andy drives one all the time on musical festival sites and is qualified and was happy to come over to help out. So Andy and the roofers turned up and after a bit of delay the first pallet of ply was lifted onto the roof and they were away. Again a good crew who worked really hard and seem to be doing a great job. They have spent a week and plyed and membraned the main part of both roofs so we almost have a dry roof. It was really hot on the roof with no shade so ice-cream went down really well (and for us as we were up there working as well). They still need to do all the fiddly bits like rooflights and soil stack, plus all of the top of the oversail roof but the bulk is done. One wrinkle here is that the rear bay on Plot 2 has the same oversail detail and MBC couldn't fit this because the scaffolding is in the way, but we couldn't take down the scaffolding because we needed it for roofing the main roof on the floor above. So when the main roof is done we will have the scaffolders back to take down the back corner and then MBC will fit the roof and then the roofers will come back and fit that section of membrane roof. Oh how it all gets really convoluted and complex really quickly. Finally to add to the simple / complex plan we had the roofers and the window fitters start on the same day - what could possibly go wrong! Windows The EcoHaus Internorm surveyor came out and lasered around and said that the rear bay window on Plot 1 was 30mm too low and the three windows wouldn't fit. Some checking and it was an MBC error that they happily agreed to fix and Brendan popped over and spent a morning cutting 30mm off the underside of the 3 sided glulam frame in situ and in mid air with a skill saw. We were apprehensive about the sort of job he would do but skill saw is an understatement when it comes to Brendan: two saw cuts one from each side that met perfectly in the middle - truly fantastic work. So one week after MBC had finished EcoHaus Internorm arrived to fit the windows (same day as the roofers - but the windows arrived first!). Their plan was to fit all of Plot 1 windows and then move to Plot 2 - but they were all over the place fitting windows at what seemed like random. We had some of the scaffold moved to make space for them and they seemed happy - and we said if they needed anything at all just to ask. So we were working around the back of the house when we heard an almighty crash and ran to see what had happened. They had asked Andy to lift a huge pallet of windows up above the garage level (about 2m) so they could load them through the window opening. During the unload one of the fitters stepped off the scaffold onto the pallet. The load slipped and the windows fell. Included in this fall was the fitter who had stepped onto the pallet. Ongoing discussions with EcoHaus preclude us from saying much more about this except to say that mercifully the fitter was only bruised and a load of windows were damaged (no glass broken though) and will need replacing - it could have been much much worse. They carried on and then discovered than one of the huge panes of glass for Plot 1's rear slider was cracked in transit from Austria, and also that there were no bolts to fit Plot 2's Juliet balcony. Finally, and this is my fault; the front door for Plot 2 is handed wrong and will need a new frame. So they finished fitting what they could but we have three gaping holes awaiting replacements and a bunch of other stuff that needs rectifying. We have to say that the quality of the actual windows is fantastic, but the experience has not been good so far. Just to contrast this with another MBC issue: we discovered that the kitchen window on Plot 1 didn't fit and there was a 300mm gap above the head of the window (window surveyor didn't spot this one). Well after MBC had left site we discovered a 300mm panel that didn't seem to have a home! Quick call to MBC and yes this was the missing piece, they apologised and Mike came over the next day, apologised some more, fitted the panel and problem solved. If only all the people we deal with had the same attitude then it might all be simple! Rooflights, gutter, soffits and facia Since we have been on a cost cutting mission we have taken on much more of the 'doing' ourselves and keep trying to cut costs where we can. One of these is the guttering etc. the original plan was powder coated aluminium. However this would have been about 3x the cost of plastic, and given the really complex oversail roof detail this would have been really expensive to have fitted. So, and with some real reluctance, we have gone for plastic gutter and soffits and facia. We would be the first to admit it doesn't look as good and will not last as well as aluminium but it is 9m in the air and nobody will examine it in detail. Its likely we will compromise and fit metal gutter to the rear bay (when its finished) as this will be almost at eye height and will look much better. So a mad rush as the three of us have been busy fitting all this and trying to keep half a step in front of the roofers who need the gutter fitted before they can membrane the oversail roof. The reality is that the plastic looks really OK - though we are somewhat mystified by the physics of fitting a flat gutter all the way round the roof - anyone done this? We had to call a stop on Saturday as the wind was really strong and the plastic panels wanted to take off and it really wasn't safe. Also as part of the roofworks we have 4 rooflights on the roof :- 3 fixed pyramid lanterns, 1 on Plot 1 over the stairs and 2 over stairs and landing on Plot 2, plus one flat sliding opening rooflight over the en-suite on Plot 2. The fixed lanterns were flat pack so we have just brought all the parts up onto the roof and built them in-situ ready for the roofers to flash the membrane roof around them. The sliding light was ready built and is really heavy and a 4-man lift so MBC helped unload it and store it and the roofers moved it to the tele-handler and we hoisted it up to the roof and they moved it to a point where its a really simple install. We have had to build the upstand / kerbs for all of these so they fit exactly into place - and we were able to test this with the empty frames. We have just placed the completed unit above the landing and it really looks great - the one above the stairs will look great but at the moment the hole is covered with ply as there is a 9m drop below it and we dont want to leave that open for obvious reasons! MVHR Joe decided he was going to fit his own MVHR system as its not too big and complex and he is desperate to save every penny as he doesn't imagine he will be back on live music lighting until next year so has no income and a lot of time. We have all worked on this install and its not too hard, but the sheer volume of ventilation pipework is mind boggling and routing it is a real challenge. Plot 2 is more complex and since we no longer have an M&E person will get CVC in to install and commission - though having done one we could probably do this one as well! As you can see a lot of stuff in the last few weeks - and a real mix of good, bad and ugly! And still not wind and watertight as planned, but certainly a lot drier! Next steps will be to sort the insulation (Plot 2 is really complex) and screed - which needs doing before MBC can test for air tightness and we can start first fix, and also to get the render done so we can get the scaffold down and finally see the houses for the scaffold. On the insulation and screed front we has planned on 150mm of PIR insulation and 100mm of screed, the thick screed to get some thermal mass and delay into the heating/cooling system. In the interests of cost reduction it looks like 100mm EPS + 90mm PIR + 60mm pumped screed will be much cheaper and have similar U value but lower thermal mass - any thoughts on this plan? Or even 200mm EPS + 50mm screed - which has slightly worse performance but lower cost? One nice moment last week was when we were up on the scaffold and a couple walked past, stopped, looked at the build and said 'wow that looks amazing!' . So nice to hear that others agree with us; it really is starting to look amazing!!!!2 points
-
It was suggested this might happen. One school said gravity would overcome the potential issue. Another predicted it to a tee. Seems all too familiar for some reason... ? VID-20200528-WA0008.mp41 point
-
Ideally you'd want any connection downstream of a loo to be in top third of pipe. I'm sure it would be ok where it is but just use judgement1 point
-
Could you not use an offcut of granite/quartz? If you have a local supplier they will have offcuts or look on ebay etc. Or maybe a piece of toughened glass might look good, particularly if frosted.1 point
-
How about using some of the solid laminate from the likes of Worktop Express? It's very nice stuff (a friend installed in her new kitchen extension recently) and would double up perfectly well for this purpose.1 point
-
1 point
-
Microinverters are convenient (maintenance wise) placed inside the loft, but should be as close to each panel as possible (ideally just using the short retained flylead that comes with each panel, no extensions). This is awkward if doing a "warm loft" as it means lots of penetrations through the thermal & airtight boundary on the pitched roof. For this reason we're doing micro-optimizers on the back of each panel, then we'll chain them to have high-voltage DC connection to the ground-level inverter.1 point
-
It is the inverter that sets the maximum generation. My inverter is rated at 4kW but with the output current limited to 16A. This caused the DNO to initially reject my application, saying it was over the limit for automatic approval, that was resp;ved when I sent them the data sheet stating the current limit.1 point
-
They sometimes have a screw at the front at the base that winds the rear leg up / down. RTM.1 point
-
More generally, and not being any form of expert, I found that having a (paid) M&E adviser in the planning stage of my build has proven to be invaluable. A few hours of hourly-rate advice from an expert has impacted on so many areas, not only the choice of a heating system, but everything from penetrations through my concrete raft, to lots of other issues that had knock-on consequences elsewhere. I had picked up a great deal of knowledge by avidly reading this site (thanks everyone!) but that adviser was able to assist in unpicking all of my half-thought-through ideas and string together a coherent concept. I considered it money well spent and my architect complimented me on the approach.1 point
-
Hi Just signed up to BuildHub as we are in the middle of buying a steel framed barn that has full planning permission to convert to residential. This is our first full self build, so no doubt we will be asking lots of questions along the way. At the moment we reading lots, trying to gather as much information as possible. So if anyone has done already done this type of build and has any advice it would be welcome. We are in Buckinghamshire so any recommended Builders/Designers or Architects who have worked on this type of build would be good. Many thanks Martin1 point
-
Yes. As long as it’s a dedicated ‘high flow’ unit it’ll do the job. Most you can expect in reality is two “ok” showers simultaneously, or one excellent shower, but two is possible. This is remembering that an instant hot water heater, of whatever fuel origin, is ‘cold mains dependant’, so if during the two ok showers someone flushed the loo, you’re going to know all about it. Same if any white appliances are set to run whilst you’re showering that would be a disaster. Discipline is number one in this scenario, so with unsympathetic teenagers in the mix I’d forget anything instantaneous here @MrsDeS. Boiler + thermal store is what I’d fit here, or a bigger than necessary UVC ( unvented ( mains pressurised )) cylinder, but you’ll then suffer the longer term ownership issues when said water thieves fly the nest and it’s just you guys there. As you have UFH ( and why have you oversized the rads if you’re on gas not a heat pump ?!? ) I’d say fit the TS ( thermal store ) as it’ll give you a buffer for running the UFH and give you your condensing range, ( which you won’t get at very low temps btw ). Downside is you need to keep the TS hot all summer for DHW ( same as you would with an UVC, but typically hotter than ) so losses need to be considered and managed. Best way is to put it in the airing cupboard to warm your trollies all year round. Cold mains needs to be surveyed before deciding, as you can’t get a pint out of a half pint pot, and you’ll probably need to have all the cold mains in 22mm and pipe accordingly for your needs.1 point
-
You'll get a technically correct answer from others on here @MrsDeS. But the results of heating stuff up depend on how people perceive those results. On how real people feel in situations relevant to them. I'm suggesting, based on a trustworthy estimate, you over-specify by a bit. How big's that 'bit' then Ian? Ask another plumber - one who hasn't specified or quoted for the system. No conflict of interest that way.1 point
-
I am at the stage of discharging planning conditions so I can start. It has taken almost 12-weeks and I have only just had the first one discharged (of nine). I have just sent them a two-week "deemed discharge" notice for the rest, which might focus their minds (… or might not). That's an indicator of how slow things are in my neck-of-the-woods (Cambridgeshire).1 point
-
I would be inclined to use copper compression everywhere - you will be able to modify it easier and unless you’re sure on push fit, the Tectite copper fittings are once only unless you buy the expensive ones. For your pressure gauge you need a 1/4BSPT hexagon bush, threaded into a 22/22/1/2 female tee A decent thread sealant is always good, and spanners that fit along with a nice set of pipe pliers to hold the fittings straight. I’d assume the plastic female stuff is 3/4 BSP - be careful not to strip it with brass fittings and always try and find an adapter with a flat face or shoulder when going into plastic and check the depth of threads too.1 point
-
Everyone is being very helpful re the details here, but before going any further can I make a few points. 1. Garage doors provide a pathetic level of insulation and air tightness. If you take a picture of one with an IR camera, much as the centre of each panel is insulated, the edges are not. Nor is the frame etc. The amount of heat you lose through a cold bridge at the edge of your slab will be inconsequential to what you lose through the door and the door frame. 2. I thought at one point that this was a good idea, but my research suggested that heating your garage and putting a damp car in there is bad for it. If you plan to use it as a heated workshop that is different, but if you plan to put the car in there it is a bad idea. 3. How much time do you actually spending the garage? My unheated integral garage with a 40mm insulated door drops to around 10C when it is cold outside. This is much better than keeping a car outside and fine to nip in there to put the trash in the bin. So again unless you plan to use it as a workshop and spend hours in there it would be a lot to spend for not a lot of use. Of course if you want to it is up to you, I have been thinking of plastering and tiling mine as it would look nice but then I keep telling myself I don't really need to. So far sense is winning.1 point
-
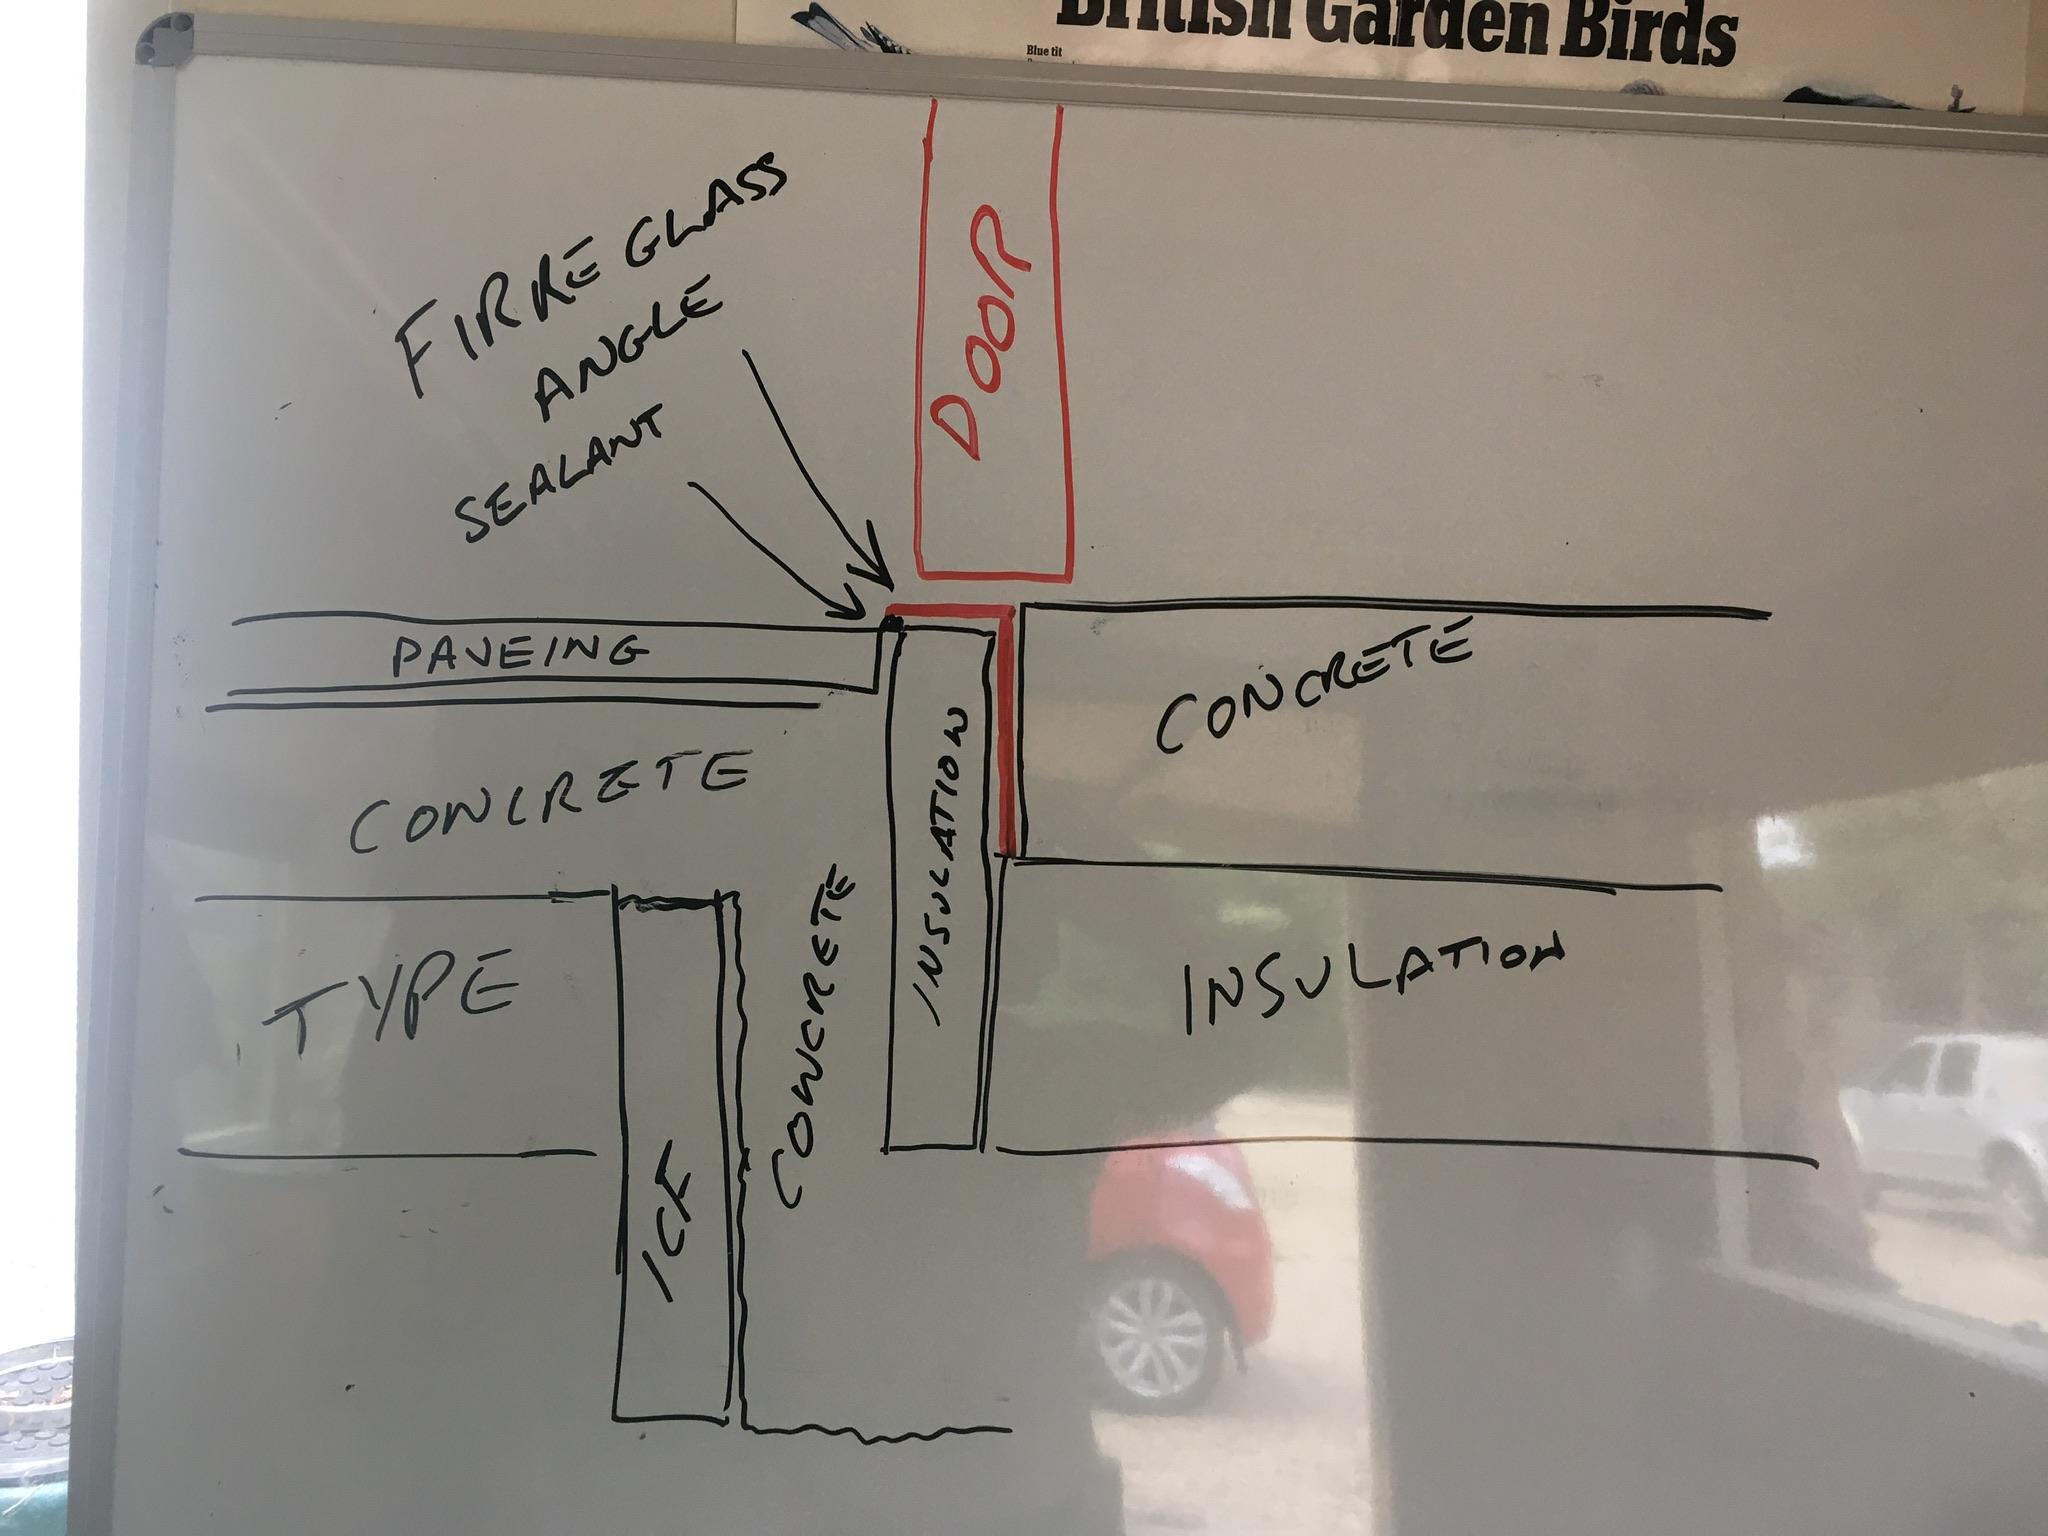
I think I’m going to do something like this, I haven’t put a lot of thought into it but it’s sort of what I’m thinking.
 1 point
 -
Piling is a very interesting topic. As I (imperfectly) understand it, piles of many types - are driven, screwed or compacted to whats known as a Refusal - simply a calculated back- pressure beyond which its not worth doing any more work (called the Working Load I think, maybe wrong). Refusal sometimes therefore varies by position. In our case one of the 64 piles just shot into the ground - to Refusal at about four meters. Most refused at a bit over three meters. One hit an incursion of rock. Because it was the last pile driven I could hear the difference in the cadence of compaction. And the ground really shook. The rest sort of slithered in. Just for completeness, @eandg, piling cost us £6500, Groundsure test , about £2500 ish, and one critically important letter (email) from the SE - one that together with a bit of research on my part and help from BH members saved £17000 (yes 17K) . Hillard Tanner saved his fee many times over. Top bloke - and his partner Nick Bailey. Ours were tested to 2.5 times the static load. One or two of the piles achieved 3 times the static load and one a little more.1 point
-
This post is summary of the Principal Designer thread. The purpose of this summary is to assist members and guests decide for themselves how CDM2015 impacts their build project. The summary is offered as is and should not be interpreted as authoritative advice. As is normal in asynchronous online discussion, the thread sometimes changes its focus a little. Where those changes occur, the content has not been summarised. Discussion of this issue is particularly relevant to us because we are a self-build forum, whose members are assumed not to be professional builders, or -in relation to building- have any technical understanding or capability beyond simple DIY . To be clear, the following assumptions are made; · A client is a Domestic Client. The distinction is central to all that follows · The Domestic Client can choose to apply for VAT relief in due course, whereas a Client cannot · The Domestic Client is not engaged, or about to be engaged, in a business related to the build (because they will then be a Client, not a Domestic Client) The thread started with a question about the role of Principal Designer. The examination of that question inevitably lead to discussion about how the role related to other key aspects of the legislation. There was some reference to the history of Health and Safety legislation, but it was pointed out that over time, the general emphasis had not changed. If you qualify for Domestic Client status, then a contractor working for you carries the main responsibility for Health and Safety. It was in the detailed examination of the term ‘responsibility’ that a good deal of discussion arose. Several members agreed that the legislation was poorly drafted for our sector of the market. And in the context of a self-build forum, where many of us will be doing things for the build on our own (DIY) as well as employing contractors, it is easy to see a rich source of confusion. For example, self-builders might be tempted to become involved in the build in a way which implies technical competence and so enhanced H+S responsibility. A strong warning was given to self-builders to avoid becoming involved in technical aspects of the build to the extent that they might be considered ‘ a responsible person’. And that includes the self-builder being trained in a relevant build subject to the extent that he or she might be assumed by the courts to have more responsibility than a Domestic Client would be expected to have. Perhaps the simplest articulation of how CDM responsibilities can be operationalised was in this post (@jamiehamy) ‘… We have only used contractors for the steel frame, lifting in floor beams, ground works/drainage and electrics - and each time I've made it clear that the contractor is responsible for operating safely and I do not dictate how they complete the activities. I don't supervise on site and most certainly do not manage their work or how they work - they have a deliverable and it is their responsibility to complete that. Where required, I offer safety equipment, ask what they need me to provide to work safely and healthily, I find out if they are dependent on me for anything and let them get on with it. Maybe I should do more in writing but I choose reputable contractors and all work is fully invoiced…’ In terms of prosecution for H+S breaches, providing the Domestic Client has fulfilled their duties (not covered in detail in this summary) prosecution is highly unlikely. Domestic Clients should make sure the site is safe and secure, tidy and clear of obvious hazards. There was some discussion based on the meaning of a series of CDM-specific terms; Project Manager, PD, PC, Client, Domestic Client, Business or Business Activity, Contractor, design, designer as well as others. Please refer to the full discussion for a more detailed discussion. But it was convincingly argued (with supporting evidence, and some unevidenced dissention) that a Domestic Client cannot be either a Principal Contractor or Principal Designer. Additionally, there was some discussion of official legal documents related to CDM2015. In summary: be sure to understand the meaning of the term Domestic Client, and to maintain that status throughout the build. Any competent person with whom you have a contract to complete work on your site should be capable of working safely. Offer support to fulfill H+S requirements, but never offer advice or direct work or manage the process. If, after reading this summary you feel you need to, take care to seek advice from more than one reliable, authoritative source. Paying for advice does not guarantee its accuracy or authority. Source url forum.buildhub.org.uk/ipb/topic/2376-principal-designer-role/ Bibliography. HSE (2015), Managing health and safety in construction. Construction (Design and Management) Regulations 2015, HSE Books downloaded 04/05/2017 http://www.hse.gov.uk/pubns/priced/l153.pdf See especially Appendix 6. HSE (2015), How CDM 2015 applies to Domestic Clients Appendix 6, Figure 1, in Managing health and safety in construction. Construction (Design and Management) Regulations 2015. Download the flow chart (from our server) here HandSforDomesticClients.pdf HSE Construction Discussion Forum (accessed 04/05/2017)1 point


This leaderboard is set to London/GMT+01:00