
Leaderboard


Popular Content
Showing content with the highest reputation on 05/19/20 in all areas
-
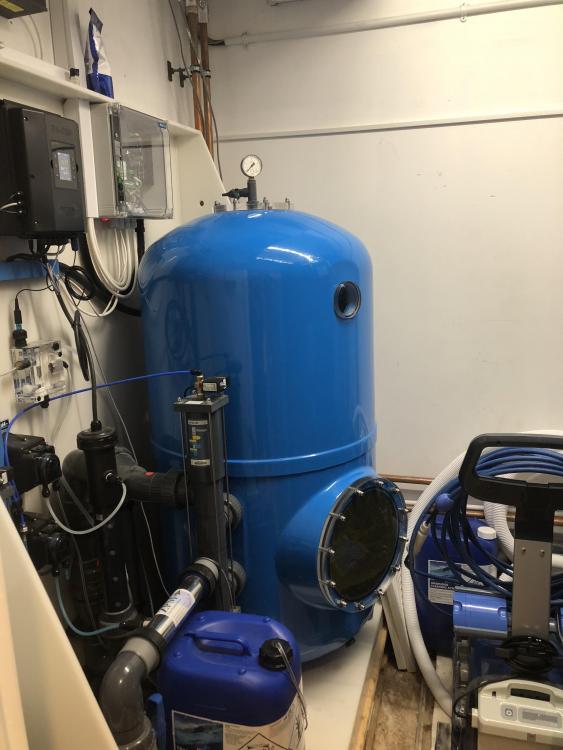
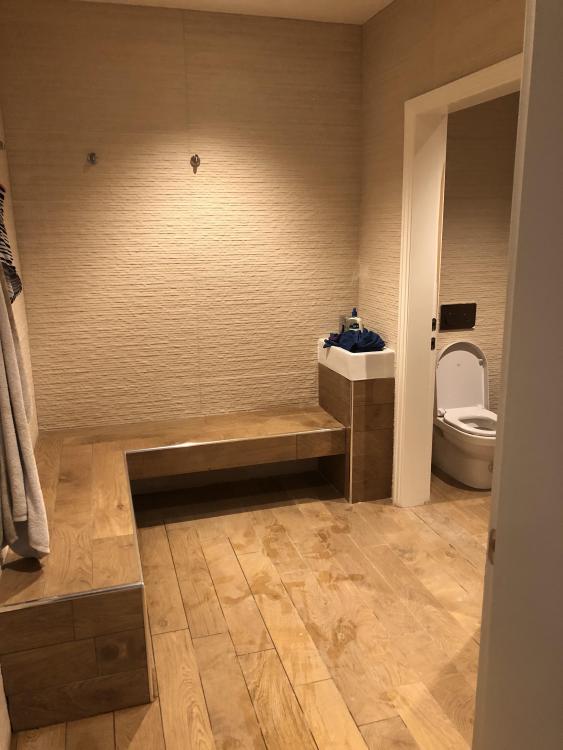
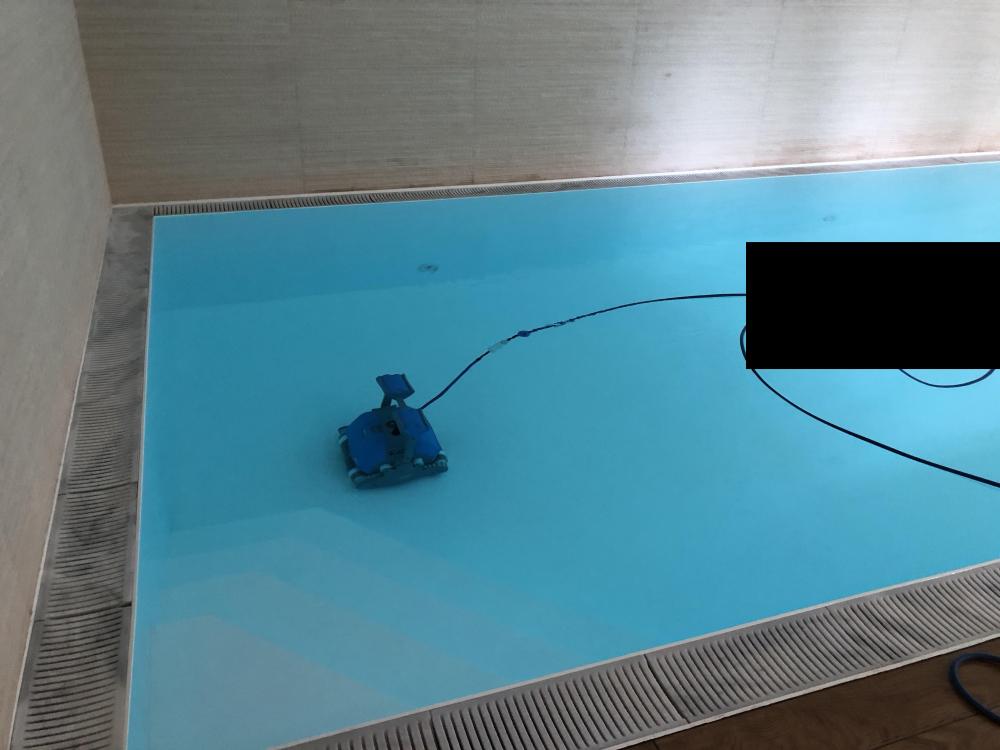
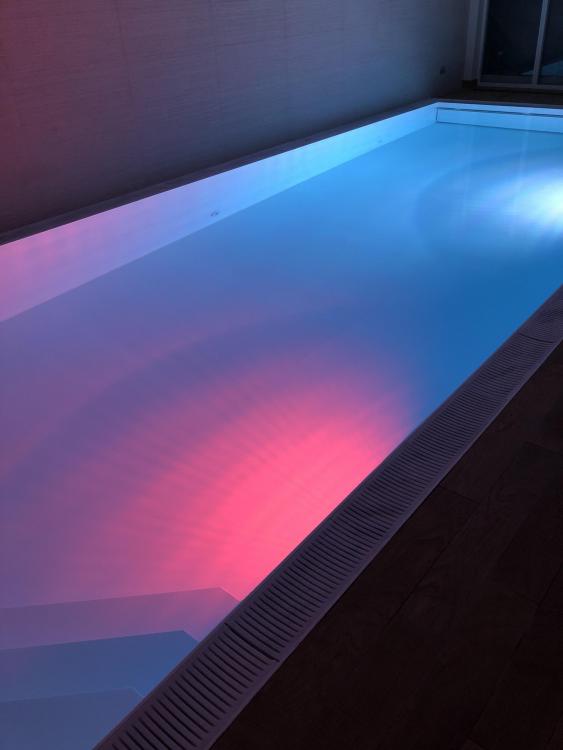
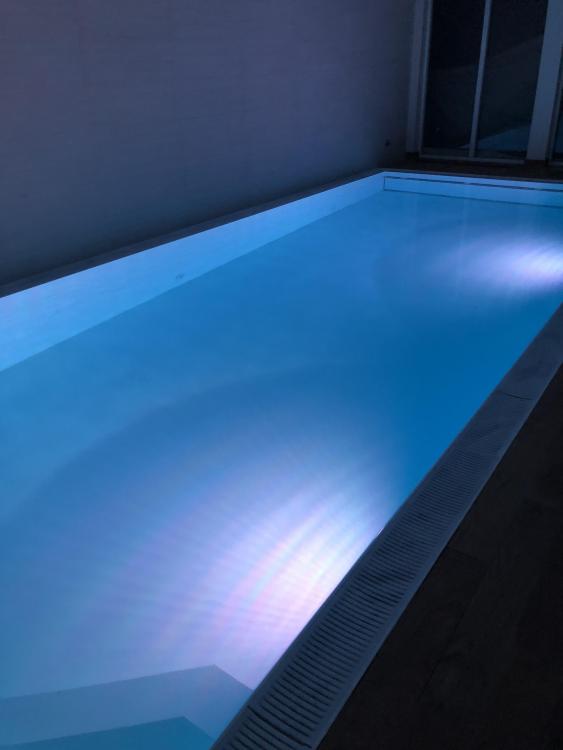
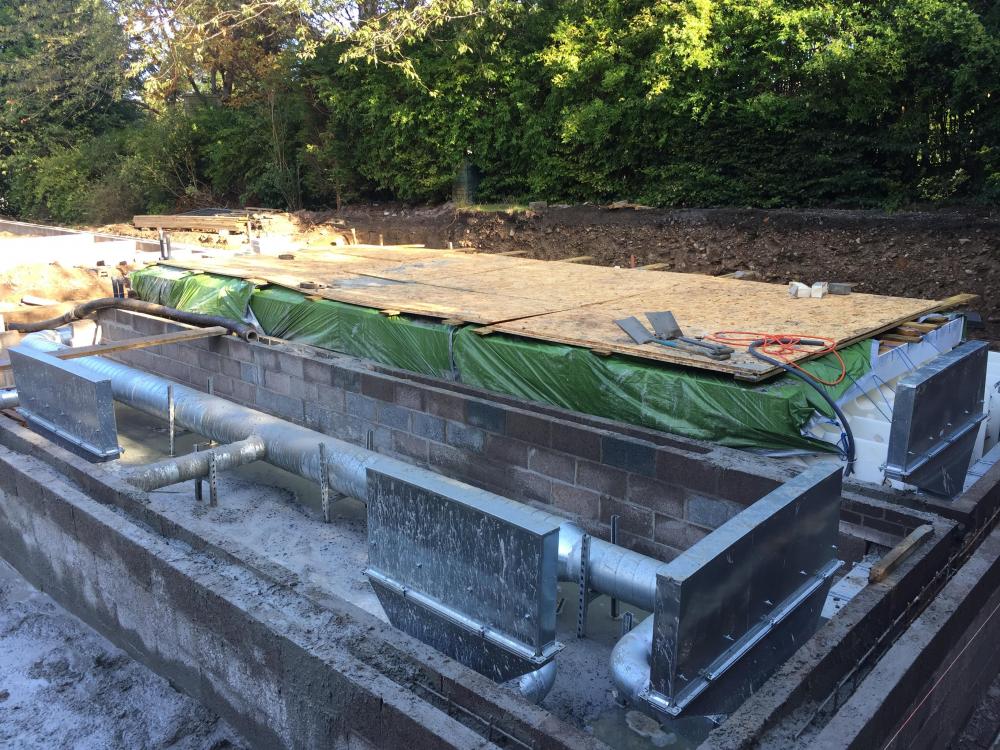
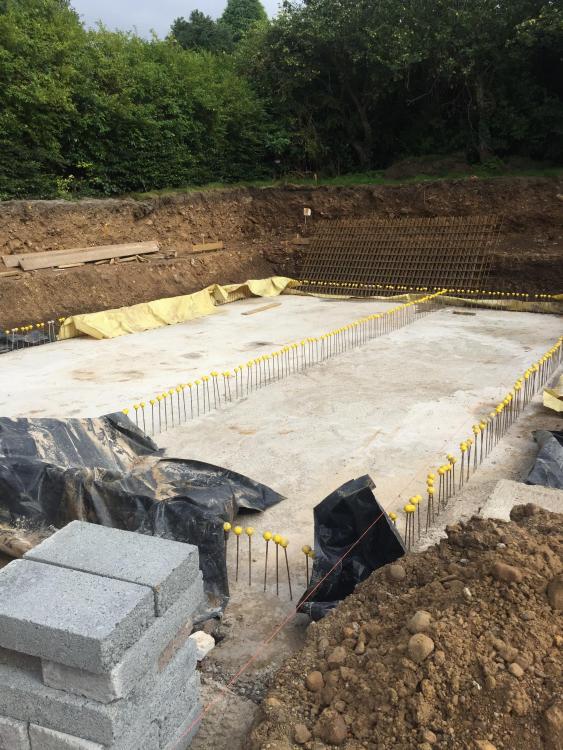
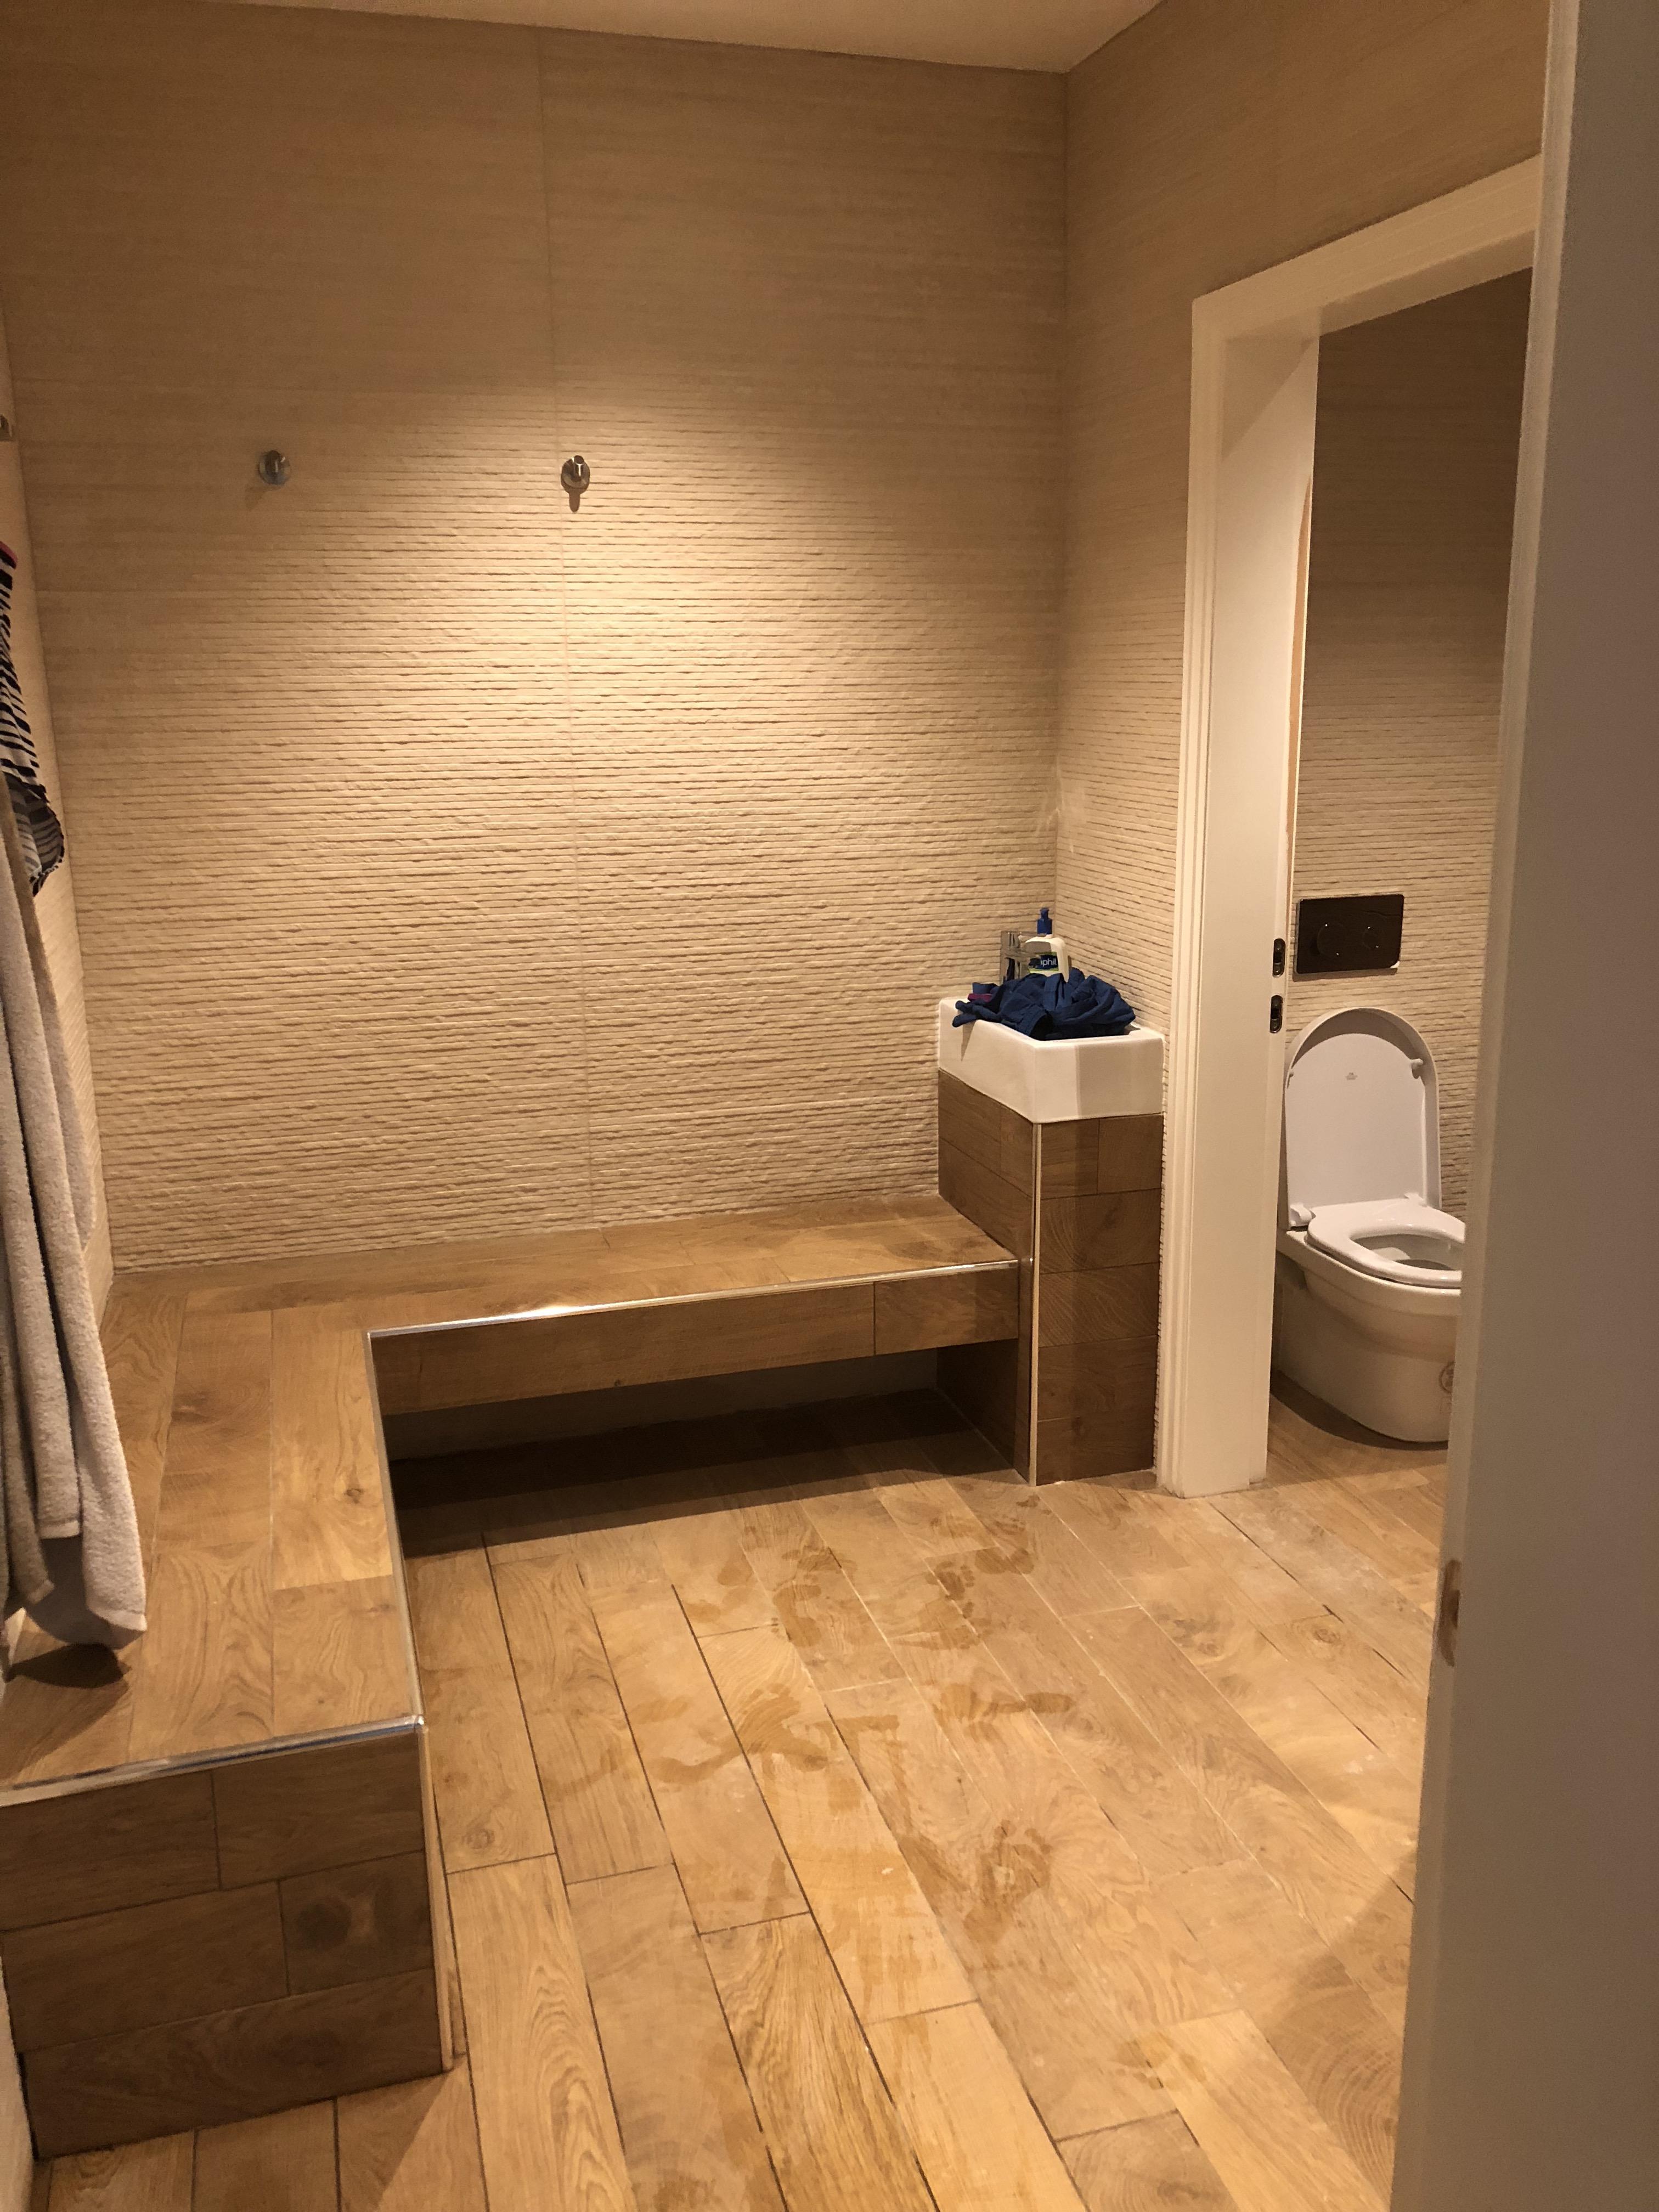
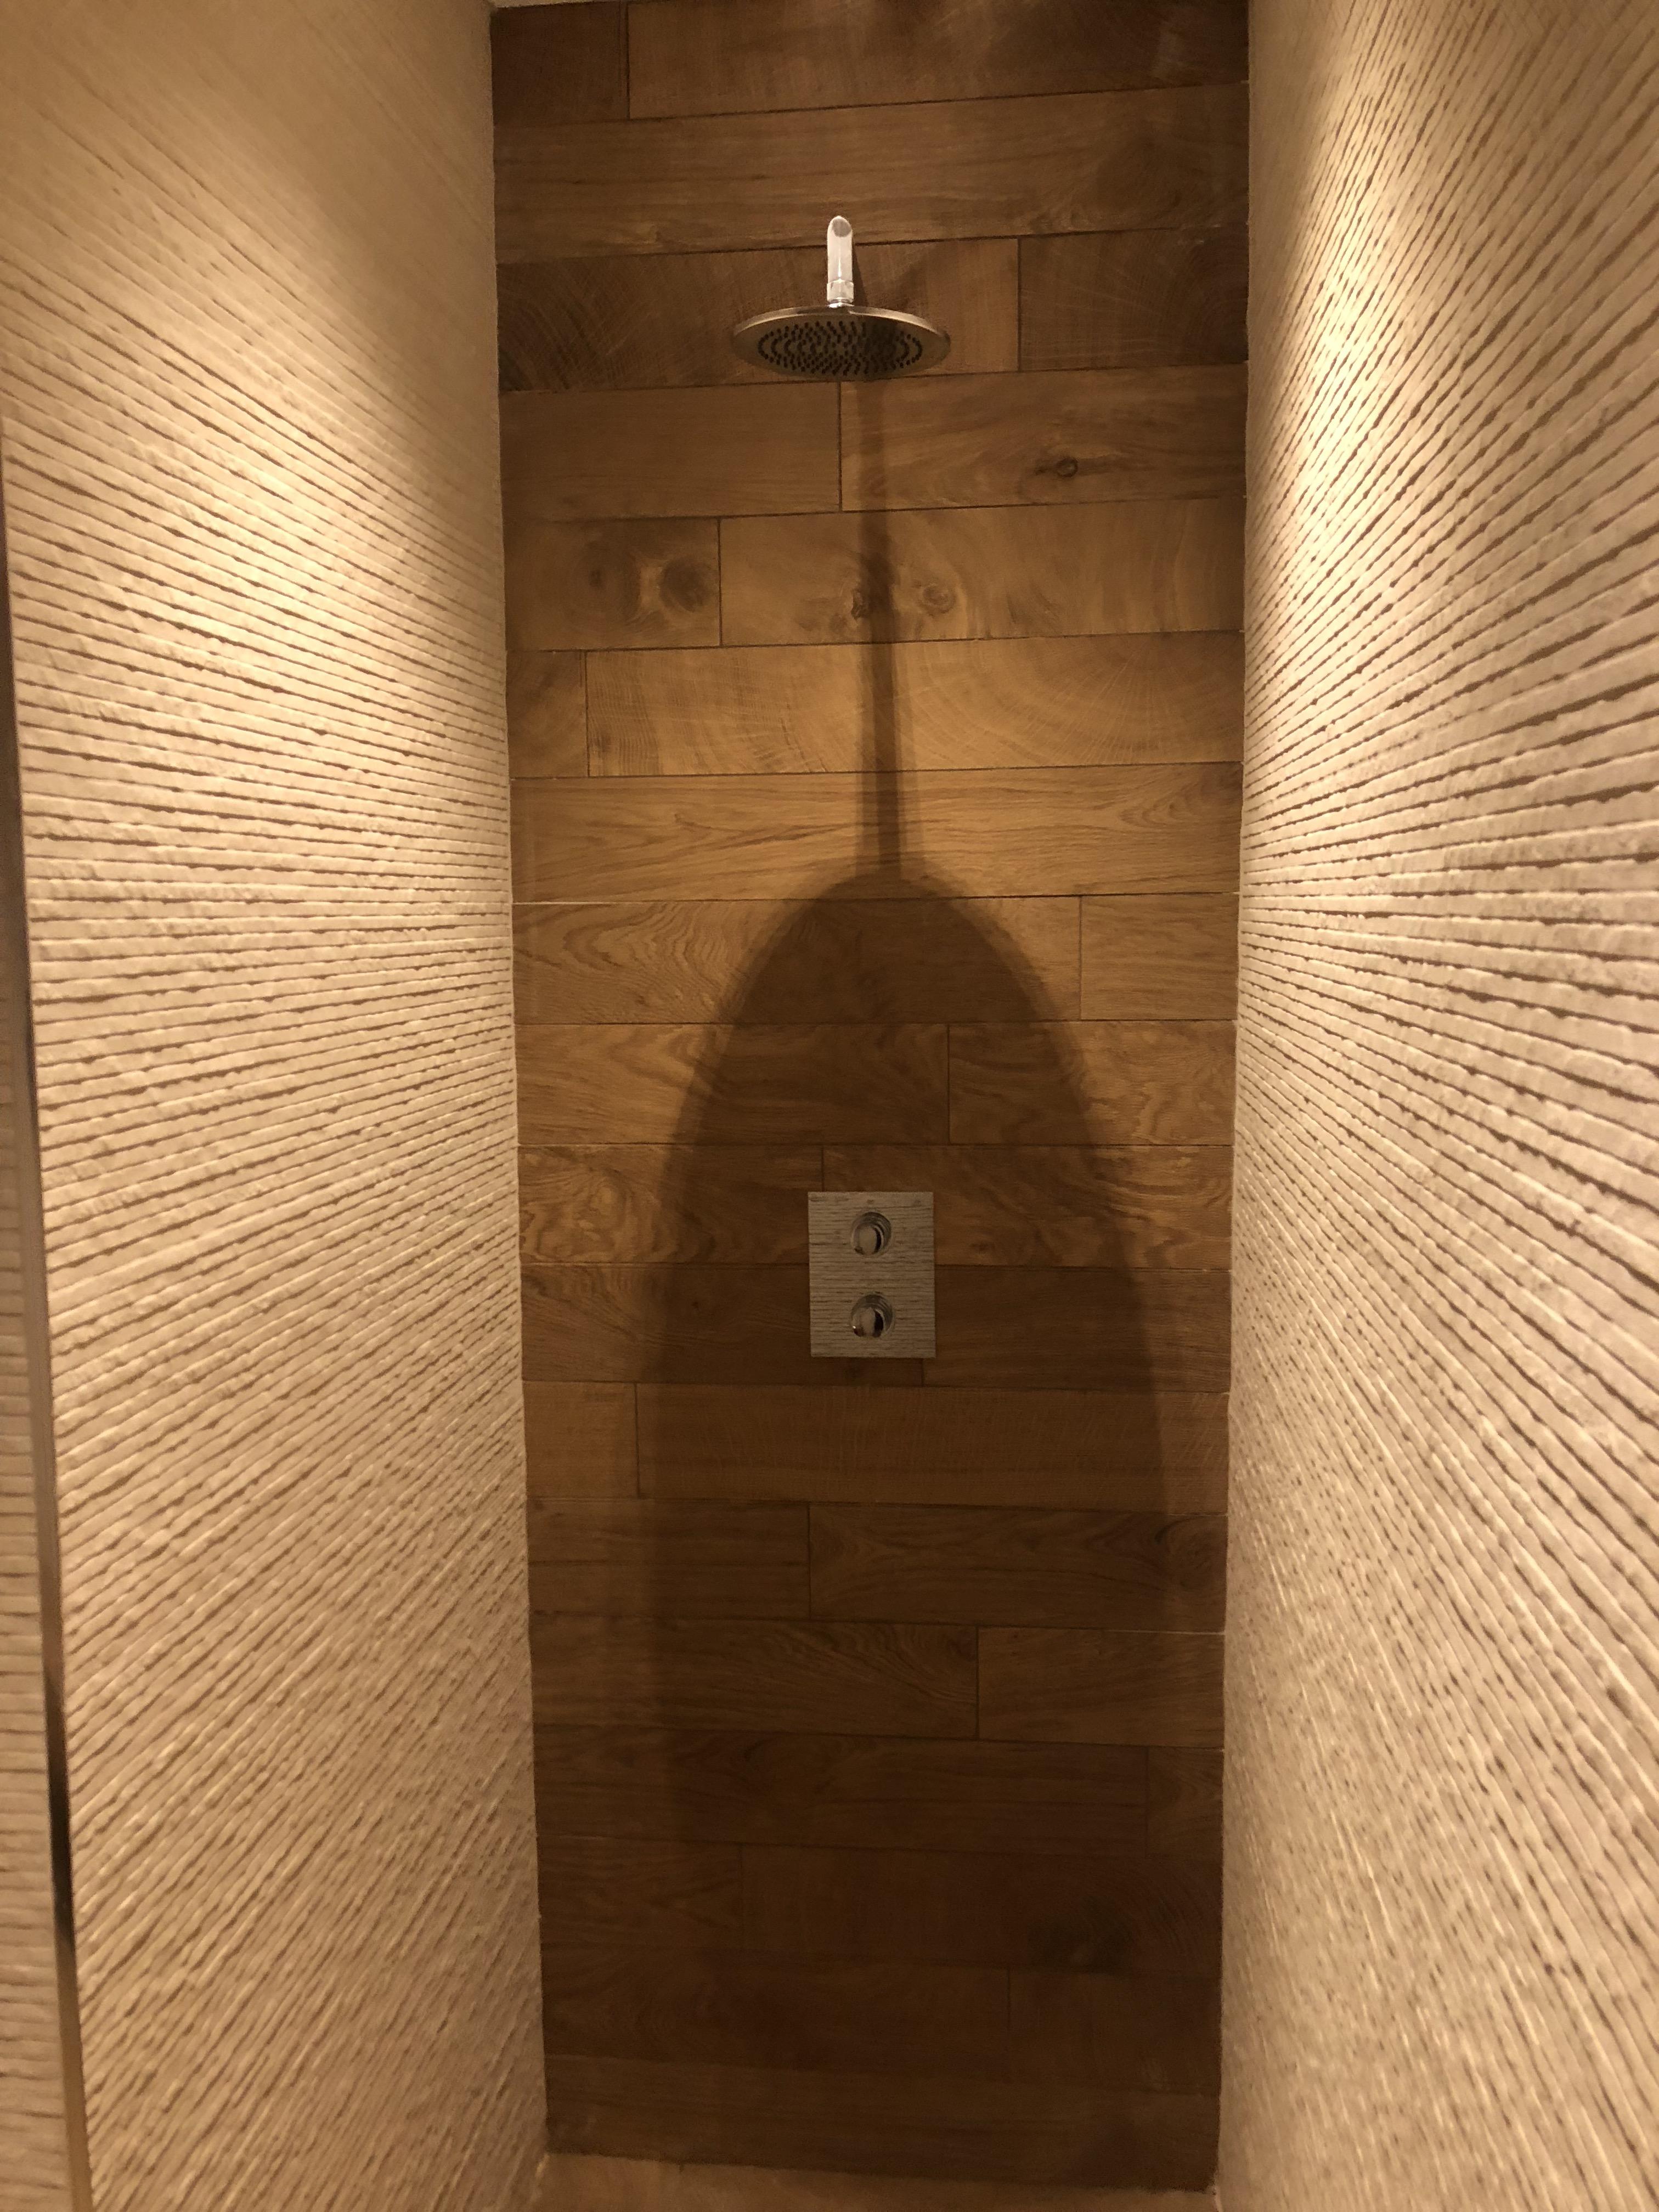
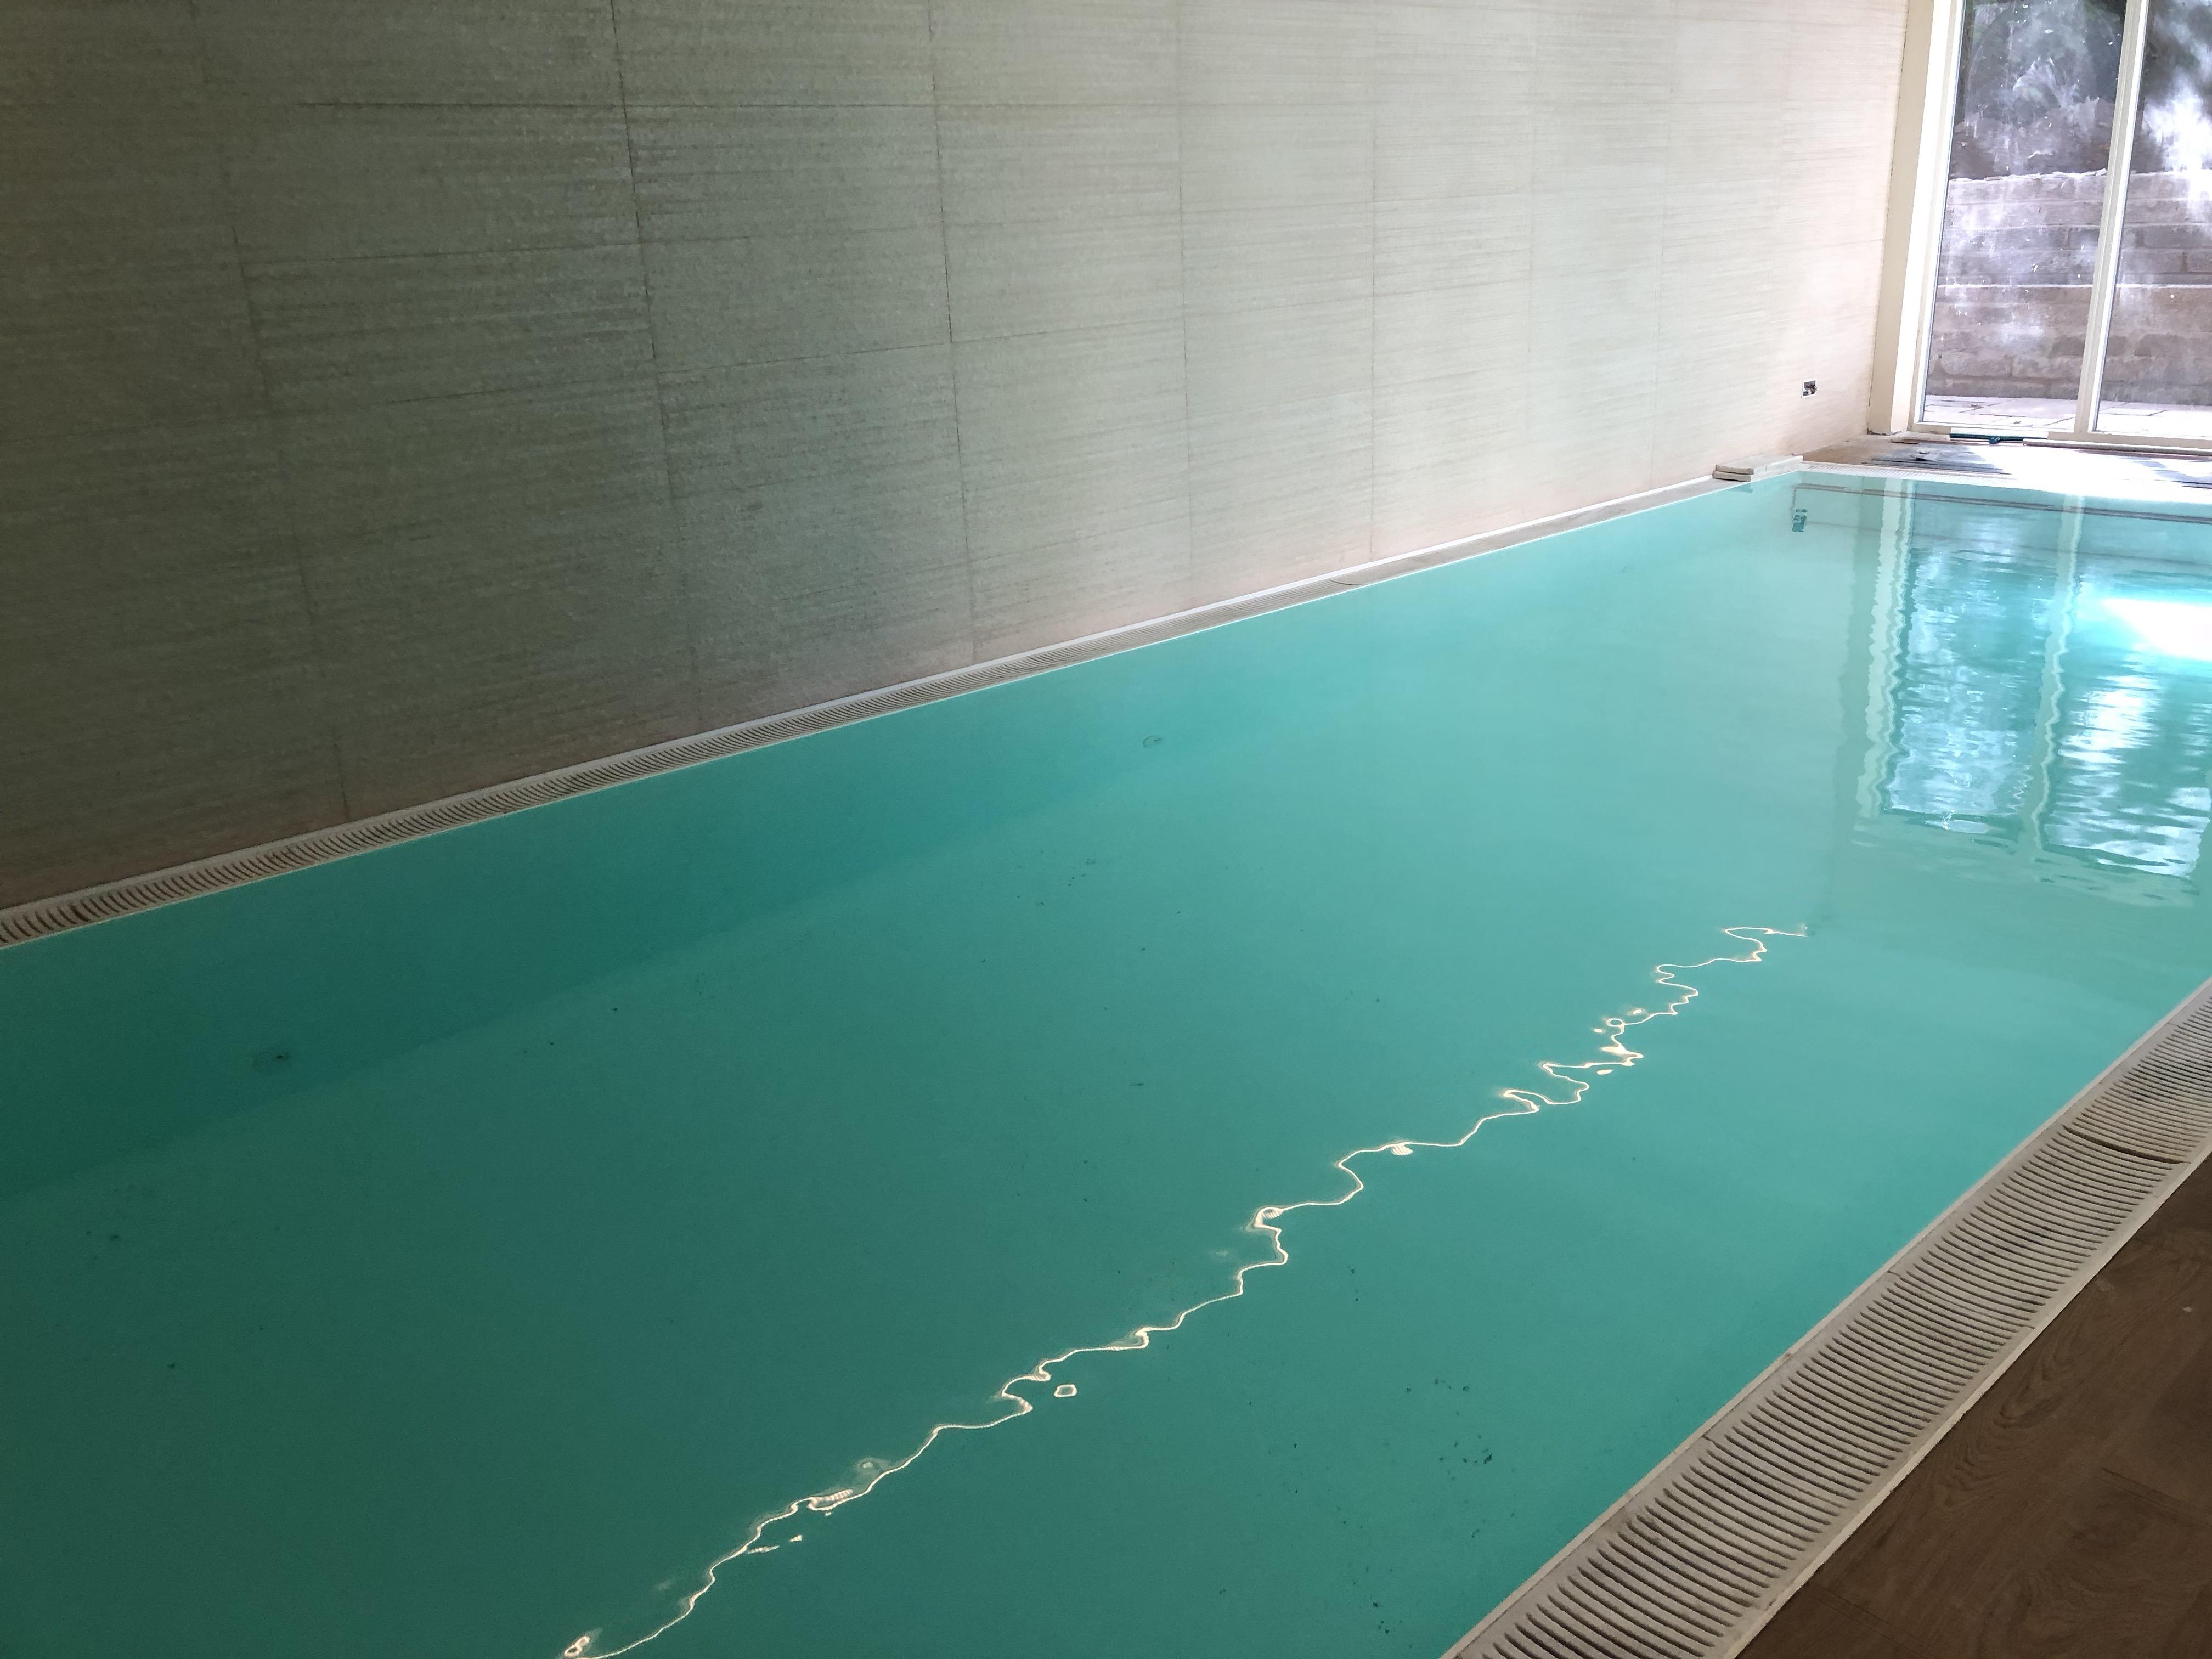
This may be of use to some people and of interest to others. Certainly I could not find much information before I embarked on our build and it was a bit of a leap in the dark. We designed our house with a swimming pool. It is quite an extravagance but my daughter and I really enjoy swimming and messing about in the pool and it is a luxury I have always fancied. The pool has now been up and running for the past couple of months and I am extremely pleased with it. The installers did a very professional job. As always I tried to make sure that there was as little maintenance as possible required. The filtration system by a company called DA-Gen is all automatic. In the last two months all I have had to do is put a pool cleaning robot like a Roomba in the pool every week and it polishes it up. Other than that there has been abolsutely zero maintenance. The installer told me that historically they would visit a pool once a month. They will probably visit mine three times in the first year and then less after that. The main job will be changing over the chemicals, and just checking everything is working. The pool automatically tests the pH level and adjusts as necessary. The pH is set at 7.2. The chlorine is set at 0.5 ppm which is the same as the local drinking water. The pool creates chlorine from salt when necessary and there is no chlorine smell or taste. The pool is from a company called Niveko. It is a one piece polycarbonate pool and came as a single piece on the back of a truck from the Czech Republic. The pool is 8.9m long, 3.4m wide and 1.3m deep. Thus it contains around 40,000 litres of water. I spent some time at the pool in the gym and reading advice from owners in America on what size to buy. Traditionally pools are twice as long as they are wide, but I wanted a pool that was long enough to swim lengths. Having tested out the gym pool I reckoned I needed at least 8m. If I could not get permission for this much floor space I would have investigated an endless pool where you swim into a current. Depth wise people recommended that a deep end was pointless as it was impossible to stand and play games. we often stand and play water volleyball and the depth is working out perfectly. More depth would just be more water to heat and more ground to dig out. I would recommend 1.3-1.4m depending on your height. I read up on various kinds of pools. A discussion with one company that build traditional tiled/concrete pools suggested a cost of £200,000 which was ridiculous. You can also have a liner pool where you build a concrete shell then use a waterproof liner inside. This is cheaper but needs replacing every so often. I also investigated building a pool from ICF. Although this seems like a good idea, I could not find anyone with expertise in it. Eventually I came across these polycarbonate pools. I liked the design as it has EPS insulation around the outside. The pool could also incorporate a built in cover. Around one third of the heating cost of a pool is due to evaporation. This also keeps humidity down. Finally the smooth finish compared to a tiled pool makes the build up of bacteria much less likely and reduces the need for cleaning and chemicals. It also means no sharp edges on your feet. The total cost for the pool, dehumidifying equipment, filtration, ventilation etc was around £80,000. The real cost is the 80 square metres for the pool room, plant room and changing room. This probably added around £120-150,000 to the build cost of the house. The building work was not complicated much by this, a deeper area of foundations was dug and the pool sits on a concrete slab similar to the ground floor of the house. We did find once we dug down that there was some underground water and it had to be tanked. The pool and ventilation were then put in place below floor level and covered up whilst building work continued. The pool sits on top of 150mm of EPS with a further 50mm around the outside. Historically a pool was a big negative on a house in this area, making them almost impossible to sell. The reason was massive heating bills and maintenance costs. Also they made your house smell of chlorine and the humidity would destroy your house. One thing that prompted me to write this is that we have our heating now all working as it should. I noted on another thread that they had not insulated the circulating hot water system. This has been done now. I thought that this was causing unexpected high bills for heating hot water. However, I have since realised that perhaps the main reason was that the pool, hot water and UFH had all been connected in series to the boiler. Thus when any one of them called for hot water from the boiler all the pumps ran. This was pumping hot water to all 4 UFH manifold in the house every time the hot water or pool called for heat. By my calculation the loops contained towards 200l of water which was constantly being circulated and heated unnecessarily. We have now separated the circuits and gas use has dropped dramatically. Before building the pool i tried to use @JSHarris heating calculator to calculate the cost of heating the pool. After a bit of messing around I decided that a pool was not different to any other room. The reason that pols historically use a lot of heat is that they were often put in orangeries or cheap extensions. Effectively you are trying to heat a large (80sq metres in my case) room to 28c all year round. These rooms often had single or double glazing. My pool is in a room as well insulated as the rest of the house with triple glazed 0.7 U-value windows. The area below the pool has 0.1-0.15 U-value, the walls 0.14. The heat recovery system is 90% efficient. The calculation said that the pool would cost around £500 a year to heat. Frankly even at £1000 I would have been pleased. Anyway I have been on holiday this week and checking our gas usage now that everything works as it should. We have been using 7-9 units a day depending on how much the pool is being used. We have been using 75-100 kWh of gas per day or around £2-2.75 a day in gas. Hot water is around £1 a day, so the pool seems to be coming in close to my calculation. I am very pleasantly surprised. This is heating the pool to 28C and the room to 24C when the pool is closed and 29C when it is open. The outside temperature has really dropped to around 15C. The humidity is kept to around 60% when the pool is closed and 65-70% when it is open. All in all it is a big extravagance but one I am very pleased with. It was great in the hot weather a few weeks ago, my daughter and her friends are loving it and hopefully I will get many years of enjoyment from it. In terms of things I would have done differently. We were a bit tight on the plant room and stuff just fits. The changing room door is quite close to the pool and the frame gets wet. We should have sloped the tiles back towards the pool so that when the kids jump in the water would run back naturally. I bought a squeegee to push excess water back in. Everything is pretty much finished, just some mastic around the room edges required. Heating costs may fall a little as the bottom edges of the windows have not yet been sealed to the floor and had compriband insulation outside, so we are probably leaking a bit of air. Pictures - Concrete pad awaiting the pool. Pool and ventilation below ground level. Plant room. These are the filters and chemicals, the dehumidifier/heater is behind the door. Changing room. We came up with the idea of building the bench out of wood effect tiles so it won't be affected by water. Changing room shower. Pool today after the kids were playing in it. Cleaning robot. The pool has two large colour changing LEDs that provide a great effect at night.


 1 point
 -
One question my dad asked me on Saturday. He only came up to get rid of a tree stump in the garden that's been there since Storm Doris blew down our Silver Birch. Job done, we thought whilst he had the digger he could tackle 7 other stumps in a large overgrown border near our drive. He then asked the question he would now probably regret and was met with a response of "we will probably extend the drive at some point". He looked at my like he did when I'd told him I'd failed my GCSEs and explained we were going to pay a builder to get rid of all the hardcore then buy it back in again at some point for hard standing and that we can save 'thousands of pounds'. So, dad realising what he had talked himself into dug out the area under strict permission not to damage the Christmas Tree because where would we hang our fairy lights otherwise and I was on social media advertising 20 tonne of topsoil and moving stumps. The neighbours must wondered what was happening with an endless supply of trailers, cars and even a JCB Fastrack. The wheelbarrow clearly felt the impact of yesterday's hard work and pretty much sums up how we feel today too (another job dad sorted).1 point
-
You can always put more insulation in if you change your mind as you go, either in layers or one layer, you can make almost any thickness within reason to fine tune things. I haven't checked recently, but my BCO stated insulation is cheaper than concrete......1 point
-
Will work fine. It will all depend on how long it takes for you to figure out the delay in the heat coming through due to having 100mm of insulation. Mine takes roughly 90 mins before you would feel in on your feet and I have 150mm. But as it takes long to heat up it will also stay warm for longer. Don't forget that the house will take a fair while to dry out so it won't be till the winter that you get a better idea of your timings.1 point
-
Think you build a brick chamber around it then cut the top out. Gravel is presumably to key into the base and benching.1 point
-
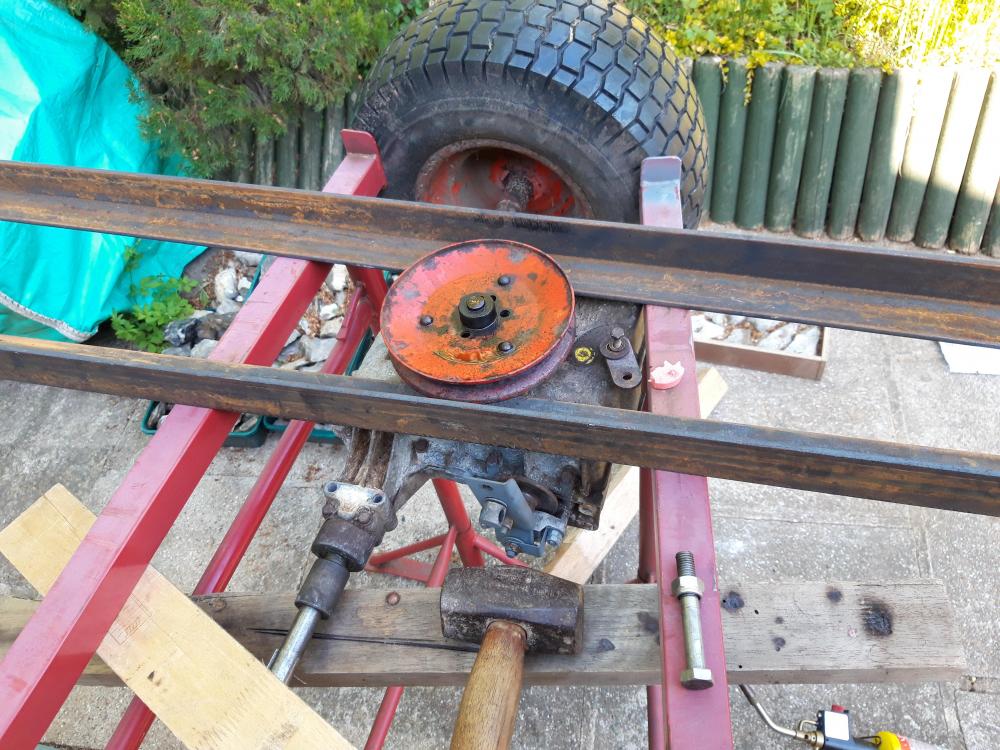
I win! Finally got the pullies off both gearboxes! Heat with MAPP gas, rub a candle over the shaft and the wax gets sucked in. Beat it with a bfo knocking stick and punch. Repeat. Pretty sure having it all on the sturdier trestles / angle iron helped. Exactly as the lad showed on YouTube tbh. The orange, better looking pulley took two evenings. The rusty as Hell pulley on the new gearbox about 2 minutes! Pullies degreased and in the citric acid bath to derust now. Still got to do the wheel ?
 1 point
 -
@Field_of_Dreams, yes. On all of those points I turned out that it was possible for my tree specialist to draft the Method Statement to accommodate whatever I wanted. I was quite surprised and pleased. It seems almost anything is possible and, so long as you choose a good expert, he can make almost anything work. I do not know if all of the tree experts are like my one, but he was recommended to me by another self-builder as someone who would "be on my side", which I am now coming to appreciate.1 point
-
i have misleading info in my post above - I couldn't find the actual data when I respond and made a guess without checking ( we only had a paper copy of the original quote and I couldn't find it before I posted - apologies. So in the interests of providing good data, SWMBO has has now located the paper copy and the actual facts are: 1) Landscape Designers would seem to work like architects and their normal basis of fees is based on % of final landscape cost. I attach a redacted copy of Appointment for Landscape Design Agreement, which sets out the expected % Fees, Their % fees vary from 17.5% to 10%, depending on the total costs off the work value. 2) We only used their service for stages A and B but on a hourly rate basis, as we had no intention of using their services for Detailed Design and other subsequent stages. Our cost was £3500 (including VAT). SWMBO still insists that this was money very well spent! 3) Landscape Designers do not undertake actual construction services but would offer project management and contract services to supervise/manage the actual works. ( analogous to architects mode of engagement). 4) For completeness, I summarise the actual landscaping costs ( 2015/2016) , including ground clearance, regrading, retaining walls (both concrete block and wood sleepers), all foundations ( including garden shed, paths, terracing and drive), supply and lay terracing (210 m2), supply and lay SUDS drive (Marshall stone 110 m2) topsoil for planters, copings for walls, all service ducting for cables and water to various points in garden, ACO drains in terrace etc . Rear and side garden and terraces/paths/retaining walls - £45,311(% VAT rated) Drive - £16,450 (% VAT rated) 5) On this basis of these construction cost, the Landscape Fees would have been £4737 +VAT (as a minimum) though I suspect they would not have carried it out a efficiently as my contractor, as we utilised all the heavy machinery already mobilised to site for the main ground works and foundation preparation. So, I have probably been unduly critical of landscape designer fees...... 6) SWMBO did all the planting design and planting, providing many of the plants from cuttings taken from this garden before ground clearance and previous garden. Much of this was completed before the house was completed, as the retaining walls provided a garden separated from construction traffic and builders damage. Of course, we also retained and protected all of the mature hedges, trees and plants during the ground clearance, which provided a great basis for the landscape design/plan. _Appointment for Garden Landscape Design Agreement_a.pdf1 point
-
Not that I’m aware of. The dpc should be laid on a fine skim of mortar to give it a bit of grip & you then have virtually a normal bed joint on top. Personally,I put a fine skim on lintol tray damp too,for the same reason.1 point
-
So Octopus have now confirmed that: 1) They are installing 3-phase smart meters, but this is paused due to COVID-19. 2) Metering is "vector sum" across all three phases. (This confirms what @joth concluded from his investigation, and means imports/exports on different phases at the same time are netted out. Based on this, siwtched back to 3-phase now rather than upgrade later, as it seems there is nothing to loose and we already have a 3-phase supply on-site. Need to do load-calcs for the house, but this will probably still use the a single primary phase for house consumption.1 point
-
If it bothers you that much you could cover the cost for their side to? Should only be a few hundred £ to do something acceptable over and above of doing your own at the same time, and it would add more than that to your property. If you fail on the correspondence and don't want to stump up extra cash, you could re-do your side of the path, run an edging strip level in height with their path on your side of centre. Then widen your side to a proper width in matching edging, this will establish your path as looking decent and still leave them access, you ride would then look correct and theirs not so.....1 point
-
More likely here1 point
-
Not made anymore. Never had a good reliability record when they were but I wanted one as it sounds like a Harrier jump jet. Edit: Despite sounding like one they never really took off...1 point
-
I think your being fed conflicting and incorrect info. There are two types of ground bearing raft foundations. The more traditional, a concrete raft is poured directly on top of the excavation (with appropriate compacted material etc), then walls are built on top of that. After that, insulation is then fitted on top of the raft and finally a screed finish. The other type is an insulated raft, where EPS forms are laid and concrete pour also forms the finishes floor (and needs to be appropriately floated) Both can be done in a single pour. The variable will be the total loading from the supporting walls, you may need a thicker ring beam around the edges. In our case, we will have 400mm thick ring beams and a 200mm thick main slab. To do this, we are excavating down to the required depth, putting down 100mm of sub base, compacting. We'll add extra stones to the main floor part, so we only need the 200mm of concrete. We then build 400mm high formwork, lay our services, tanking membrane, mesh and pour concrete. Similar for an insulated raft, but the EPS forms are thinner at the load bearing parts, forming deeper channels for the concrete. Be aware that there are quite low loading limits for EPS. We only found out at the end of the design process that an insulated raft wouldn't work, as no matter how we designed it, we were always outside the safety limits of the EPS, so have gone for a traditional raft. It's working out needing less steel and labour, if a little more concrete. On balance, faster and cheaper. Make sure your engineer knows enough to get their job done, ours didn't!!1 point
-
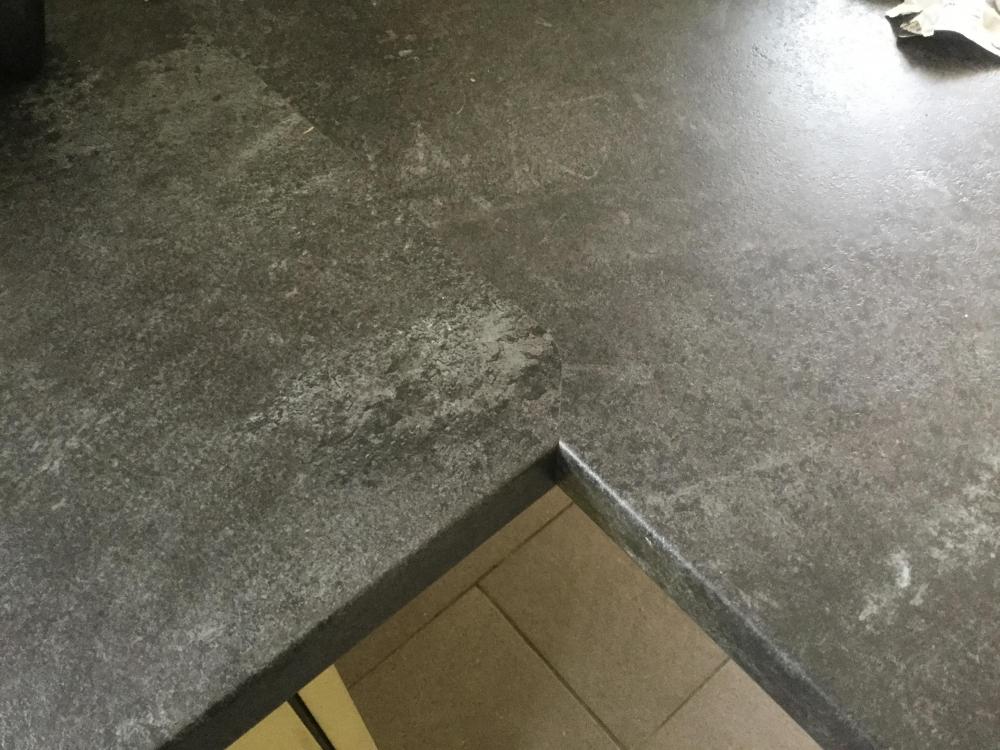
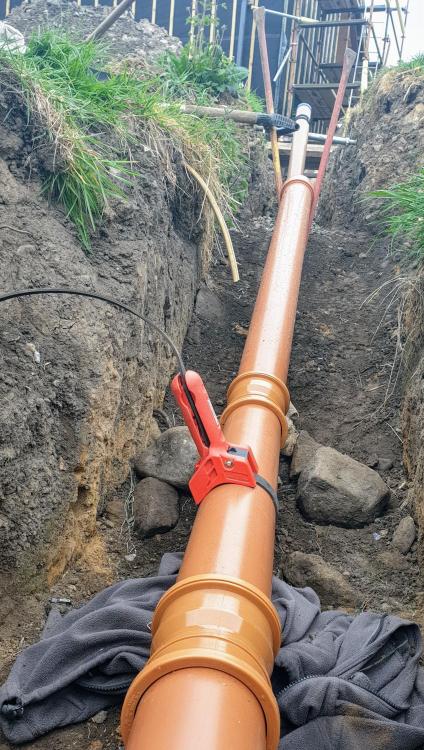
Oh dear, the sainted @Russell griffiths is right, too right for comfort. And so's @PeterW. I suppose I should be grateful, - really hard to write that word in present company...... It piddled down here last night. Look at this Look at the ground, just above the pipe on the left hand edge of the photo. The big crack in the backfill (not the best photo). It's just as if the ground sighed with relief at the rain, and sank 10mm or so - bit more maybe. So, a la Russel Griffiths advice, I'm going to wait another fortnight before I doing anything to that pipe trench (backfill with pipe bedding) - to let it settle some more and a la Peter W's advice, later still, I'll need to bed that 30 degree bend in a concrete boot won't I?
 1 point
 -
Should be fine. Note I compacted mine with a whacker plate. I was basically too tight to pay out for MOT Type 2.1 point
-
Yes. But, I (if I can be bothered) separate big bits out: they serve well quickly to fill this, that and the other.1 point
-
I don't think that will cause them problems. As @ProDave said - cut the holes out before skimming and make sure the wires are there so if you make a mistake you can just change the board OR make sure you measure and record exactly where the wires are and leave them plenty long enough. You could drop a plumbline and mark the floor (permanently) where you need to drill.1 point
-
When I did my last, I used the excess concrete to progressively place the foundation for driveway kerbs.1 point
-
I am into woodwork and I like to do everything myself too. Having said that, I cannot see me installing kitchen counters that regularly, I'm more of a cabinetry or custom storage solutions sort of a guy. Mind you, I am tempted to quit my business and start a building firm doing extensions, so maybe I need to learn this now! I am just off the phone to a chap I like the sound of, £200 for fitting the tops, I have scrutinised his workmanship on his Facebook page and note lots of masons mitres executed neatly.1 point
-
I was pretty surprised how refined our finished walls were given the relatively rough nature of the boarding (no worse than many others I've seen). Good tapers and plasterers can deal with some pretty rough edges I reckon.1 point
-
I used to do mitre joins, even for other “kitchen fitters”! still have the kit and did my own on our build. Yes you need a decent sized router, good cutters and accurate jig, but I taught myself but takes practice. I am sure there are plenty of u tube vids to show you how. Yes good to do joins before cutting pieces to length in case you make a small error. You will get a lot of self satisfaction when you do a good job.
 1 point
 -
We've got 10 enlight E5 in the bathroom of 10m2 - on 3 switches. Its a rectangular room with sink + toilet one side & bath + shower the other. Lights are ~ 6 over the sink and centre of the room / 3 over the bath & shower / single in a dormer. You can create several different moods by chosing which ones to have on. Its a hard decision to make with v little guidance. I think 7 would have been plenty in the room, we may add dimmers. With 6 on it gives us ~300 lux on the floor and 500 lux at ~ 900mm. That would be enough light. I think ours are ~ 400 or 450 from walls.1 point
-
Just ask for pump grade concrete - smaller aggregate (10mm) and more cement so you should be fine if you run it wet and have rails to tamp or screed to1 point
-
Either is fine but personally would have used a 215 concrete naylor on flat like the blocks and just carried through1 point
-
You can cut each board to the length of the one below it, hold it in position then holding another bit of timber underneath the roofing mark a line. If you make this bit of timber the right size it will give you the right size cut for your board to sit in the right spot1 point
-
I popped round my friends house today to borrow a block and tackle to drag my heavy bath up the stairs. This was in his garage, that’s my fantasy!
 1 point
 -
The carpenter who did our cladding was very good and very skilled. What surprised me was that he cut every single board slightly too big, 10mm or so, checked it and then did a second cut that was always spot on. It added a few minutes for each board having to cut them twice but there were no mistakes and the results were excellent.1 point
-
Sorry it wasn’t a ‘fit’ @Patrick hopefully you’ll find someone soon.1 point
-
You can get an 11.5kw Mitsubishi with a 250L Mitsubishi tank for £4600 + VAT from Secon. https://www.seconsolar.com/mitsubishi-pre-plumbed-standard-cylinder-package-3364-p.asp They are trade only but should give you an account if you let them know you are a self builder. If you have a Mitsubishi registered installer locally who will install the ASHP, then this would would work out a more cost effective approach. I have a ASHP with oversized radiators. The system works very well, but my house is well insulated and airtight.1 point
-
It looks like you don't have any sound attenuators - won't you get cross talk from room to room? I'm looking at this now, and due to space and length of my build a branch layout would be better, however my gut is telling me a radial would be more easy and less prone to noise. @Stones comment about noise is surprising though1 point
-
Following on from the plastering work we did a quick stock take. Our plan was to be back on our narrow boat for the summer but with the current problems that was out of the question. We didn’t have materials to start flooring or fit bathrooms or kitchen and there was little hope of getting them. After a bit of head scratching and phoning around we found we could get fencing material and paint. We also had a few other jobs on the list that we could tackle, commissioning the water harvesting system, second fix electrics. We decided that the fence should be at the top of the list. Our plot has been behind Heras site fencing for a year now and although we’ve kept the site tidy it still was not that pleasant an outlook for the neighbours. We’re not far from the coast and strong winds are the norm so over engineering the fence makes sense so we don’t get a long term maintenance problem. Some while back we erected a green oak fence with the expectation that it would last a good thirty years. That proved a false expectation with the post rotting out after 15 years. We replaced the post with galvanized steel, but it was a lesson hard learnt and a problem we would avoid this time round. Initial thoughts were to use galvanized post and larch stringers, my Larch is expensive! After a bit of searching around Pat found a fencing product by an English company Marano who make aluminium fencing and had a nice contemporary product called Breeze. It’s an aluminium product and didn’t cost a fortune, and as it’s name suggest is designed for windy locations. The only down side was that it is not the best from a privacy point of view. On the subject of wind we also had a pane of glass broken. It happened overnight and we think it must have been broken by flying debris as it’s on the first floor with no access. Annoying but no big deal we thought. The glass that got broken is in a door supplied by Velfac. Contacted Velfac to ask about re-glazing only to be told it was not an option and the door would need to be replaced. Unlikely we thought and contacted the Velfac specialist fitting company who has fitted our windows, they agreed and said they would come back with an estimate for re-glazing the door. After a week they got back to me and rather apologetically confirmed re-glazing was not an option...so repair was an eye watering £1200. I’ll add a thread in the glazing section of the forum with more information so at least others will be forewarned. Back to fencing, at the front of the property we needed something cheap and cheerful to smarten the site up pending some art work fencing courtesy of one of our daughters who is an artist blacksmith. We decided to go with park fencing really low cost but looks surprisingly contemporary. I guess it’s cheap because it normally gets put in by the mile. Fencing complete, attention was turned to commissioning the Kinspan water harvesting system. Pretty strait forward, wire in sensors, pump, and connect water pipes. Half a days work, year right! All went really well, followed the initialisation instructions, tank set up OK, gauge reading set, pump pressure test...RCD trips. Meter across pump, sure enough earth and live not separate. The tank is just over a year old and the pump is a Grundfos SB3, quick look on their site confirmed a two year warranty. Contacted Kingspan to ask for new pump only to be told their warranty is one year from delivery, never mind installation. We’ll send out and engineer to look at the problem, OK how much is that £350 and how much is a pump £350...OK I’ll take care of it myself. The pump it turns out is not the simplest thing to dismantle, the parts PDF line drawing is not the best so It’s been put on the back burner. After a bit of searching and some good technical assistance from Anglian pumps, a new Divertron 1200x pump ordered £235. Still painful as it was not on the budget and had not done a single days work. With the plastering done we also wanted to get a mist coat applied and now we had more time get a finish coat as well. With a lot of area to cover, spraying looked a good option as I already had a HVLP setup. It turned out not to develop enough pressure for the emulsion, time to get an airless sprayer. Being a single use project I decided to see what was on Ebay and found a Wagner 418 sprayer being sold after use on another single project, looked clean and genuine, result I thought. Sprayer arrived and setup with paint to experiment and get to know how to use it. Not easily as it turned out, the spray was tailing badly, this is a solid central strip with a gap either side then a thin line, not what you need. Read the manual, googled it and it looked like it was down to low pressure. The 418 has no pressure adjustment, and the manual said it was down to cleaning out the inlet valve and paint filter. Lots of cleaning, no result, more research, cleaned outlet valve. Tried new nozzle, tried another gun and so on. Several frustrating days later opted to return it and buy a new one. Thank goodness this worked brilliantly and we were soon painting. Allowing for a 50/50 mist coat mixture we should have had plenty of paint. Half a day later, half the rooms done and all the paint gone. Fortunately the local Toolstation had stock. Another half day and it was done. All I can say is airless sprayers are brilliant, but boy do they have a drink problem. For the top coat we are using a really tough mat latex paint that you can scrub. This of course was special order and ordered before we knew about the sprayers drink problem. Needless to say the 45lt disappeared in half a day. It did cover the majority of the house, and we just have two bedrooms left to finish. The finish is very pleasing.1 point
-
FWIW, we under ventilate our house, as, I think, do others with MVHR. There has been a lot of research into ventilation, and personally our experience pretty much lines up with this. This article aligns well with our experience, and is worth a read: https://passipedia.org/planning/building_services/ventilation/basics/types_of_ventilation1 point
-
Remember, the new export payment only pays actual export, metered via smart meter, not deemed 50% of your generation as with the present FIT system. That is why our export payment would be so low, because we self so much of it. It is far better to self use it and save in the order of 14p per KWh than export it and only get 5.5p per KWh I find a 4KW system is about optimum if you are relying on self usage. By dumping excess power to an immersion heater you can use most of what you generate if nothing more useful is consuming it. It is really only in the mid day peak that we can generate more than we can use at times. Larger systems than 4KW and it will become harder to self use all of it, and that I feel is where battery storage will become more important. My first years assessment is battery storage with only 4KWp would not have been particularly useful.1 point
-
I've been following the Octopus variable rates, Go tariff, etc for a while, but can't get the sums to add up for our pattern of use. I also suspect that these tariffs are very much an inducement to get more people to have "smart" meters, so that tariffs can be made more complex, and harder to compare in terms of value for money. One problem is that we need most of the 7 hours E7 off peak period in order to charge up the floor slab, and this isn't something that can be speeded up by just increasing the power input, as doing that increases the flow temperature, which then tends to cause a temperature overshoot. Battery storage helps a tiny bit, but not as much as might be thought at first, as the cost of re-using the stored cheap rate electricity is about 1.2 times the unit cost, because of round-trip losses. That makes the 8.148p/kWh E7 off-peak rate really 9.78p/kWh for us. The Go tariff is marginally better, but again the 4 hour time slot is tight, allowing for the slow down in charge rate of batteries during the balancing phase (a 10 kWh battery storage system may only charge at a mean rate of around 2 to 2.5 kW in practice) and allowing for the 30 min period of uncertainty in timing at either end of the 4 hour period (makes the 4 hour slot effectively around 3 hours, until such time as some means of accurately syncing meter 30 minute tariff rate change periods with loads is implemented).1 point
-
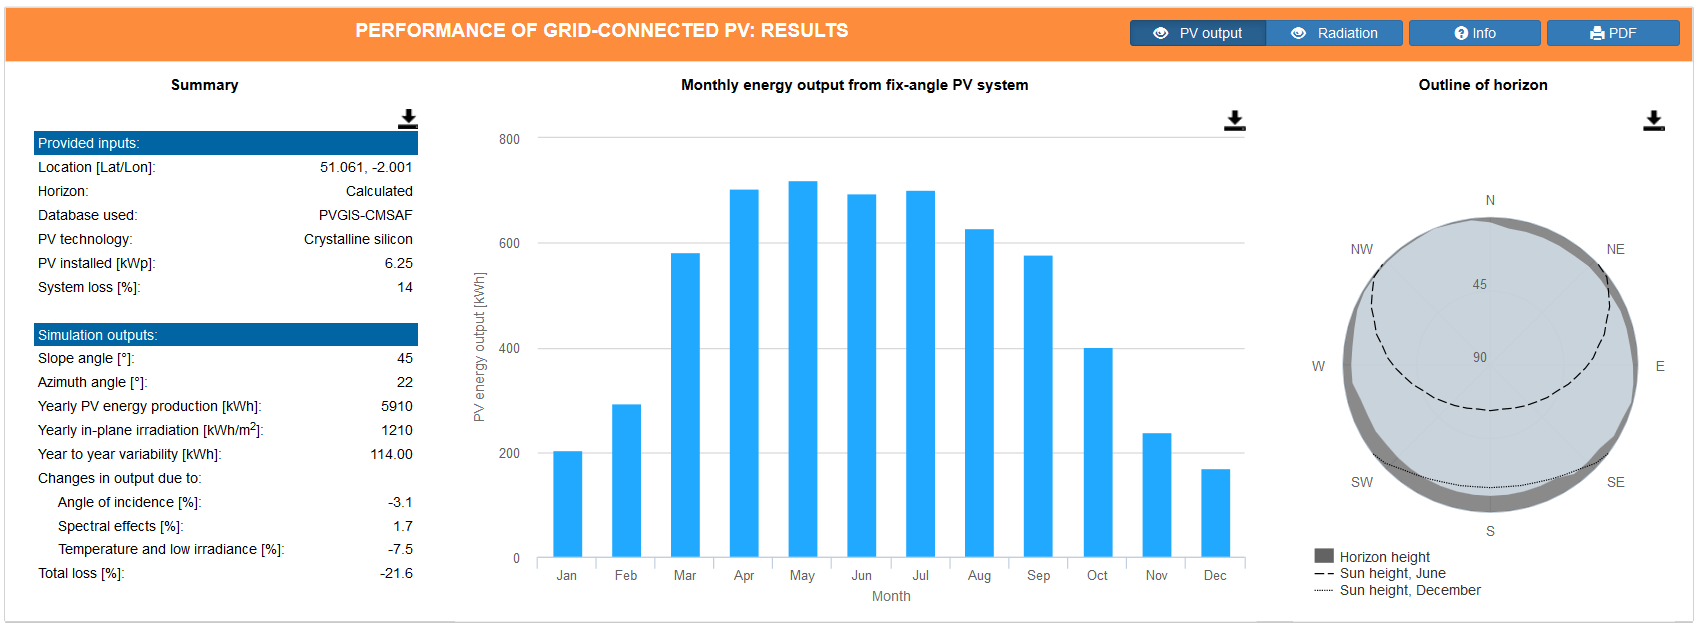
Welcome. There's a pretty useful website that allows you to put in your location, the orientation of the panels and the number of panels and will give you the estimated generation over the course of a year, month by month, PVGIS: https://re.jrc.ec.europa.eu/pvg_tools/en/tools.html For example, this is the estimate it provides for our PV installation, which is pretty close to what we actually get in practice (we tend to get a few percent more than PVGIS indicates, our average is very close to 6,000 kWh/year over the last five years):
 1 point
 -
I sourced and installed my own. I got a 4KWp ground mounted system for £1500 with a lot of searching to find everything at the cheapest price. On the basis (reasonable assumption) I can self use £250 worth of electricity in a year, it will have a payback time of about 6 years. Personally I would forget the export payment thing. If I had been able to claim that, I would have been paid less than £10 this year. And in order to claim it, yo must have had the panels installed by an MCS contractor, which would add considerably to the cost.1 point
-
The Italian Job came to mind today. Only blew the bloody test bung out of a 110 pipe didn' I? What with a Manometer? No, with just a little more force than that. Bought myself a nice little test kit, and for whatever reason couldn't get the damn thing to work. Tried a test rig before using it on the real thing. Bloody thing kept leaking. So tonight, in the bath, instead of abluting, I'll give it another go. See where the leak is. Meanwhile, back on the ranch, I'd had an idea. If I were to fill the piping up with water from the top of the rodding point (just visible) like this I would effectively have a couple of meters water pressure pressing on the bottom bungs, and maybe a bit less on each of the joints. As I started filling the pipe, my suspicion was aroused by the creaking of the plastic joints - specially this one You can see there was a bit of a drip there, but I wasn't too suprised because its unsupported. An hour later I got bored of checking the water level. It had gone down a bit: 100ml or so. So I went for a coffee. The pipe is eight meters long or so - about 880,000 cc... (?) How much is that? I dunno. Pop! PPPPSHHHHHHHHHHHHHHHHHHHH ! I'd blown the bottom bung out hadn' I ? Neighbour stuck his wizzened head over the fence, swallowed his tongue laughing. Tried it again. Full on Charles Atlas screwing the bung tight this time. Two hours later, got bored took the brass cap off the bung. Got wet. Very wet.


 0 points
 -
As per @Russell griffiths it needs to be non-climbable. Cover the top part in broken glass and razor wire to make it safe.0 points
-
The base of my basement excavation was lined with 150mm deep of 'type 1' - in excess of 20m2. After it was laid and compacted I had a look and managed to fill a wheelbarrow with taps, pipes, wood, cable and other miscellaneous 'stuff' and that was just from the surface. Looks like they just got a load of fresh crush from a local yard - i'd swear the there were probably bits of the original house that was pulled down a few weeks previously in it.0 points
-
0 points
-
Obviously0 points
-
Most Sunday mornings last year someone used to drive his McLaren around Penzance (one of the poorest places in the UK). He used to turn it around in by the Chapel Street COOP. Just to upset all us poor people. Lots of noise from the car, lots of clasped hand movements from the public. Not seen him this year.0 points
-
Not much "fantasy" in the replies so far. How about a large 4 lane Scalextric that can be lowered on pulleys from reinforced roof trusses?0 points


This leaderboard is set to London/GMT+01:00