
Leaderboard


Popular Content
Showing content with the highest reputation on 02/04/20 in all areas
-
After i got planning for my potential build, i have been thinking a lot about how to actually build it, and also the costing for it. This got me drafting certain areas in CAD, which grew and grew in to a detailed set of drawings with plans, sections, and elevations, and tbh has taken a heck of a lot of time. However, i now have a clear idea how the building will fit together and hopefully i can used this as the basis of a building regs submission. Also it gives a lot of detail for people to provide cost estimates. If anyone has the time, and/or the inclination (there are 15 drawings!!), would members cast an eye over the plans and provide any comments on; The layout / design of the house, The construction and detailing, and potential design issues, better ways of doing things. The level of detail in the drawings and how things may need to be changes for BR submission The house is to be built into a slope and there are some changes from planning which may mean it needs to go back in for revision, so if there are changes that need planning permission these could be made. The split level house is a function of planning and roof lines. The south is out of the bi-fold doors at ground floor, which goes onto the garden. There are a few amendments that may be made Living bi-fold maybe change to a sliding door Ground floor W/C changed from 900mm wide to 1000mm to allow for a sink. Hopefully the drawings make the constructions clear, but am happy to clarify anything. Rev_0_complete_set.pdf2 points
-
Welcome Mark, we are with you on thinking basements are great and we are building a basement which is fully in ground at the back of our sloped plot and out of the ground at the front. So, not wishing to prescriptive or 'know it all', and you may have already thought it all through, but here are some of our thoughts - hope they help :- Your most important element with a basement will likely be waterproofing: and for waterproofing you will need (for building regs, BS 8102 etc) 2 out of 3 methods :- (i) external tanking, (ii) waterproof concrete and (iii) internal drainage/waterproofing. We went for external tanking and shuttered and reinforced structural waterproof concrete (btw steel reinforced concrete is often shortened to RC) as it seems like admitting defeat letting the water in and then draining it internally and pumping it out again. However internal drainage is often preferred by warranty and lenders since you can see it (and fix it) after you have finished. We will have a 20 year guarantee for our waterproofing from Cementaid / Caltite and they seem to be very thorough in checking the work our contractor is doing. Our contractor - who is a specialist groundworker / RC expert and is fantastic - reckons our external tanking is unnecessary except to get the warranty as the concrete is 100% waterproof on its own (providing it is properly done). Interestingly our structural warranty provider (LABC) was not prepared to cover the basement element. With ours - since we are out of the ground at the front, hydrostatic pressure in not a big issue - which it can be when you are fully in ground - so is much less critical and we have an externally drained French drain around the outside. Odd though it may seem, one of the issues is that in-ground basements tend to want to float (if you are below the water table at any time of the year) so you need to watch that! Not sure what your need for a contiguous piled structure is (retention of some form?) - you may well be able to use the basement walls for this structural element (if they have enough steel and concrete) - and perhaps temporary sheet piles while you do the dig and construction - we have done some of this and it has worked fine - and it may be cheaper that permanent piling plus basement walls. But you certainly don't want everything to collapse into your nice newly dug hole, and the last thing you want is one of your contractors buried in it (btw not a joking matter - holes can be very very dangerous place). Also you may want to consider having a basement footprint that matches the house above - depends on cost/budget - but can simplify things and may not be that much incremental cost. There can be an issue that if you mix a basement with traditional foundations they both need to go down to the same depth to avoid any differential movement - but talk to Structural Engineers on that. Tip: if you want to build extra basement, but dont have PP, then the extra bits you build are technically an 'undercroft' that you might convert at a later stage (subject to PP / PD). Our advice would be to first consider the use you want from a basement - storage (easyish) or fully habitable (much harder). Then look at the warranty and funding side and see if this constrains you on the methodology. Next step is a topo survey plus a good soil survey (this will be money well spent - and if a basement contractor is prepared to quote without seeing a soil survey then they are likely clueless or naive) and some careful thought about site drainage (while building and on-going) - which is really important if you are below ground. Armed with all that then talk to a few Structural Engineers and/or Architects and see what they think is best - they may not focus on cheapest but you likely will! Also talk to a few of the competing basement product providers for you chosen waterproofing - they should have approved contractors you can talk to. You may also want to look at ICF as it can be a good option for basements and is probably your only option if you want to do it yourself - we are not experts in this area but there are some on the Forum who are, and have done it all themselves (hats off!). You may also want to consider a few other things - like fire protection and exits (note that 3 story buildings get much more complex from a fire standpoint and basements have a few fire quirks all of their own), natural light, foul and grey water drainage, access, insulation, and of course how your SIP structure will sit on the basement (and link to the basement insulation without cold bridges). Also consider muck away - we generated 600m3 and this is really expensive if you cant 'loose' it somewhere. Site access may be a big issue on a small site as you will likely need lots of machines and lorries - oh and look at any overhead cables and underground services - these can cause havoc and delays that you might not believe - we can tell you the saga of the sewer if you ply us with drink! So best of luck with the project and welcome to the forum - we have found that there are lots of amazingly knowledgeable and generous folks out there. If you want then take a look at our week by week video Blog ( Self Building two in North Wiltshire) but be aware that we are building two houses and the below ground elements are really complex - PM us if you have specific questions or want to chat or visit. If you want we can ask our contractor if he is interested in a job in Herts but this may be too far for him - though he does cover a big area, and ours is a smallish job for him!2 points
-
Go make a cup of tea/coffee and view this. When he says "top piece" that is what has been called a "Head" above.2 points
-
As our house is on a steep hill and limited space for materials etc up top, one of the first things after demolition is to build out the new driveway. This runs out across a slope and near some trees so the best option seemed to be screw piles. After much research and calculation (is it cheaper to manage the separate parts of this vs getting a contractor for the whole job) I went ahead this week. By having an excavator on-site with the ground workers (currently building garden walls etc) it saved hiring one in so total cost for the piles/ steel structure + the beam and block + the concrete top should come in about 60% of the quote received from a contractor for the whole job. Piles were delivered on a pallet 5 piles at 2m long each + 2 x 2m extensions for each should they be needed + the excavator attachment with torque readout. No dramas - all installed in half a day with each pile OK for a 375kN loading. Didn't need 5 of the pile extensions as hit the torque needed at 2.5 to 3.5m so that's some cash back ? Next bit is tomorrow when I have the steel fabricator out to measure/design - all being well the frame should be in place in 2 weeks and a week later all ready to use.1 point
-
Adding a bit more detail for background: on the AC range the meter will sample over the whole waveform and take an average which best represents the overall voltage, both positive and negative. Effectively it squares the individual voltage samples (so both positive and negative come out positive), averages those, then takes the square root. This is called the RMS value: root mean square. Our standard 230 V AC peaks at about 325 volts but the meter shows the average magnitude of 230 V, or whatever, not the peaks or overall average which is obviously zero over periods much longer than a 1/50th of a second. On the DC range it just takes samples and displays those, probably with a bit of averaging so it's likely that the AC will average out to zero.1 point
-
Hi, Dreadnaught, aye, it is, we're right near the Cambridge border (ish) between Newmarket / Bury / Haverhill. I grew up in Sawston, so know your venerable county well1 point
-
By way of an update, I got some info from Vaillant rep and these R290 "aroTHERM plus" models will apprently: 1) Be due out in June. 2) Have models between 3KW and 12KW. 3) Have COP of up to 5.4 (A+7/W35kW) 4) Have flow max temperature of 75C (COP at 65C is 2.3) EDIT: Full specs haven't been released in U.K. yet, but I found these specs from the Netherlands for some of the models: https://www.vaillant.nl/professioneel/producten/arotherm-plus-warmtepomp-65024.html1 point
-
Only had a quick look and I'm on my tablet so may have missed something you have already included. Some are things I missed.. * I don't think resilient bars would be essential for the plasterboard ceiling on top floor but if you want them why not. * Part M requires a WC on the "entry level". Usually that's the front door but if not you may have to justify an alternative door. I would mark on the drawings the "Part M compliant entry" and "Part M compliant WC". In our case (also split level) the BCO wanted to understand the whole route from parking space to WC on entry level and for that to be wheel chair friendly - so show any external paving and/or ramps and the gradient along that route. * You have notes describing the floor and ceiling joists. I would also work out what the max span is for each and add that somewhere. Eg Max span of floor joists is X meters in bedroom Y. Also add floor and joist spacing is not already done. * Specify all glass below X meters above floor to be toughened glass. Think some glass also has to be laminated these days but I'm out of date. * Being a three storey house you may need to check fire regs. Things like fire rating of doors and walls of the stair well are different for three storey vs two. Show location of interlinked battery backed smoke alarms? * Outside will the ground be sloped or stepped around the house? If steps are over certain height you may be expected to add railings to prevent falls. Ours were close. * Check height of window sills above floors. There is a minimum to stop people calling out.1 point
-
Great drawings and some great points already contributed that I will try not to repeat. First a few structural issues which will need an SE I think. 1. I have some questions about the roof, has it been looked at by a SE? The front to back span above bedroom 2 and 3 is almost 8m, can the roof be supported by 200-250mm joists across this size of span? Actually, looking more at the drawings, the joists are shown going in both directions on the sections. 2. There is an outside wall above the master bedroom and then to the right of the stairs. What supports it? 3. The floor joists are also shown going in both directions. It might be a good idea to do a joist plan for the top floor to make sure you have something underneath them for them to be supported. The awkward bit is always around the stairwell where you may also need thicker stud walls to support the wight of the stairs. 4. What supports the outside walls above the study, you have a corner between two walls with little apparent support underneath. 5. The inside blockwork on the entrance hall may need some kind of foundation support? It seems to just rest on the floor screed. 6. Could that continuous full height window in front of the stairs cause problems? Can the frames support the weight of the windows above? Drawing points 1. You have shown the interior stud wall insulation and the roof insulation as the same material, they probably won't be. 2. Once you put a fall on the roof you will need some way to carry the rainwater away. I think the normal solution would be a hopper and downpipe down the outside wall. 3. You have drawn what looks like pieces of wood around the window edges but they will be cavity closers. 4. I don't know if you can combine the bathroom extracts like that, but it would allow sound and smells tp pass between them so they are better separated. Design points 1. Could you move the garage door left to the other side so that you drive in to the left of the stairs? Otherwise the length to the front of the stairs is a very tight 4.9m. 2. I would have a wider interior door into the garage as that is one of your main entry points to the house. 3. Cupboard under the stairs on the entrance level for coats, shoes etc. 4. If you are going to amend your planning I would think about rearranging the windows at the front of the Master Bedroom so that you can put a wardrobe in that area and make the en suite larger.1 point
-
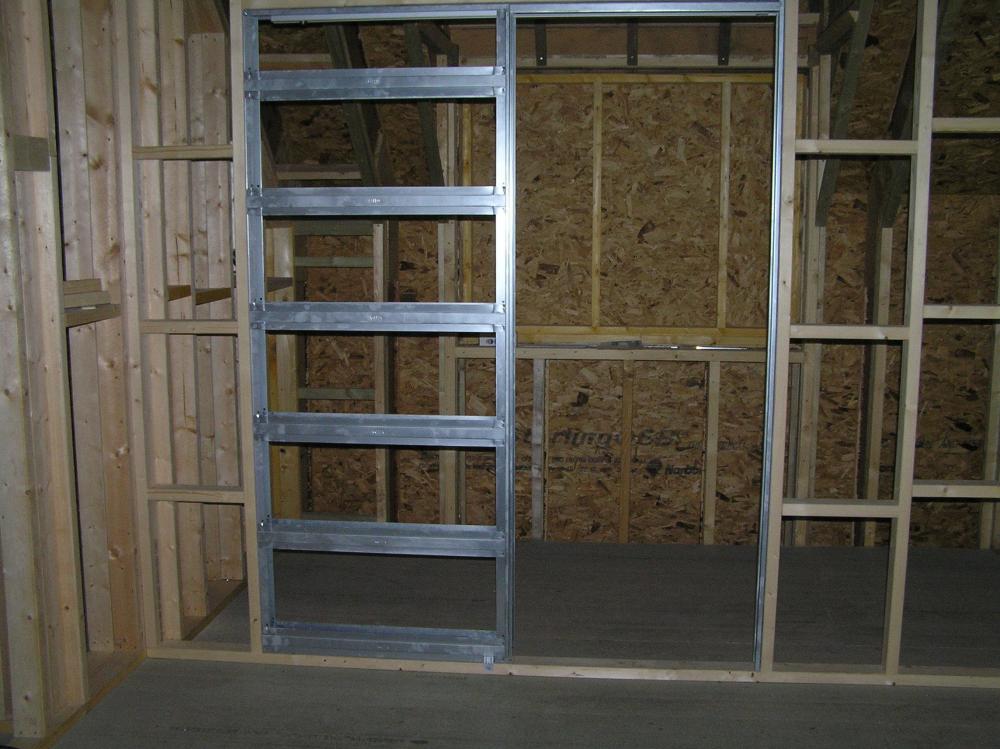
The pocket side does indeed have a metal lip that the board butts up to. However, on the impact jam and header there is no lip and you simply fit the board flush to the opening.1 point
-
I fitted one at the weekend. As you say the impact jam has no holes. I simply drilled three pilot holes and screwed it the vertical stud frame which it was going into. My kit had two removable metal braces which help to keep everything square whilst you install it.1 point
-
Because mains electric is Alternating Current. The V (dash dash) is Direct current, you'd use that around a car or to test batteries etc.1 point
-
Just the 600.1 point
-
IIRC when I fitted mine many years ago there was a metal lip on the edge of the frame that the plaster board slid behind. They may well have changed the design since then though.
 1 point
 -
I don't know, but i want one in there, and haven't added it yes as not sure if i need to up the width of the W/C from 900mm to 1000mm. Building regs (part M) states minimum width of front access W/C like this is 900mm, but 1000mm preferred, and basins should not project into a 750mm area in front toilet in such a way to impede access. narrowest basin i can find is 180mm, so i think that this W/C is going to have to go up to 1000mm wide, as its not long enough to get a basin outside of the 750mm zone.1 point
-
This is the correct replacement head if you want to replace the whole lot or if the gearing is mashed https://www.toolstation.com/corgi-replacement-actuator-for-motorised-valve/p388581 point
-
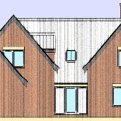
Does indeed look good! Some thoughts on the layout: Add a compass direction arrow to the floor plans Move the doors into Bed 2 and the bathroom further 'up' the page (north?) to incorporate the airing cupboard into the hall, to make space for full-width wardrobes in Bed 2? Consider whether to make windows smaller to accommodate wardrobes in Bed 3. Consider a double partition for additional soundproofing between the master bedroom and the bathroom, unless you're planning a full fitted wardrobe there (I guess you may well be)? Don't narrow-down the width of the en-suite for the shower - you have enough space to be more generous. Put the shower above the bath (in the location of the shower)? Is the loft going to be accessible (maybe not, in view of its size); if so, how will it be accessed? Especially as you don't have much of a roof space, add a plant room to the basement? Does your LA specify a minimum garage size? Taking into account the stairs, is it big enough to comply? Provision for an electric car charging point in the garage? Do you have space for horizontal and vertical for MVHR ducting? Think about adding solar shading to prevent summer overheating Large windows facing north aren't great for minimising winter heat loss, though you're limited by the plot orientation Looks like the roof may be perfectly flat? Some fall (1:40?) is likely to be recommended.1 point
-
600 as 200 is peak 200 so will read a null reading, yes black to COM and red to the max 600V (there may be another terminal which will be for non-fused current measurement up to about 10A).1 point
-
The original thread had Photobucket pics in so no use now. I'll redo it sometime. Meanwhile here's the gist: https://forum.buildhub.org.uk/topic/9640-electricians-insulator-stripping-tool/page/2/?tab=comments#comment-1642031 point
-
Very impressive drawings! A few quick suggestions: I'm not keen on turned staircases - try to make quarter landings if you can Make the showers bigger - you'll appreciate it later Provide built in wardrobes and get the VAT back Work up the ground floor/wall interface and door thresholds in more detail - you need to avoid cold bridging Move the first floor landing staircase to create space for a central plant cupboard, for your router/wifi etc Are you having MVHR? Definately worth it but need to create space preferably in the middle of the house1 point
-
Crimp new wires in a staggered joint and use heat shrink sleeving to provide the double insulation that's required. This has to be a maintenance free connection, so screw terminals (as used in that connector box) aren't allowed. I have a feeling that @Onoff posted some photos of a proper crimped and sleeved inaccessible cable joint some time ago, but I can't find them from a quick search. Not hard to do, and by staggering the joints you can keep things from getting too bulky under the final sleeve. If you have room, then Wago connectors fitted inside a Wagobox are classed as maintenance free, I believe. There's also the Hager/Ashley maintenance free connectors (same product, different name) like this: https://www.tlc-direct.co.uk/Products/ASJ803.html1 point
-
Given the inaccessibility anything with screw terminals won't suffice as there'd nbe no means for inspection and re-tightening should they creep/loosen over time. One option is crimps, but I wouldn't recommend that without a decent tool and some experience, and so I'd recommend instead something with spring loaded terminals. Wago do a 'Wagobox' that is classed as maintenance free when used with their terminals and Ashley do some maintenance free junction boxes with builtin terminals. Debox also appear to do a maintenance free version of the one you linked to. Apologies for the lack of specific part numbers and/or links but I am posting from my mobile so trying to be brief! Can post further details later if required.1 point
-
No, I think the SM-1 is just the motor. The list price for the SM-1 is £12, a head will be nearly three times the price.1 point
-
By "Head" he just means the whole actuation caboodle, the "head" could be unbolted and chucked and a new one bolted on. These things are very simple; it is to all intents and purposes an electrically operated valve, a motor/servo turns, moves some bits via a pinion gear and rack usually or just two gears. Often the issue is plastic gear teeth actually, the pinion is usually metal (often brass) but the others are plastic and they wear or a tooth breaks off and the thing cannot work on the motor anymore - chances are the motor is actually OK, it could certainly have failed but more likely an actuation issue from the drive gears. Do you know this valve is getting the "signal" i.e. a supply to actuate it? If so I would suggest you just change it out on this occasion and next time you will have more to knowledge to play with. If it was me I would take it apart and cut new gears in brass!1 point
-
…including the steel box.1 point
-
We didn't as we are using all breathable materials and we took the view that the conjunction between a non-permeable material and permeable is where you are going to get water (condensed / vapour) potentially sitting trapped. We had a good look at the existing windows which had no DPM and there was no water ingress at all, so we decided that provided the fall on the windowsill was sufficient the water will only head out not in (we went for a 10% gradient but depending on if the sill faces prevailing weather / is very exposed you could do up to 20%). Obviously there are conditions of driving wind/rain which could, on odd occasions, mean some water thinks about going the other way, but with the window reveals being deep (giving some shelter from such conditions), the window frames being in good condition and pretty thick, the mortar around the window being in good condition and all the stones of the wall having an outward fall that there will not be a damp problem. We have no reason to regret this and the windows have been installed for over a year, through the seasons and we still have complete visibility of what is happening on the inside as we have yet to cover over the internal walls. HTH1 point
-
One thing that you should consider re the hydro, which I have come across on a couple of pico installations. Most energy projections for hydro use a flow percentile, typically the 95th exceedance percentile, to give an estimate of a reasonably low flow and therefore energy production. It is often assumed this occurs in summer, but depending on where you are in the country it can also happen in winter, typically during high pressure with very cold temps. This starts to freeze up water in the catchment and reduce flows. To cut to the chase, make sure your system can cope with a scenario where it is cold and the hydro cannot work at full whack.1 point
-
You can but they take some work Isolate the power and clip the connections off for the motor - they have no polarity. Take the 2/3 screws out holding the motor to the body and withdraw it - the cam should stay in place but watch the return spring doesn’t come loose. Put the new motor in, screws into place and then use the manual lever to move it forward and let it return back under the spring. Connecting the wires either uses the crimps provided or a standard barrel crimp depending on the supplier.1 point
-
Pic as requested ?
 1 point
 -
Not a house ... beams aren’t big enough and their screw piles are really low rated.1 point
-
Yes a reflective VCL should have its shiny surface facing into a cavity of at least 25mm. It can be on either side of the service cavity but is usually on the outside. Yes a cheaper non-reflective VCL would be O.K. if no cavity. The best place for the VCL is on the warm side of all the insulation but it could be between the PIR and the Frametherm but do not increase the thickness of the PIR. It would decrease the temperature of the frametherm too much and give potential problems from interstitial condensation at warm side of VCL1 point
-
That's pretty much my walls. TF Protect 200 9mm OSB 145mm Frametherm 35 25mm Quinn therm (taped) I used breather membrane on the outside part of the OSB. The foil taped insulation can replace VCL. I used protect air barrier on the flat ceiling upstairs and above coombes. I used frametherm 32 in my floor and it's a much thicker material compared to 35, worth considering as an upgrade. Might be worth a look at my blog.1 point
-
Hi @soapstar I got two years from here for £700 https://www.tradedirectinsurance.co.uk/insurance-products/self-build-insurance/ I think the surveyor and the architect both inspecting together is still to much. Are you not just paying two professionals to do one job? Building control do a few inspections during the build but won't charge, as this is covered by your building warrant fee. What are your intentions with the house, can you ever imagine selling within ten years?1 point
-
You really want to hold off putting the stairs in till as late as possible. We used a joinery firm to make and install the stairs. We don't have a huge budget but decided to make an investment here. A cheap stair will get you from A to B but a good stair looks good, feels solid and is nice to touch.1 point
-
I've just done a review of our heating costs over the last calendar year. We only use electricity and have SunAmp PVs heated only by E7 for DHW, and a Willis for UFH heating the slab of our 5 bedroom 3 storey house. Based on my Home Automation logs, our annual (Willis) space heating costs for this last year work out at ~£380 p.a. This would fall to around £115 p.a. if we had used an ASHP so maybe an annual saving of around £265. We use an induction hob and 2 × electric oven/microwave for cooking (with a 2 ring Propane for backup and which we've never used in anger) so we have no other need for gas connection. So there would be maybe a 10-year payback for installing an ASHP if I did this myself, plus some extra benefit if we used one with a cooling mode option for the Jul / Aug temperature peaks. We also saved a lot of money avoiding gas installation, and the annual standing charge for gas connection (~£75 p.a. in our area), and the cost of annual maintenance for a gas appliance (something that is mandatory IMO). And note that if we did have an ASHP, then the avoidance of the gas standing charge represents an offset of some 65% of the ASHP running cost. So in our case the gas vs ASHP argument is a no-brainer.1 point
-
I have used Mrstairs a few times and never had a problem.1 point
-
Day1: The diggers gather like vultures. The old bungalow is doomed now with only one more day of asbestos removal on the inside. The driveway can't be finished until the rain stops. Day 2: Half the house appears to have gone! It seems there isn't much to it that isn't rotten. Another view of of the half-a-bungalow. Skipping a day to day 4: All the house down with the wood awaiting collection. All the asbestos roofing felt has been stripped and removed from site. The pine floor (front of frame) is retained because I can see uses in the future. Day 5: Site graded and ready for building the new house. The tall house in the background is a neigbour's self build from 10 years ago.1 point
-
no reason you couldn't use a poured thin screed over the timber deck either. Our FF is 50mm hemihydrate over caberdek , on 254 pozis @ 400ctrs, with a span of 4.7m. It's impressively stiff and quiet.1 point
-
I asked earlier if you have a multimeter? If you do, follow the cable coming out of the valve head it will go to a junction box or a wiring centre. Measure with the multimeter set to ac volts between the brown and the blue core. If there is no voltage, it is a control fault. If there is 240V there and the valve is not opening then the motor has gone and you need to replace the valve head.1 point
-
So the question for you is, do you want all the hassle of doing a self build to be marginally better off on the valuation at the end.1 point
-
Right everybody. Stop with the tractors.0 points
-
picture please! @Big Jimbo,s missis might be interested ?0 points
-
Since my herb wall is likely to be entirely in 4” or similar plantpots, regularly renewed, horseradish will probably not be present. Or turnip !0 points


This leaderboard is set to London/GMT+01:00