
Leaderboard


Popular Content
Showing content with the highest reputation on 01/21/20 in all areas
-
Yep and it works fantastically. Zero risk of it toppling out with a very simple clamp bar to the feet.
 3 points
 -
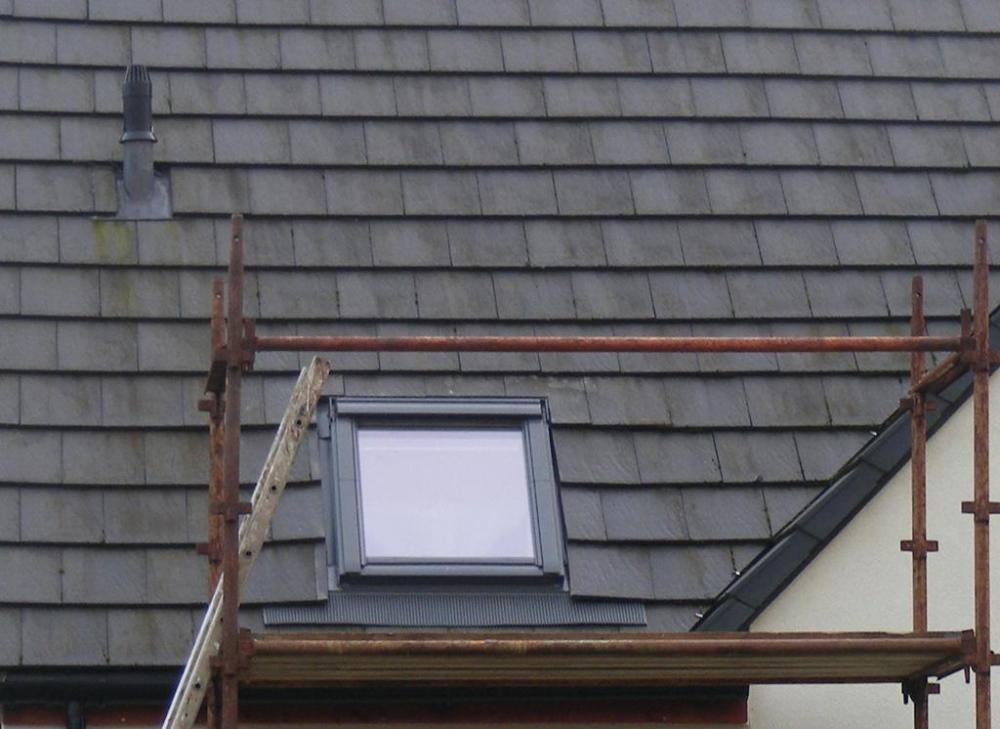
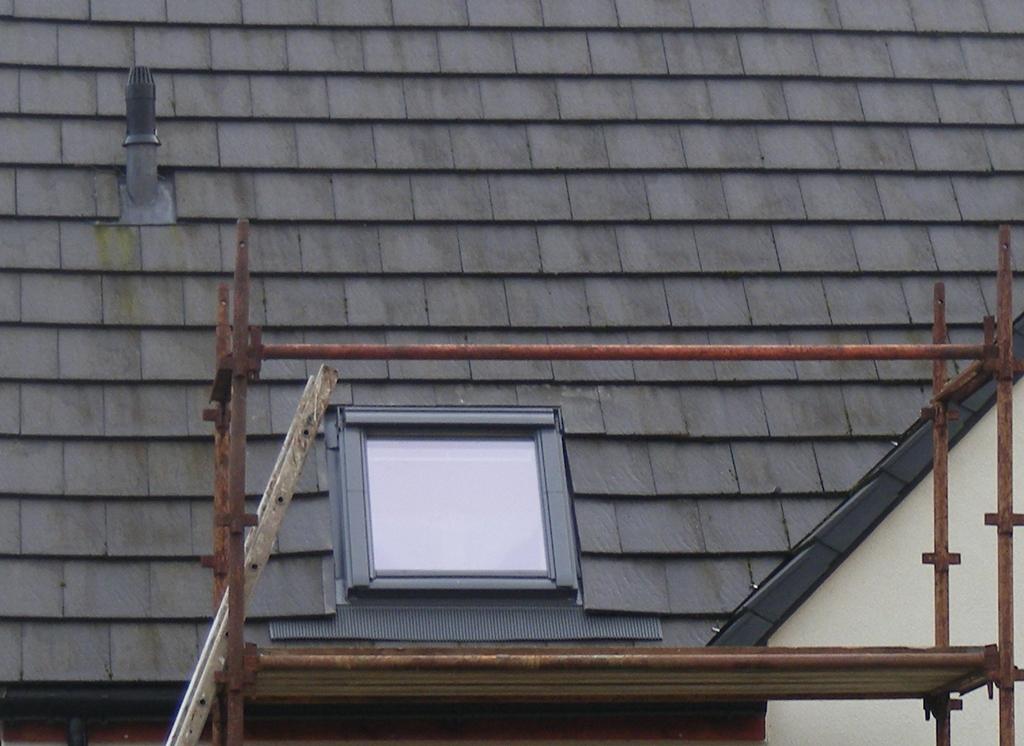
It's 4 months since I fitted the first of my 2 velux windows. I moved the scaffold ready to do the second, and then lost the weather, it was either too cold, too wet, too windy or I was too busy working. So finally today, taking advantage of an unusually mild and dry spell, I have fitted the other one.
 2 points
 -
If the heat loss for the room is 678w its 678w whether you heat it with a coal fire or a nuclear reactor, im not sure where you are getting the 3:1 calculation from Where the heat pump has to be factored in is with the lower flow temperature most radiators have the quoted output with a deltaT of 50 degrees so a flow temp of 70 degrees for a room temp of 20 with an ASHP you want a flow temp of 30-35 for most efficient running so you need a radiator (emitter) that has an output of 678w with a delta T of 10 degrees1 point
-
+1 If it couldn't be separately occupied it wouldn't count as a new house so it wouldn't be zero rated. Aside: If you have a Tree planting condition that required you to agree a landscaping plan you can reclaim the VAT on the trees as well.1 point
-
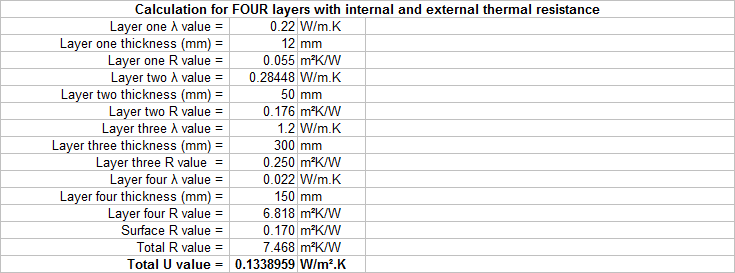
Just done a quick and dirty run for the following build up: 12mm plasterboard 50mm service void 300mm concrete block 150mm PIR EWI These are the results:
 1 point
 -
For just the concrete blocks on their own, as a single layer, with no insulation inside or out, then use the single layer option, enter the wall thickness (0.3m and the thermal conductivity (λ) for concrete (1.2 W/m.K), and this gives the basic U value for that layer, with normal internal/external surface thermal resistance values, of 2.38 W/m².K For a two layer wall, use the next option down, for two layers. If, say, the wall was 300mm of concrete, clad with 200mm of EPS as EWI, then the total U value would be 0.172 W/m².K If PIR was used as EWI, then the same wall structure, but with 200mm of PIR as EWI, would give a total U value of 0.105 W/m².K You could drop the EWI thickness down to 150mm with PIR as the EWI and still get a U value of 0.138 W/m².K, which is probably fine, especially as the U value will be improved slightly by having in internal service void, layer of plasterboard etc.1 point
-
Screw 25mm battens to the rafters, then use offcuts to space the insulation off the tiles. Gives you a 25mm air space.1 point
-
That's enough to put me off a brand that does that.1 point
-
Lots to go on there. I have installed SAMBA, next time the desktop pc is on I will see if that finds it's shared drive. I wans't expecting to have to build my own server and program it from scratch, I kind of expected an off the shelf cheap consumer solution to be available. I have a BT Hub 4. It has a USB socket. I have plugged a USB memory stick into it. If I interrogate the router, it says USB: No devices detected which I guess means it is expecting to find a computer, not memory? I do not want a cloud solution. Call me old fashioned, but I think this cloud thing is barmy. I do not want to trust all my data so some service that can be accessed anywhere, that might get hacked, that might go bust, that might not be available of there is a network problem, that might seek to earn money from exploiting my data. I am looking for a local solution under my control. More investigating to do.1 point
-
We did a similar thing when we extended our 1930's semi. The council wanted the wall of the extension stepped back, AND the roof. Well we stepped the wall back, a bit, not much. But the roof line we kept the same. I think it looked better for it, rather than trying to step back a hipped roof. It helped that the builder sourced some reclaimed roof tiles that were identical as well. I guess the planners could have forced me to change that. I just thought I was making it look better.
 1 point
 -
Still there, via us:- https://forum.buildhub.org.uk/topic/10669-frameless-glazing-units/?tab=comments#comment-1801111 point
-
Just a wee quick note @AnonymousBosch, those windows are less than 300mm (circa 295 if memory serves me right) ? Regarding the work, you have 10mm tolerenace either side, plus 14mm of exposed frame. Totalling 24mm either side. What's the objective? I presume it's to finish of the returns with render at some point and make it look nice? They are narrow windows, so why not make it a feature? Pack out the returns by 50mm, then just bring the render into the aluminium cladding of the windows frame and finish it off with a render stop bead? Result, less visible frame externally.1 point
-
The ratio is as seen ... next to no glass, mostly frame. Special request is a bit grand: they are what the architect specified. CTI outside and inside?1 point
-
Yes, just put no. They are wanting to see if the new build is an annex to an existing house or tied to a business or similar meaning you can’t sell it as a separate entity. If you had a condition like that you would not be eligible for the reclaim.1 point
-
no site visit as far as I know, certainly not with me anyway1 point
-
I've used Rain-X on house windows. Works well, and seems to last longer than when used on a car windscreens, maybe a couple of years or so. Only thing to watch is that the windows will still spot if just rinsed off with tap water (hard or soft), as the beads of water left behind by Rain-X will dry and leave behind rings of solids. Rinsing with deionised water gets around this, and doesn't need much water. A spray bottle filled with deionised water will rinse off several windows. Not hard to make your own deionised water, either, plus you can rejuvenate DI resin to save having to keep buying the stuff. Rejuvenating it just needs sodium hydroxide and hydrochloric acid (often sold as brick cleaner). I have a small deionised water filter that I made up for car washing ages ago, but am about to knock up a slightly bigger one, that will fit on a hose pipe. Should make rinsing off windows (and the car) easier.1 point
-
yes - works for pretty much anything.1 point
-
This thread is pretty close to being a duplicate of this thread, might be an idea to merge them: I've replied on the original thread with some info regarding floor temperatures, heat output and how to use a cheap IR thermometer to check the floor temperature.1 point
-
Could the same be advised for rooflights I wonder? And maybe even windows too while we're at it?1 point
-
Make sure it slopes by 3-4 degrees downward and when it is up then get it coated with Rain-X and it will be virtually self cleaning.1 point
-
have you considered suing rads that are designed to run with low temp ASHP ,basically they are much larger or are fan assisted https://les.mitsubishielectric.co.uk/products/heating/domestic/radiator/i-life2-slim1 point
-
no "mass" reflects sound, insulation absorbs sound1 point
-
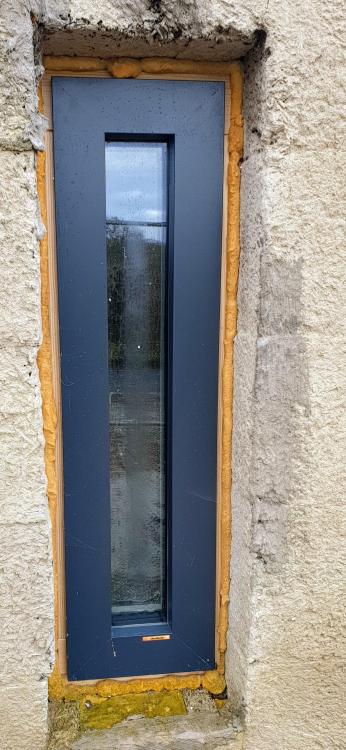
I thought I'd start small and make my mistakes on this small window (of which we have 3) [Quick aside @craig (Ecowin) thought that Gaulhofer wouldn't be able to make windows this small - 600mm overall] Here's the patient : the problem at this stage is similar to the one @Roz had .... here First job is strip back the foam to just a bit deeper than the frame, and CT1 along all four edges right? Which leads to the first question - CT1 outside AND inside? (Photos to follow.)
 1 point
 -
I will test it out. I went down the labour intensive route with every step so far. Some did save a bit of money, some came out the same price. All together still savings to be made. Unless you calculate your own work, but just look at everybody on this forum, houses wouldn't be built and budgets could have never been kept without the time and efforts you put into the building yourself. In case you haven't seen it yet, different topic discussions about the block and beam insulation1 point
-
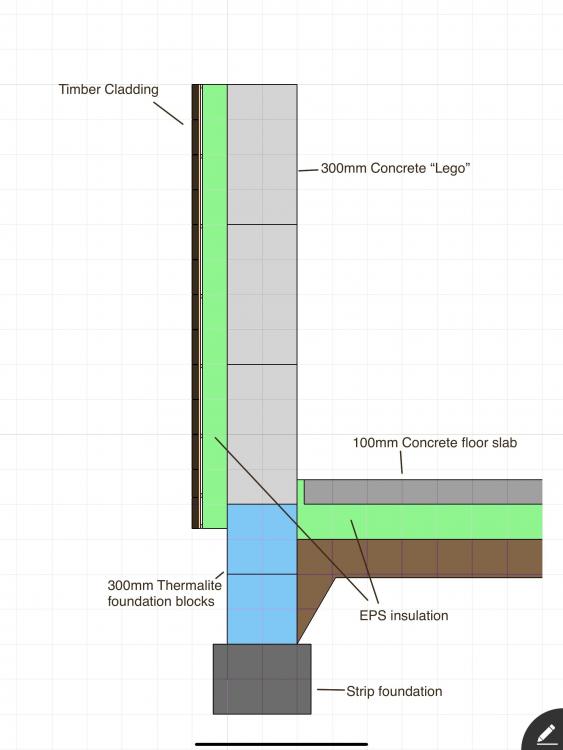
I have just done a sketch of the wall build up I was thinking of using if I go with strip foundations. All the EWI and cladding would be DIY with skilled assistance. I think @Jeremy Harris suggestion of hilti nailing is the best option.
 1 point
 -
Harvesting will need to be done using a certified system if you want it considered so it will be north of £2500 - that’s about 8 years of a standard water bill, or 35 years of just toilet flushing ...1 point
-
As far as I can see, things like camera mounts, laser levels, and other optical sort of stuff that may need tripod mounting, tend to use UNC threads (American). I suppose you may get away with Whitworth, if you can find any these days. Except for my telescope tripod, which is an M10.1 point
-
I will be installing one soon, if you can wait, I will give an opinion when I have done so. The cheapest range they di is not inverter driven.1 point
-
I just put them in the wheelbarrow.1 point
-
I wouldn't use 032 mineral wool between timber studs. Will give little to U-value but at much more cost, 035 product will be OK.1 point
-
its pretty easy to use but brutal on tools. Buy cheap ones and you’ll need the warranty a couple of times but will do it. If you’ve got timber studs then an air stapler with 40mm crown staples is much quicker and easier. FST is the weirdest stuff ever - only needs a squeegee to apply it ..! Looks like it’s not gone on but dry in minutes and perfectly flat.1 point
-
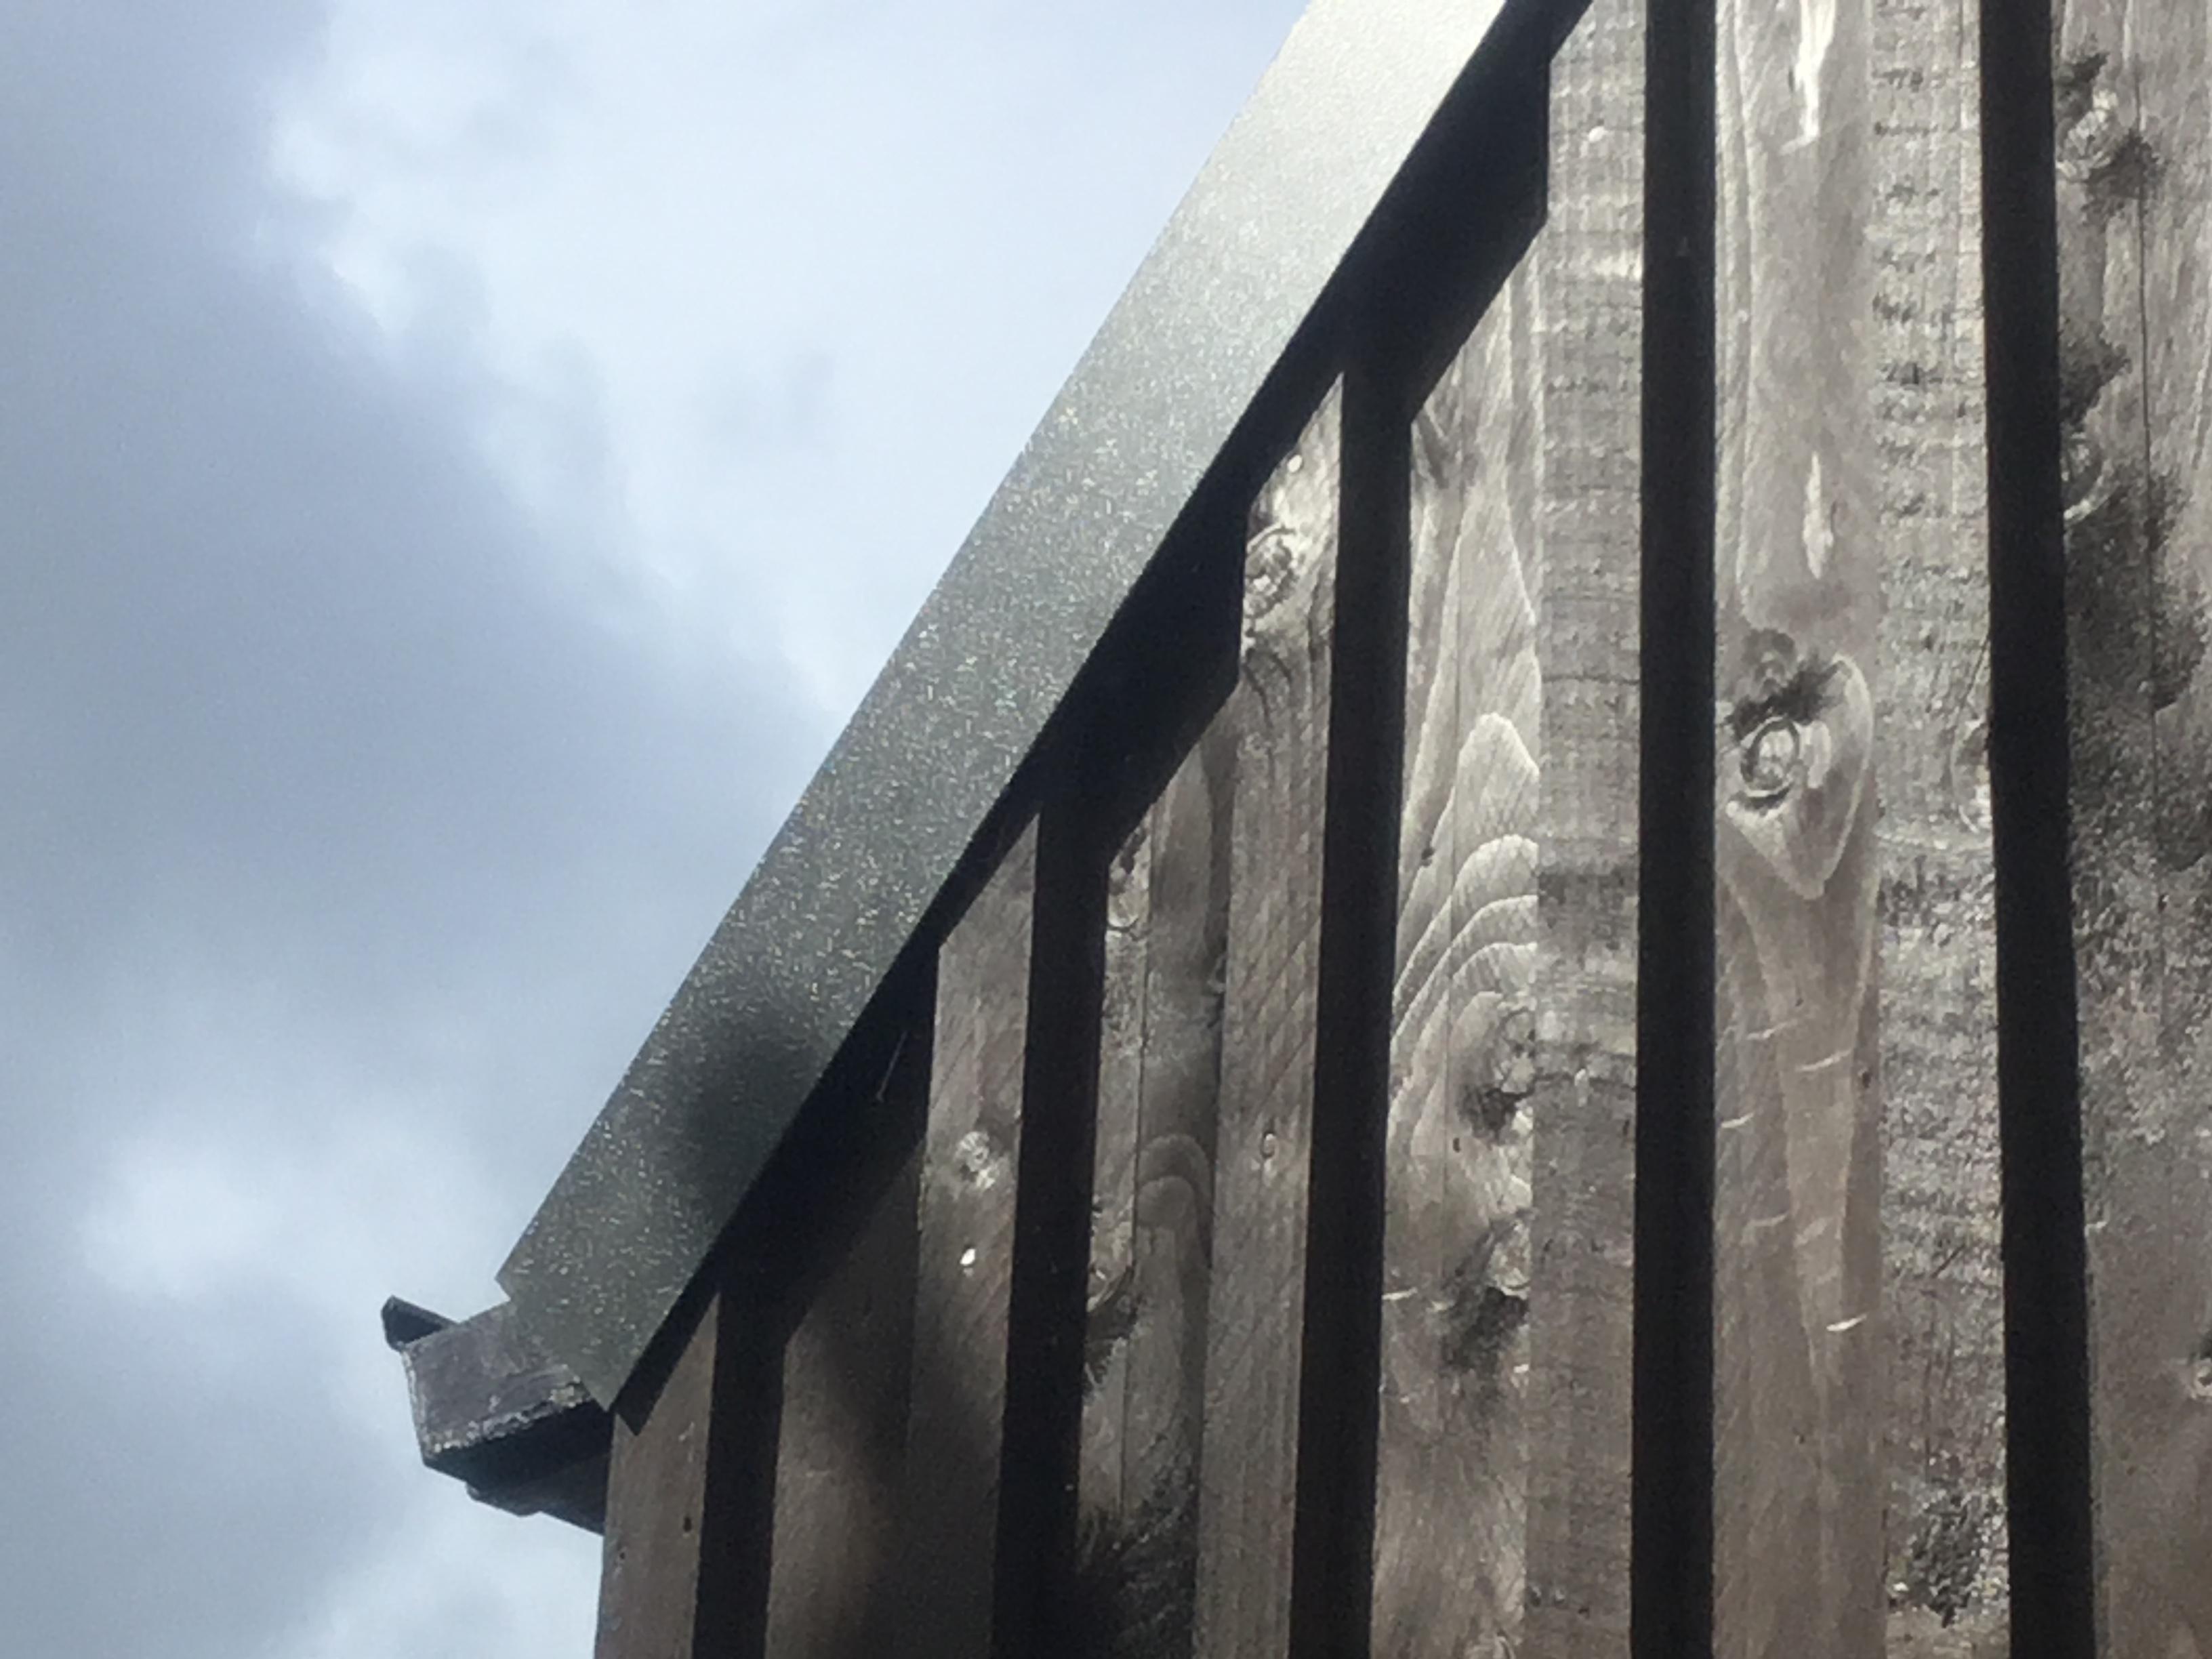
Just a small detail in regards to gable flashing onto timber cladding, I have found that leaving a small gap between the roof flashing and the timber stops water running down the timber, not sure if this is standard practice but I had one which was tight fitting and water was tracking onto the timber was causing unnecessary dampness and staining. On my glorified shed I stood the flashing off by 10mm+ and the water now tracks harmlessly down the lower side of the flashing and drips away. Small detail for a very specific application but may be of help to some. I used a small strip if wood tacked into the top of the timber cladding and under the flashing as a spacer to get a consistent gap.
 1 point
 -
of course @Nickfromwales. @Luke Salter I have met Andy and he has been to see me. You have PM.1 point
-
I am in a similar position - taking ownership of our plot soon and unlikely to be starting for another 3-6 months. I had planned on just getting public liability insurance to cover this period (and advised that a policy would be c.£150 for 12 months). Is there any reason why I shouldn't?1 point
-
I disagree with that ... it’s no harder than taper edge boards with a tape and skim finish. In some instances it’s easier as you can create clean edges with a router and bearing bit - especially on corners. Right .... depends is the answer ..! Firstly it is very heavy - it needs two people to manage boards and you also need a board lifter to do ceilings. You can’t do it on your own ..! One of the benefits is that you don’t need to join on a stud - you use JointStik to bond the edges together, this is a cross between D4 glue and Gripfill and comes with a custom nozzle that puts a bead on the edge of the board. These joints are strong, but you need to leave them to dry properly before you do anything else. There are two ways to fit Fermacell to timber, either using the correct screws or by using crown staples. Screws hold better when the timber is uneven but leave a larger hole to fill. Staples are quick and easy and leave a very small gap to fill - very easy to do but if there is stress on a board they may move with only staples. Fermacell is very easy to repair though. If you cut a hole in the wrong place with a hole saw, or even cut an access hole, you can just glue it back in place, filler in the gap, sand and it’s done - you can’t tell it’s been removed. It is also surprisingly easy to cut. Fermacell sell a knife designed for the job and it works on the the score and snap method and is very good. It leaves a slight ragged edge but this takes filler really well so isn’t a problem. When it comes to filling all the screw holes or edges, you will need their filler. It’s much better than anything else and sands to a fine finish too. It’s better put on with a wide spatula or trowel, and it goes a long way. FST - or fine surface treatment - is the oddest product I’ve ever used ..!! Fermacell show it being applied with a squeegee, I use a 12” plastering trowel and you can do a 5m wall in probably 15 minutes. You put the thinnest coat possible on - the boards change from light grey to a slightly darker grey and that’s it ..! A quick sand over with a 120grit sanding board and you can be painting less than an hour after applying. The wall will look like it’s full of filler and screws etc, but a coat of paint and it’s all gone and you have a perfect flat wall. I’ve gone from a stud wall to ready for paint in 24 hours - that’s impossible with board and skim, and pushing it with TE/taping. The downsides are that the dust will destroy any power tool that you use to cut it. Circular saws or jigsaws create a lot of dust, routers are magic for cutting holes for back boxes or making perfect corners but all of them will die in a ditch with the dust. Buy cheap Titan ones and keep going back for the warranty claims ..! Fermacell is very good for perfect square and flat surfaces - anywhere that you want curves or anything that needs blended angles then you possibly need to look at something else or look at how to get skim coats applied to certain sections. I priced a job recently that would have been £4K in Fermacell, and was just less than £2k in plasterboard and skim in terms of materials. When it came down to it, the labour costs were double for the board and skim as there was a lot of curve and detail work but the whole lot came out about the same price in total. If you can DIY and have square rooms etc then you can get a very good finish with Fermacell that is comparable to a skimmed plaster finish with no wet trade delays.1 point
-
I phoned rockwool and was told to use 50mm in a 90mm stud wall - airgap both sides was important. Add on soundbloc if want more soundproofing.1 point
-
You would have almost a tenner.0 points
-
there is always 5x as much in it when you puncture it in your workshop by mistake.0 points
-
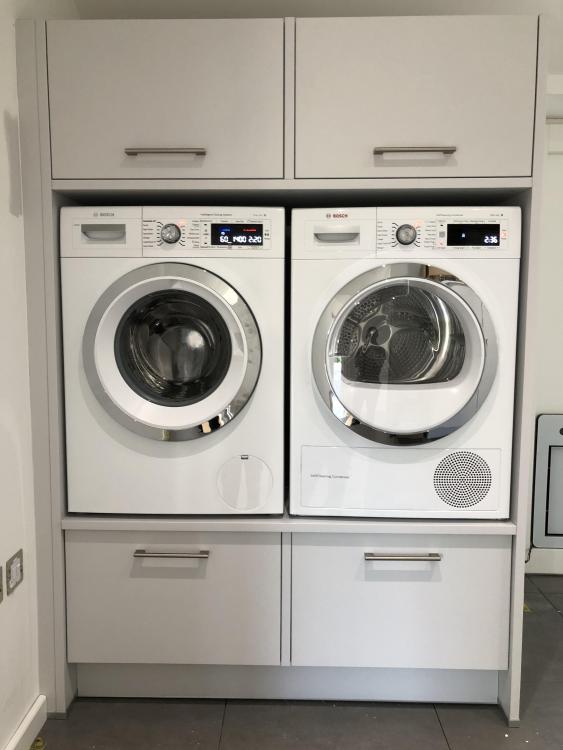
A word of caution. We built a raised platform at the end of my mother's kitchen to take the washing machine, tumble drier and dishwasher, specifically to provide easier access, with less bending over when loading and unloading the machines. It worked very well, and was solid enough as we made the raised platform using blockwork laid on a concrete floor, and then quarry tiled over the whole floor and the raised platform. Unfortunately, around a couple of years after we did this, the washing machine developed a fault, in that one of the spring dampers that support the drum broke. My mother was around at the next door neighbours at the time, and when she returned home later that evening she found that the whole ground floor of the house was flooded to a depth of a few inches, with the carpets floating off the floor. She had to move out of the house for around 3 months, whilst everything was dried out, the electrics replaced, the walls replastered, furniture and carpets replaced, etc. The cause of the problem was the raised platform. When the drum support failed, the machine started vibrating, moved itself forward and fell face down on the floor. The glass door broke, but the machine carried on working, trying to fill with water to complete the rinse cycle. Being face down, with a broken door, the level sensor failed to shut the water off, as it was trying to fill the whole ground floor of the house to the set fill level. So, by all means look at doing this, but think about fitting constraints to prevent the machine falling off the plinth, plus, perhaps, some additional means of shutting the machine off if the worst does happen.0 points


This leaderboard is set to London/GMT+01:00