
Leaderboard


Popular Content
Showing content with the highest reputation on 01/14/20 in all areas
-
I'm back at the self build (and the internet) with a vengeance, having had a good rest over Christmas. Ive just added up how many of the fancy manifold outlets I would need for my hot and cold water, its 32! Given that they are around £12 per outlet, that's £384 in total. I've decided to go down the @joe90 route and us a 4 way push fit manifold at £7.50 each, giving a price of £60. I realise that these don't include a service valves, these can be had for 80p each, giving a total price of £85.60. A total saving of ££298.403 points
-
Decent thickness of EWI on that and the decrement delay is going to be measured in weeks, rather than hours...2 points
-
yes I found this a good way to go, I contemplated individual service valves but just out of sight on that picture is a service valve on the hot and cold feeds 22mm, plenty in my opinion to change a tap etc, and if any job takes longer I could always insert a blank on a particular feed from the manifold for a while ?.2 points
-
My spa bath is part sunken (so the floor of the bath is level with the adjacent tiled floor). Access panels in the side covered by tiles give access to the trap etc. If worst case happens I can break two tiles, take the silicone off and lift half the bath surround away.2 points
-
"A true Wetroom install should be OK to use WITHOUT EVER TILING IT, remember that and you’ll be fine. ?" Said @Nickfromwales 07 Jan 20202 points
-
Last night I emailed one of the suppliers who asked for feedback, I sent them a link to an online source (they wouldn’t sell to me as I was outside their delivery area) and they have just emailed to matched the online price of £5.72 +vat.2 points
-
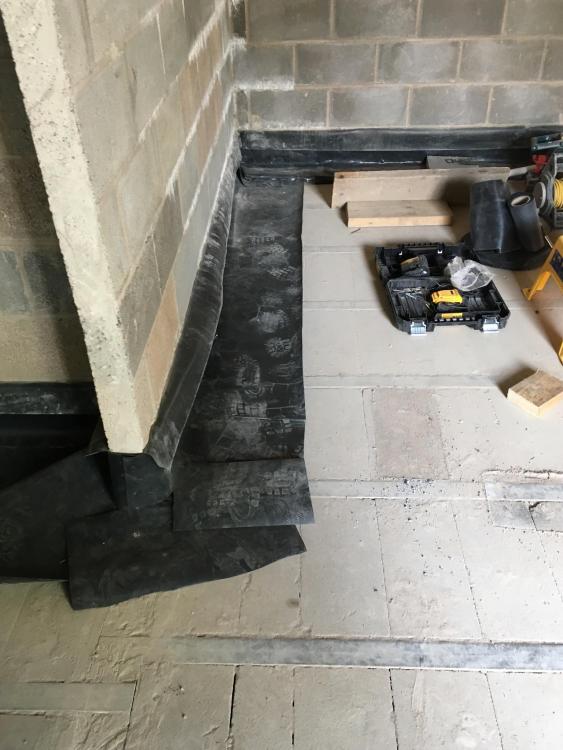
No, the plywood was a former/shutter, open at the front i think, into which they stuffed the lime, then took the wood off and brushed it up to look ok. Ended up looking like this -2 points
-
So after a month or so in the house, the time has provided us with an opportunity to reflect on what we have achieved and what if anything, we would change or could have done differently. In truth there is very little if anything that we would change. The rooms flow, the doors open in the right direction and the lights can be switched on and off in the appropriate places. Even the WBS has proven to be a worry that wasn't worth worrying about, as it's position within the hearth is no longer an issue due to it being vented through the back as opposed to the top. Some jobs have been completed such as the down pipes and a few jobs remain outstanding but nothing that has an impact upon our daily lives. One such job is the porch that needs to be slated. Thankfully I still have some financial leverage over those various trades so I know they will return. Our satisfaction I suppose, has to be routed in the preparation work, the research and being a member of this superb forum. None of these elements should be underestimated. Therefore I would like to sign off this blog with a heartfelt thanks to all those who have contributed, not only to my issues over the past couple of years, but to all the other threads, as they too are just as relevant / enlightening. I have also attached some images which complete the project, namely the WBS chimney installation and the erection of the much mentioned porch. For a final time, thanks for reading, and given the date, seasons greetings to you all. Paul.1 point
-
After a summer spent cruising the canals we arrived back on site with a little trepidation and a lot of enthusiasm. When we left the build we had just got the scaffold down and had a lockable water tight shell,. Well almost water tight, we still have two leaks. One where our roof lights join and another on a roof seam that abuts the wall on the house gable. Fortunately neither were bad enough to have caused any damage over what has been a pretty dry summer. The internals of our ICF build required no supporting walls making it a nice big unencumbered space to start installing the MVHR, electrics and plumbing. We had decided to get the MVHR installed first as the pipes are the largest and least flexible. The system design for our MVHR had been provided by Blaugberg making it a fairly straight forward install. Of course the design hadn’t taken into account joist spacing or any other details of the construction. Taking the joists into account etc we ended up mounting the two manifolds next to the MVHR unit raised for the floor to allow access. Getting the MVHR into position involved getting a bulky 80KG box to the roof area of the house, a task made pretty simple with the aid of an electric winch. With the manifolds raised off the floor and two of us feeding the pipes through the aero joist webbing we managed to get all the pipes in with minimal loss of skin. The manifolds have large removable panels that allow access to install flow constrictors. Our intent is to get the MVHR setup as soon as we can to help keep heat in the house and to get the humidity down from the 65-70 percent it’s currently at. One other job we wanted to get done early was an initial air tightness test. Although we are not building for passive certification we want to make sure we are as close to the 0.6 passive house level. We needed to get the roof VCL installed, in our case this is just a plastic membrane. Getting the membrane in place where we have vaulted ceilings was time consuming as it involved step ladder, a ladder and staging to get to the top of 5M high. With the membrane in place we called in a local firm to do the air test. With the fan drawing air into the house detecting leaks was straight forward as the air was much cooler outside than in. We had a few leaks virtually all at the junctions of the VCL with the roof purlins. The guy doing the test recommended trowelling mastic over the spray foam which had been used to seal the junction of the purlins and the ICF. Having identified the areas we needed to fix we got on with the air test proper. As the test proceeded restrictor rings were fitted to the fan until the required air pressure was stable. The initial figures are excellent down at 1.08 ARCH which given we have a bare structure and know leaks around the purlins mean we should be able to meet the 0.6 ARCH. Interesting form me was the degree to which the fan got restricted, you can see from the photo that just a 15mm ring was left exposed. For a normal build this would be the case for a small single bedroom flat. With the MVHR tubes in place we set to installing the water pipes. It’s surprising just how much having to make decisions about tap positions can exercise your patience. We had opted to use a water softener and after a bit of searching around decided to use a Monarch Solo, a non electric water softener that gives ample flow rates for our house size. Compared to re-plumbing a house starting out from scratch made it a simple and quick. Again having two people to feed the pipes makes the job a lot simpler and saves shaving the pipes through the ceiling webbing. We will pressure test all the water circuits prior to do any plasterboarding. Along side the water pipe installation we also installed the electrical ring mains. With ICF it’s important that the wires don’t come into contact with the polystyrene as it leaches the plasticiser from the cable insulation making it brittle over time. Lighting rings will follow. We have a fairly good idea of where we want lights but it’s difficult to be sure so we plan to put in a lot of redundancy so we can change lighting as required once living in the space. We have also installed stud walls for the two bedrooms and bathrooms. The seemingly huge space soon shrinks! Having said that the rooms are generous. In the entrance hall one wall has a curved corner, a little more fiddly to construct but well worth the effort making the hall/stair area look really good.1 point
-
Just be careful if you mount two manifolds together, you can’t get the demount key between them to take them apart again (ask me how I know!).1 point
-
hep20 and I got mine from toolstation. The welsh wizard recommended hep20 as the best!.1 point
-
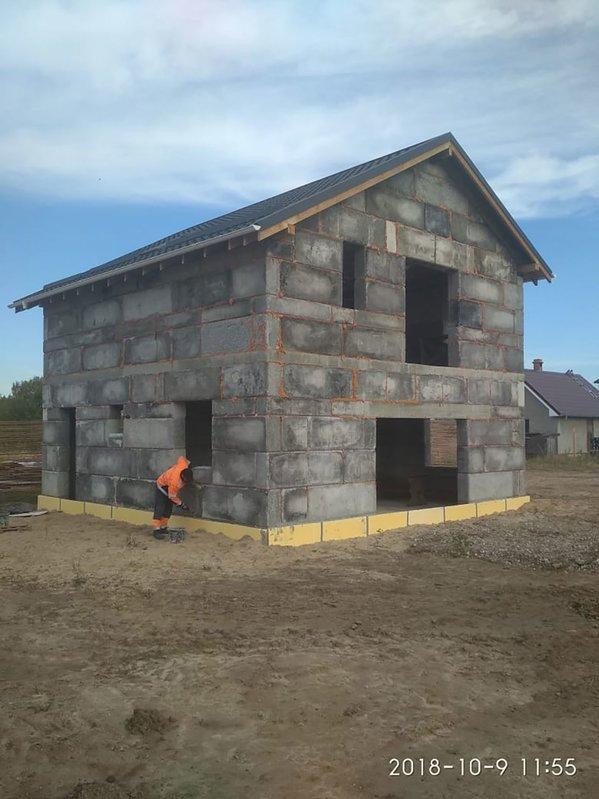
Ok so I am pretty impressed ... takes a lot too ..! I would do something slightly different, may take a bit of effort but be worth it I think ... I would use beam and block flooring at first floor - lay it onto a flat top and then build a simple wooden form around the outside of the building with 25mm OSB. Rebar half way up and then pour a full ring beam all the way round level with the floor and then I would start again with the blocks on top. Same again when you got to the wall plate and cast a ring that holds the whole thing together. Still doesn’t solve the lintels question but I think it would be much stronger.1 point
-
My set up was pretty similar to yours I used 300 hi load dpc nice and easy to join Standard dpc goes floppy and is prone to damage
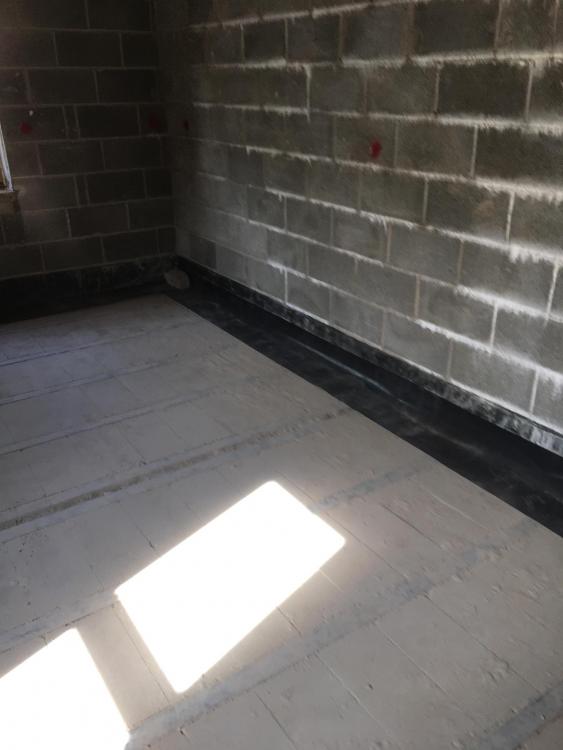 1 point
 -
I have one, fitted last year, and I'm very pleased with it. A friend put one her place after a kitchen exrension late last year and was equally pleased.1 point
-
Looks passive slab too ..?? Are they custom lintels I wonder or cast in situ with rebar ..? I would check with them how the floors go in - this looks like a 200mm block arrangement (do they do a flat top block..?) and the joints seem to be sealed up with spray foam. And as @Jeremy Harris says, the decrement delay will be impressive ..!!1 point
-
This is the house that was built in Holland.
 1 point
 -
Kick the towel around the floor is what we do when finished showering then straight in for washing. UFH helps dry the floor quicker as does good extract.1 point
-
I've used a free program called PDFill to edit PDF forms. You can to add white space and/or new text boxes with white backgrounds to type over existing text. Save as an editable project file or a new PDF. I've not really used its drawing capabilities. Might be better progs around but works for me.. http://www.pdfill.com/1 point
-
Plus one there Never rely on the tiles to keep the water in1 point
-
Financial Conduct Authority (or whatever the replacement is). You need to formally complain to the lender first and give them a chance to fix it. I got the run around with ours and the FCA awarded refund of application fees.1 point
-
Presumably it would help if you let the slab cool down, turn on the heating then do the mopping soon after so the heat hasn't had quite so much time spread?1 point
-
You waterproof the whole floor in a process called tanking, that can either be a membrane or a paint on system. You use a ready made shower former (or you can make one) so that the floor in the shower area slopes down to the drain. Then you tile it. Even if the grout cracked, the floor is waterproof even before the tiles go down.1 point
-
Whatever wall and floor substrate you use has to be "tanked". That is a waterproof liquid tanking membrane applied in two or more coats with flexible reinforcing tape at the wall/floor junctions, corners etc. This will give you an idea: You also need to pay careful attention to your drain detail. @AnonymousBosch on here is just starting his.1 point
-
A quick Google came up with this https://www.saturnsales.co.uk/Daikin-3MXM68N-Outdoor-Unit-3-Indoor-Units.html So it looks like you can buy the condenser plus three inside units for less than you have been quoted for the condenser. These are different inside units but prob gives you a good idea. One thing I always do to get an idea of how reasonable the quote is is to ask how long installation will take. If they come back and say that it will be two guys for three days then you are being charged about £1000 per man per day, I have no idea what the right cost for London is but I would imagine £4-500 per person a day might be the kind of level you are looking at. Of course they can quote you whatever you like and the only way to get a better price may be to get other quotes. Afraid I cannot help you with other places, I would probably just start with Google and see if I can find some reviews.1 point
-
More insulation than my hut yours has. Mine is toasty warm but does have a fierce wood burner inside. I’d say airtightness is more important so make sure the floor walls and roof are well wrapped and you’ll be good1 point
-
Trying to print a new fridge handle we drew up between us: VID-20200113-WA0004.mp41 point
-
Got a positive response today. They have built everything but a house (barns, underground bunkers, swimming pools, warehouses etc). They do sizes all they way down to 300x300x300. Lintels are blocks with reinforced steel cages inside. Currently go up to 1.8m long but could do 2.4, if there was demand. His concern with BR was insulation. He wasn’t really familiar with EWI systems. He is a concrete guy after all. They are bonded with a 2 pack resin which is suitable for industrial applications and swimming pools, so I can’t see it being a issue with a house? They let us build houses out of osb polystyrene sandwiches if we want to after all. ? Im also not the first crazy person to do this. He is sending me details of a house in Holland that was built from 300mm concrete Lego.1 point
-
Once you have used a dust Cyclone you will never look back ! I have 3, one on the router table, mitre saw and table saw and wish I had more ! Easily made my money back on not buying Hoover bags and generally destroying the motors. Rutlands do a good one but it’s not cheep. I got a cheep one of ebay and it does the job but I regret the buy as you cannot see through the plastic.1 point
-
B is correct in your picture. Cut the Fermacell slightly over sized and finish with a bearing bit in a cheap router running over the face. You may need a small fine tooth saw to square off the corner. You can snap and score the reveal boards to fit with the rough edge on the inside of the routed edge, then just fill any gaps. Leave a 2mm gap from a factory edge to the frame and FST and paint the boards then finish with a bead of decent sealant between the board and the frame of the window.1 point
-
It is a mix from room to room to be honest, but we have a similar issue with some of them and I did note the reveals were getting close at some points. Another option may be for you to trim your tape back? If it was me I would pack out a little, board it, then use a fresh blade and cut down the tape at an inward angle, then by the time you FST and a bead of silicone/caulk etc. down the seam (as FST/Gypsum etc. always crack at interfaces to wood/uPVC etc.) you will hide any light mark to the window frame. Alternatively if you lightly score the tape will it tear cleanly along the score?1 point
-
Laitance needs to be removed shortly after pouring if you are tiling. If you wait weeks (like I accodentally did) it's a real pain to get off.1 point
-
A month. Ah ha! The colour of the floor (away from the plastic) changes from off-white-ish in the morning to a biscuit / whiteish during the day. Other areas of the floor, not so well ventilated (corners, nooks and crannies) are visibly darker, but they too change colour a little during the working day. Very much more slowly, those out-of-the-direct-breeze areas are changing colours. Hence the need to keep the doors and windows open. Thanks @Ian1 point
-
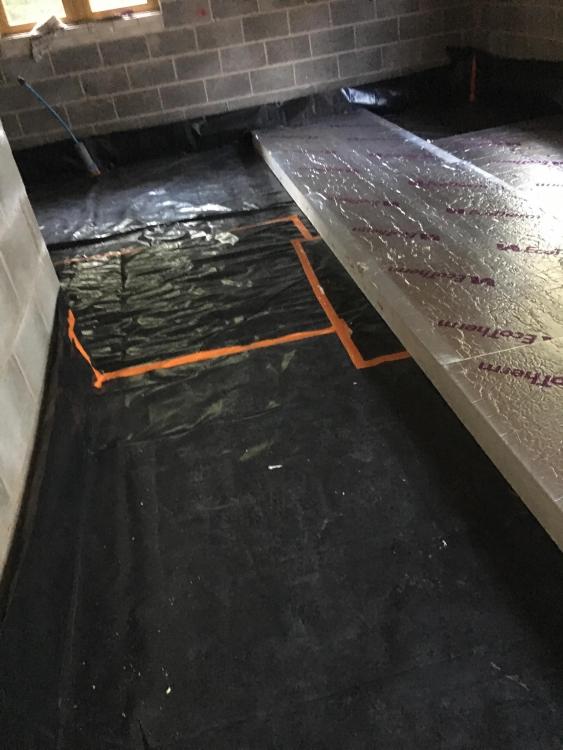
I don't see the point. The thermafloor is easy to put down and by putting a polythene sheet above the insulation your stopping the screed flowing between the joints in the insulation (if any exist) which would create a thermal bridge. It would want to be incredibly poor workmanship or a very complex shape with an uneven sub floor to justify the thermal bead screed I think. What you could do is increase the thermafloor insulation to 150mm and use a 75mm concrete screed. This would give you an even better u-value while still providing a decent 75mm thick slab for the underfloor heating pipes.1 point
-
In my, Jack's and Jeremy's slabs we have 100mm of concrete directly poured in a single pour slab with no covering screed (as the pour itself is power floated flat). The UFH piping is embedded in it. The slab also has 200 mm box cross-bracing ribs and 300ml (in my case) ring beams and centre beams. The concrete itself acts as a thermal store and is a key part of ensuring the thermal stability of the house. My peak input into 70m² of slab is 3kW, and I rely on the mass of the slab to smooth the transfer into the environment. I discuss this in more detail in my blog.1 point
-
Was up West Malling ( Laybourne? ) a while back fitting my B+SiL's bathroom. This one belongs to your builder. Maybe he laid the shat that I've having to deal with here I just cannot fathom out how they couldn't lay a bloody liquid screed level . It levels itself for crying out loud!!!!1 point
-
The pressure differentials here would just see mains water squirting out . If air is getting in that way il donate my next donut. The reason it takes forever to get the air out is because most folk foolishly try and fill / bleed all the loops at the same time with the manifolds on . That means the air gets to the manifold, can't be ejected quick enough through a tiny bleed point, so guess where it goes? Back into ALL the loops and round and round we go. To fill / bleed UFH loops you simply connect a hose from the mains to one manifold drain point, and then another hose from the other manifold drain point going to a drain and then purge each loop one at a time. Takes literally seconds that way. Just close the manual actuator caps that comes on each one, ( factory fitted usually ), leaving the first one open. Run the hose into the one loop and go watch the end of the other hose. By the time you get to it you'll have probably already purged 100% of the air out. Repeat closing / opening accordingly. A 10 port manifold should be bled in 15-20 mins max. Shut all the drain taps, replace the blank covers provided and open the automatic air vent that's provided and go get some beer. Bingo bango.1 point
-
!!!!!! You little old charmer you. ?0 points
-
Yeh an SDS drill being used by an electrician.....0 points


This leaderboard is set to London/GMT+01:00