
Leaderboard


Popular Content
Showing content with the highest reputation on 01/11/20 in all areas
-
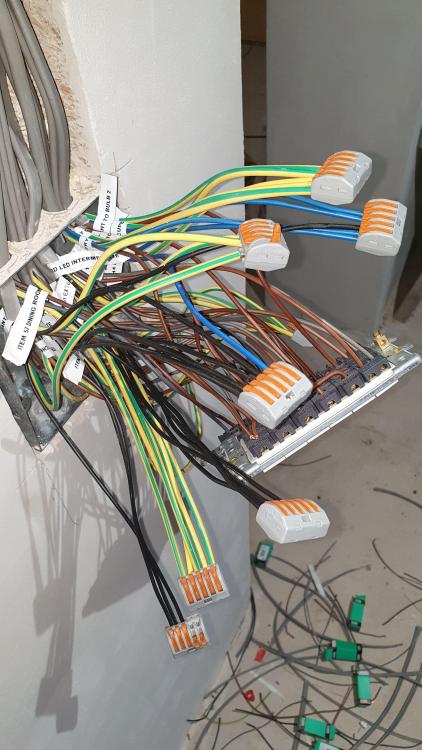
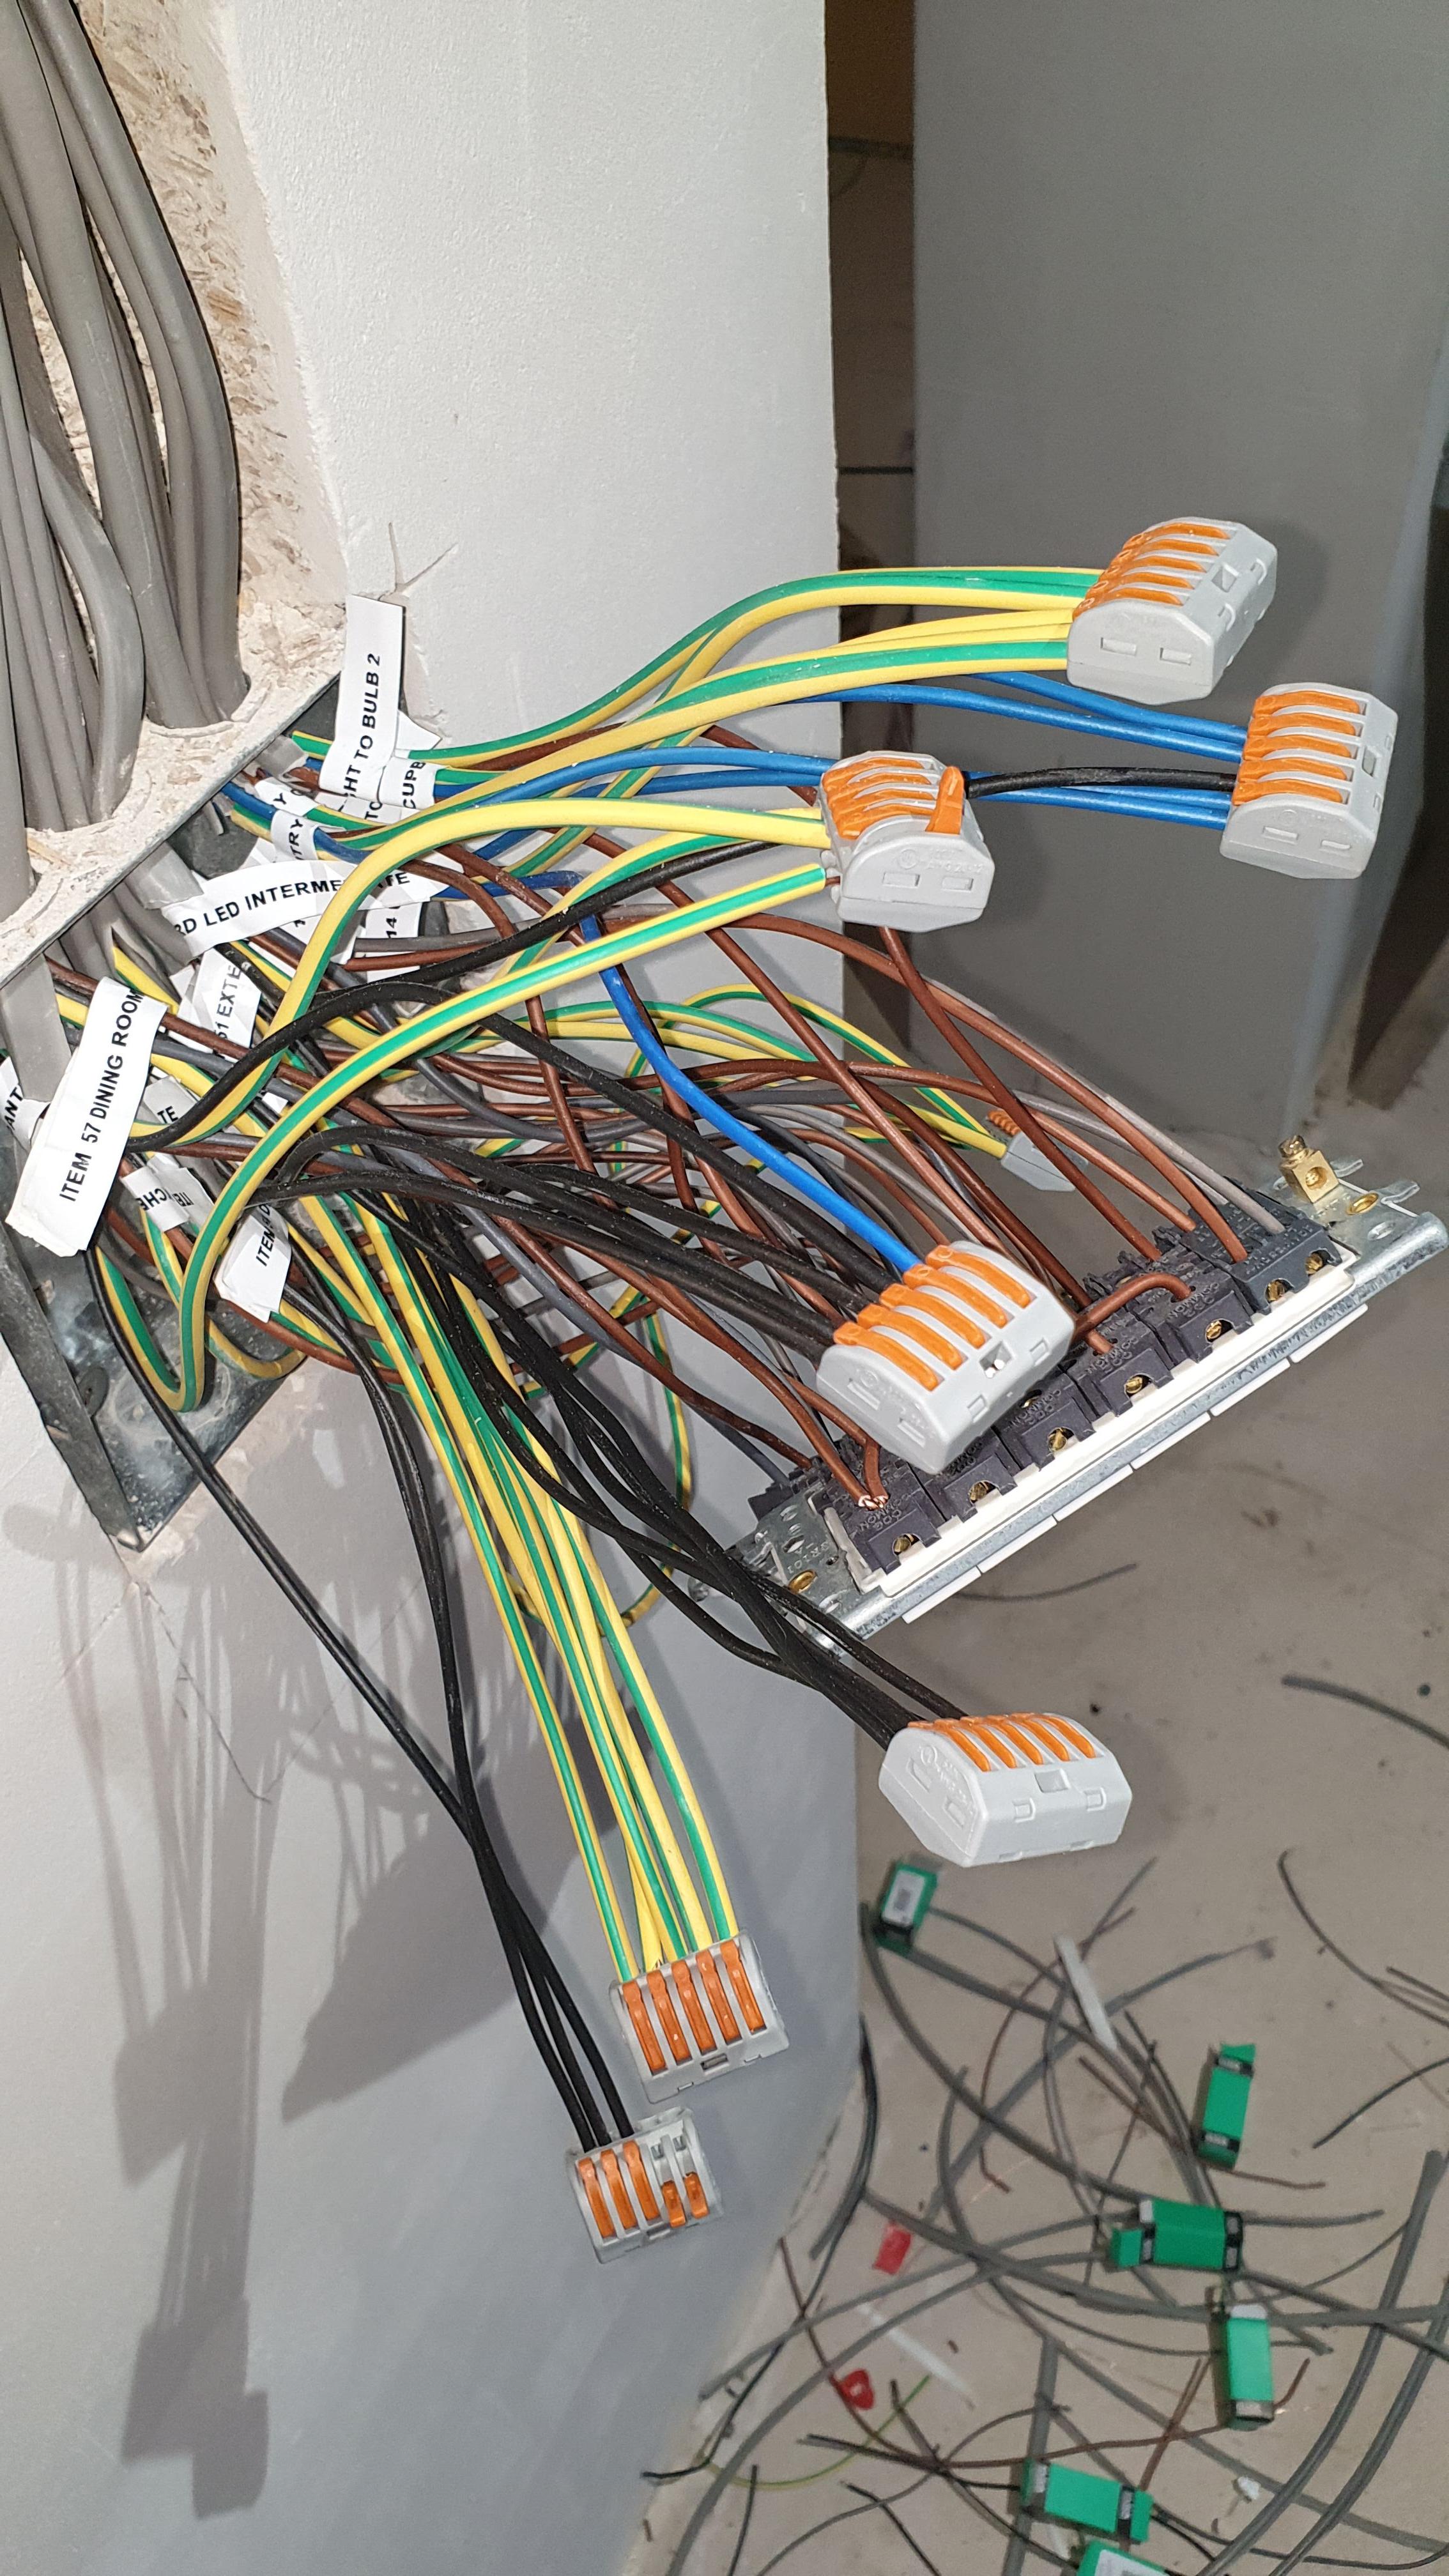
My brilliant stepson called me over today to show me how he was getting on. Here ya go : it's just a little thing .... but massive to me A humble GU10 working on mains electricity for the very first time in Salamander Cottage. Another milestone. There was this nest of spaghetti which makes it possible to switch the lights from three places and this set of intermediate switches ... Quite how sparkies 'see' it all, I have no idea. I could not be more pleased. So thanks @ProDave for telling me about Scolmore Click Mode and for all the support. Had it been up to me there would have been the mandatory 3 gang switch at the door. And that's about all. A small beer tonight methinks. Just to mark the passing of another milestone.

.thumb.jpg.3b6b15d3106e827438eb5379ca45d9f1.jpg) 5 points
5 points -
There are smaller lever Wagos available too - the 221 series: Same rating as the 222's, and I prefer the transparent case for reassurance of correct insertion. Incidentally, re the push connectors they are releasable/reusable - you just twist the wire whilst pulling.
 2 points
 -
I think that would be a terrible idea. Create problems down the line. I'd be looking to either chop out and replace with similar reclaim of you really want to or accept it for what it is. Character!2 points
-
After a summer spent cruising the canals we arrived back on site with a little trepidation and a lot of enthusiasm. When we left the build we had just got the scaffold down and had a lockable water tight shell,. Well almost water tight, we still have two leaks. One where our roof lights join and another on a roof seam that abuts the wall on the house gable. Fortunately neither were bad enough to have caused any damage over what has been a pretty dry summer. The internals of our ICF build required no supporting walls making it a nice big unencumbered space to start installing the MVHR, electrics and plumbing. We had decided to get the MVHR installed first as the pipes are the largest and least flexible. The system design for our MVHR had been provided by Blaugberg making it a fairly straight forward install. Of course the design hadn’t taken into account joist spacing or any other details of the construction. Taking the joists into account etc we ended up mounting the two manifolds next to the MVHR unit raised for the floor to allow access. Getting the MVHR into position involved getting a bulky 80KG box to the roof area of the house, a task made pretty simple with the aid of an electric winch. With the manifolds raised off the floor and two of us feeding the pipes through the aero joist webbing we managed to get all the pipes in with minimal loss of skin. The manifolds have large removable panels that allow access to install flow constrictors. Our intent is to get the MVHR setup as soon as we can to help keep heat in the house and to get the humidity down from the 65-70 percent it’s currently at. One other job we wanted to get done early was an initial air tightness test. Although we are not building for passive certification we want to make sure we are as close to the 0.6 passive house level. We needed to get the roof VCL installed, in our case this is just a plastic membrane. Getting the membrane in place where we have vaulted ceilings was time consuming as it involved step ladder, a ladder and staging to get to the top of 5M high. With the membrane in place we called in a local firm to do the air test. With the fan drawing air into the house detecting leaks was straight forward as the air was much cooler outside than in. We had a few leaks virtually all at the junctions of the VCL with the roof purlins. The guy doing the test recommended trowelling mastic over the spray foam which had been used to seal the junction of the purlins and the ICF. Having identified the areas we needed to fix we got on with the air test proper. As the test proceeded restrictor rings were fitted to the fan until the required air pressure was stable. The initial figures are excellent down at 1.08 ARCH which given we have a bare structure and know leaks around the purlins mean we should be able to meet the 0.6 ARCH. Interesting form me was the degree to which the fan got restricted, you can see from the photo that just a 15mm ring was left exposed. For a normal build this would be the case for a small single bedroom flat. With the MVHR tubes in place we set to installing the water pipes. It’s surprising just how much having to make decisions about tap positions can exercise your patience. We had opted to use a water softener and after a bit of searching around decided to use a Monarch Solo, a non electric water softener that gives ample flow rates for our house size. Compared to re-plumbing a house starting out from scratch made it a simple and quick. Again having two people to feed the pipes makes the job a lot simpler and saves shaving the pipes through the ceiling webbing. We will pressure test all the water circuits prior to do any plasterboarding. Along side the water pipe installation we also installed the electrical ring mains. With ICF it’s important that the wires don’t come into contact with the polystyrene as it leaches the plasticiser from the cable insulation making it brittle over time. Lighting rings will follow. We have a fairly good idea of where we want lights but it’s difficult to be sure so we plan to put in a lot of redundancy so we can change lighting as required once living in the space. We have also installed stud walls for the two bedrooms and bathrooms. The seemingly huge space soon shrinks! Having said that the rooms are generous. In the entrance hall one wall has a curved corner, a little more fiddly to construct but well worth the effort making the hall/stair area look really good.1 point
-
Do not render on insulation on timber frame. Render should be on carrier board with vent cavity behind. See Bldg Regs and any good document on TF construction (see STA or TRADA guidelines). Wood fibre manufacturers guidance should not be relied on. Some did have BBA certs covering direct render but these all appear to have been withdrawn.1 point
-
Yes, they're got their own carriers.1 point
-
U value 0.14 overall thickness 360mm Inside to out: plaster skim 12.5mm plasterboard 25mm battened service void Air tight membrane 2 layers 12mm OSB (racking layer) 195mm timber frame filled with Frametherm 35 insulation 100mm Pavatex wood fibre board Baumit thin coat render system.1 point
-
Another vote for some quality repointing. Get a quote from a proper craftsman whose work you have seen. The plastic windows don't look good. If you really want to lose the mock Tudor look you could just re-render. White paint may be better. If you do clay tile hanging you would be best to have a different shade to the brickwork - perhaps redder.1 point
-
With PIR in a timber frame, a 50mm service cavity and a thin render on carrier board U<= 0.15 (PH max) can be achieved at 350-375mm1 point
-
The safest way with stuff like that is don't pay with paypal, pay cash on collection. I bough my digger from ebay, the other end of the market, a very old 3t Komatsu that I won for £2500. I corresponded with the seller, agreed a collection date, organised transport for it. Turned up a bit before the transport was due, checked it over handed him the cash and loaded it onto the truck and followed it home.1 point
-
There is a physical limit. How crazy do you want to get? I think Aerogel has the lowest thermal conductivity known to man so wall made only of that stuff would be the thinnest possible. However its horribly expensive not readily available and wouldn't carry much load. Its also translucent. The next best material is PIR (polyisocyanurate) insulation which is a lot cheaper and more widely available then Aerogel. Some form of timber frame infilled and covered with PIR is probably going to give the best U value for minimum thickness. The outside could be rendered, clad with brick slips or battens and some form of rain screen/siding. One issue is the difficult of cutting and fitting PIR tightly between a timber frame. Poor workmanship can ruin a good theory. Some form of compressible rockwool batt between the frame might work better because its easier to get right even though the U-value is theoretically worse than PIR. A combination of Rockwool between and PIR outside would be reasonable. A layer of plywood or OSB would probably be needed to prevent racking. You might also look at a SIP panel construction.1 point
-
Well done bud, another step forward talking of steps, do yourself a favour and chuck those shit aluminium things in the skip and go and get a trade pair before you have an accident well done again, you are putting me under pressure.1 point
-
Fine looking house with character. I honestly think slips would ruin it. Money would be much better spent on a car or nice holiday imo. If I was buying that house. I’d be worried the cladding was hiding something if it was present. I agree repointing is a much, much better option.1 point
-
Although the pump may be typically about 1KW or even more, it only runs when the pump chamber reaches a certain height and empties it. Most of the time the pump is not running, so I would not get bothered about the running costs at all. We ruled out (did not even oficcially investigate) a soakaway in the field behind us, becaue it is a low point in the field and rainwater sits in ponds in heavy rain so it would be pretty certain the water table is simply too high. If you can engineer the works needed to discharge to a watercourse you eliminate a whole host of potential problems and maintenance issues.1 point
-
I'd suggest some decent repointing might go a long way to a smarter appearance. But make sure you get someone skilled, who can do a neat job, unlike what you have now. There is a technique called tuck pointing, which is a highly skilled restoration method - the narrow pinstripes may not be quite what you need, but someone who can tuck point may have the skill to improve the appearance of your place. www.youtube.com/watch?v=TyNY_MU62iA www.youtube.com/watch?v=A4uNGxkTlJY (warning: background music; use mute button) Note that in America, 'tuck pointing' seems to mean ordinary pointing, leading to much internet confusion.1 point
-
Sounds like a good solution for both of you. That is completely different from someone just doing a very dodgy DIY job and then getting a ticket for it which is all too common. Any sparks will tell you that sorting out DIY bodges is not only common but a PITA and often expensive too.1 point
-
everyone has thier own idea on what looks right - all i would say is address all other issues first - brick slips or clading to tudor is comestic1 point
-
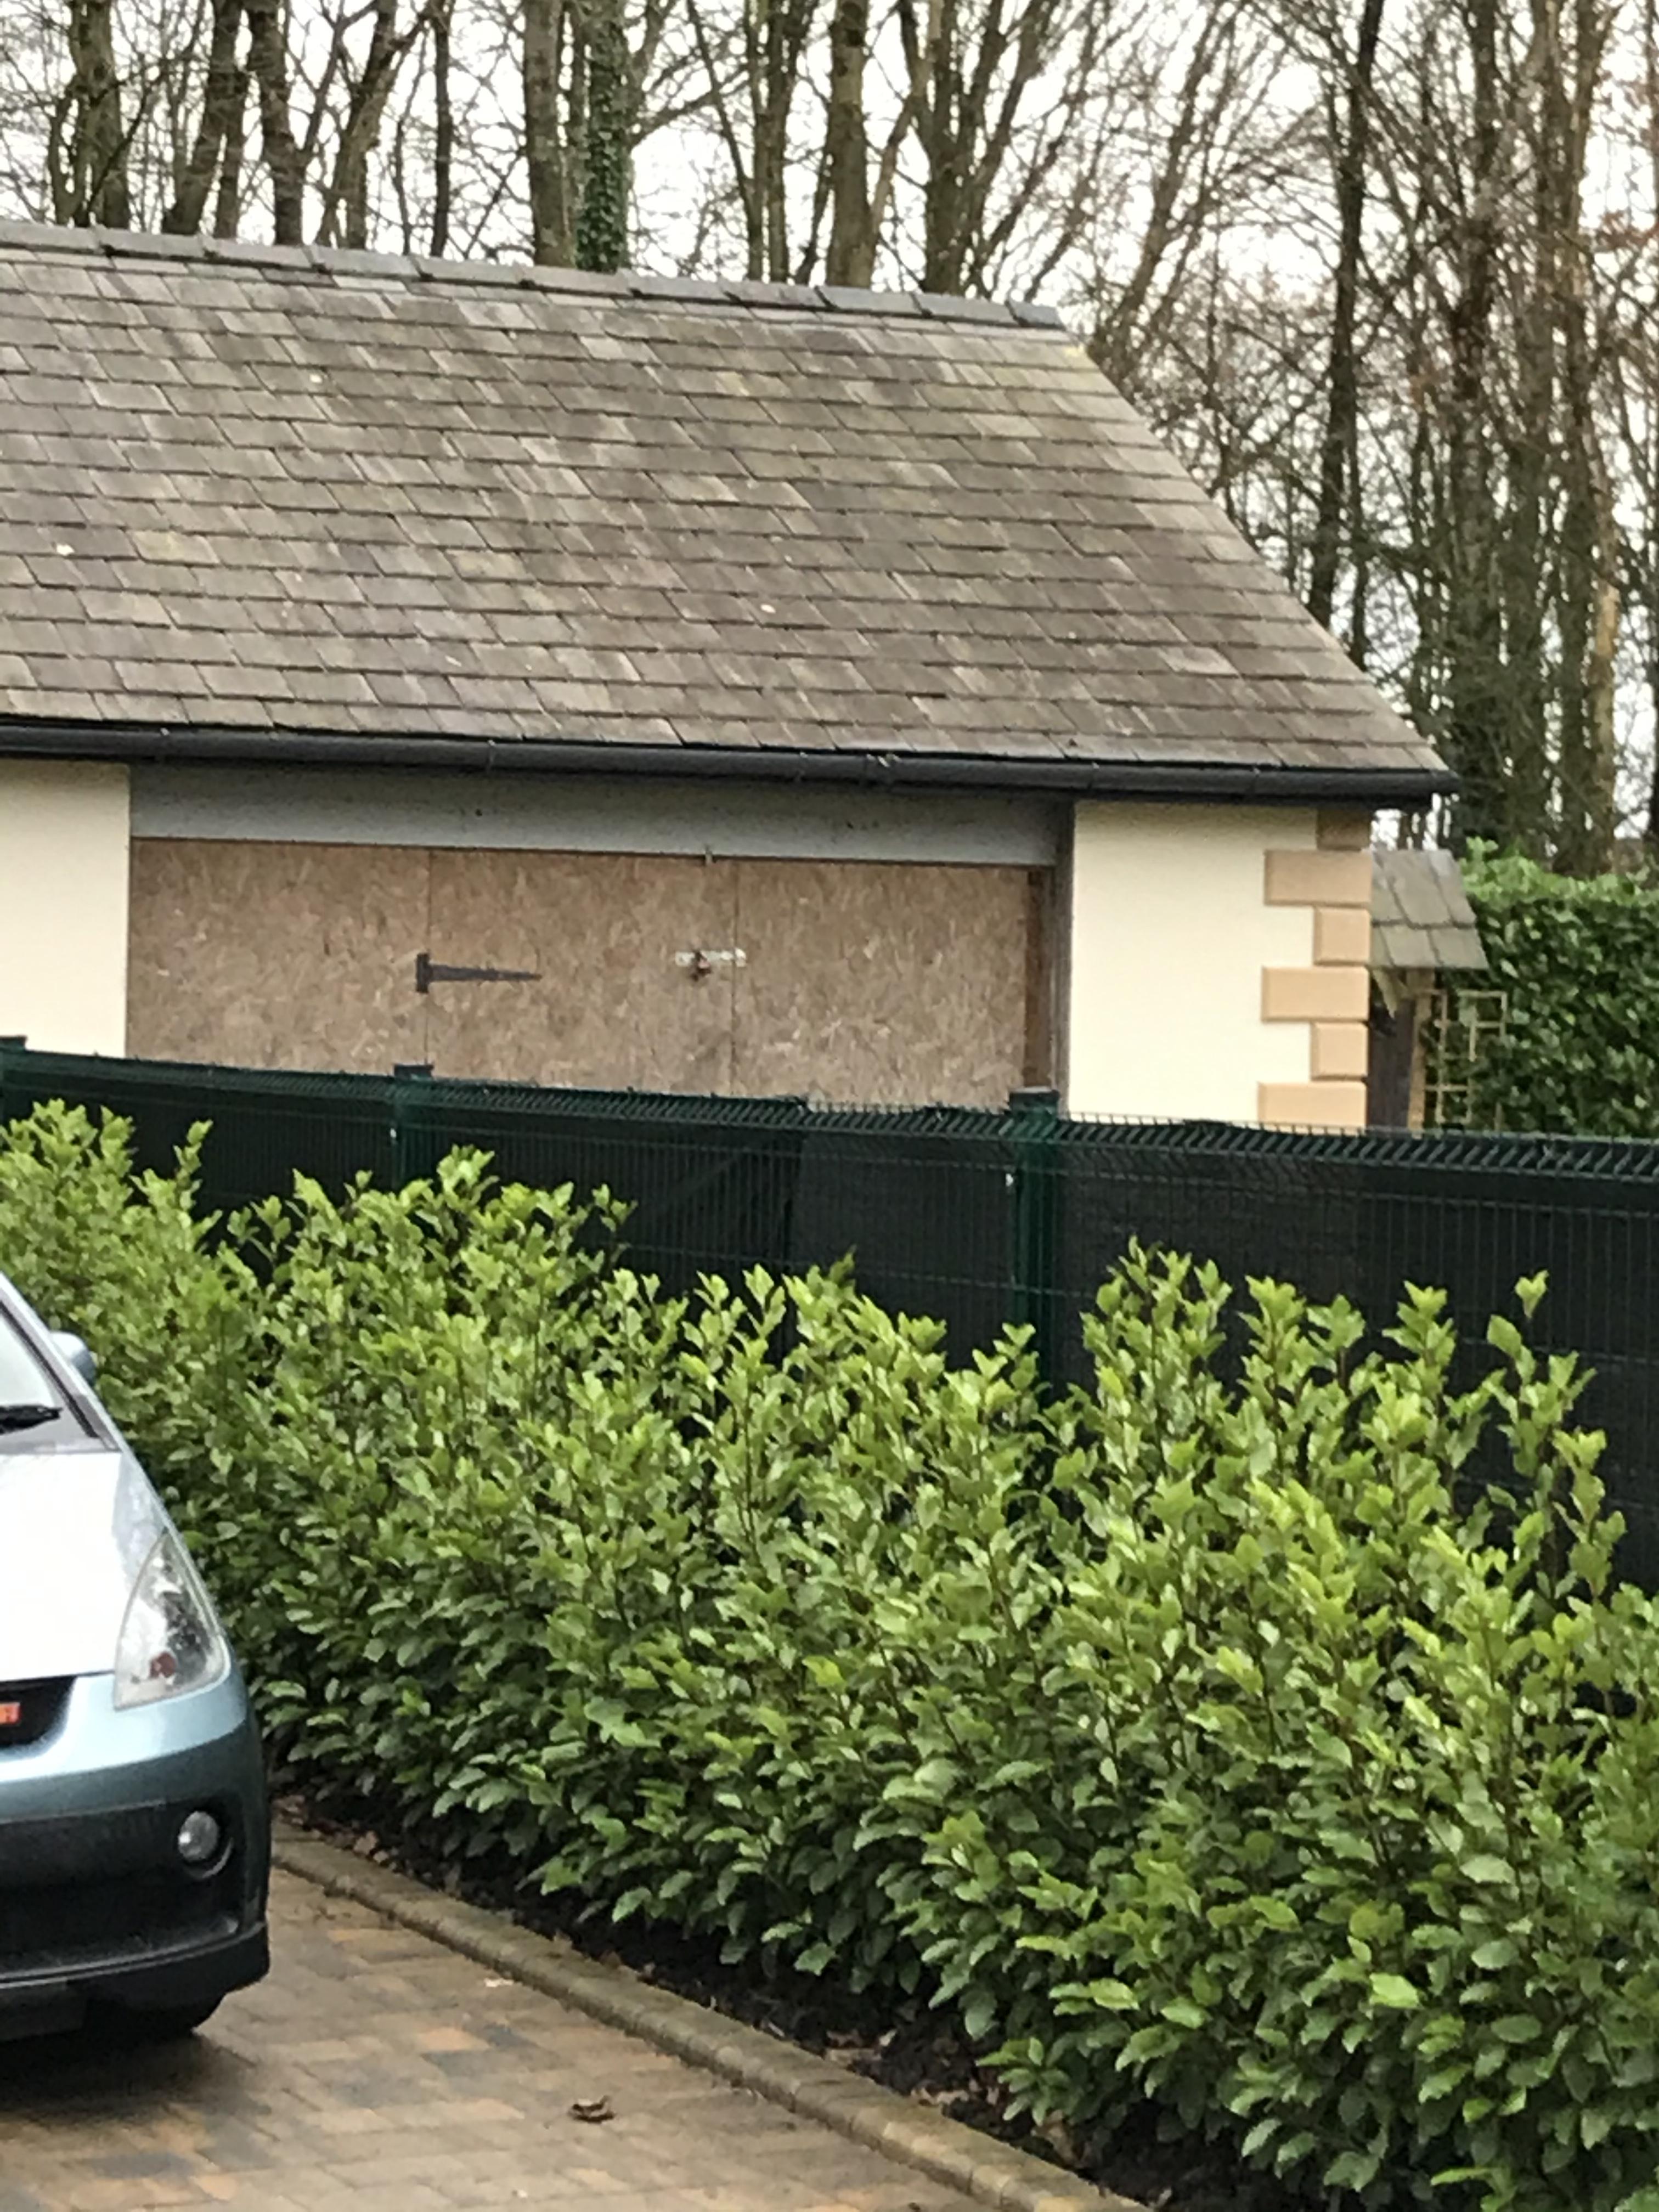
Our neighbour who sold us the land hounded us to u red gently get his garage built before we started the build 3 years on he still hasn’t removed the temporary osb door I reckon it will still be in use in another three years
 1 point
 -
If I get time, I'll photograph some of our OSB3 that has been outside for 4 years : re-used on all sorts of jobs a good few times, therefore frayed at the edges, but fine still1 point
-
Our frame went up in October 2013, and the roofing still wasn't on by Christmas. That winter was dreadful, with the worst flooding seen here in over 100 years. The frame got pretty wet, but all was fine when it dried out. The only thing I should have done was wait another month or so in the spring before getting the plasterboard fitted and skimmed, as the house was still drying out and we had some minor cracking in the plaster around the windows.1 point
-
I would not worry. All quite normal I have had OSB covering the window apertures of our sun room for 4 years now with nothing covering it. It has swelled at the edges and will be scrap when it is finally removed, but apart from the swollen edges is still pretty sound,1 point
-
All sounds like fair game for studding on the log burner. I'll look out for screws and nails. There's a 20t machine here with selector grab which has loaded one wood skip with wood from an old barn I wouldn't want to burn already. I'm paying a flat rate for the 40yd bin and suspect I over estimated the weight it will be when full.1 point
-
Where I grew up and I still live minutes away1 point
-
My mother and father came over from Ireland in the late 1950's and settled in Cricklewood, North West London. They did the same as all the other irish settlers in the area. Painted all the brickwork bright Red, and then painted all the morter lines in black. ? There were lots of houses in the area done the same.?? The days before York stone cladding.1 point
-
I would think that would be a major PITA, every reveal or stop area up against windows and doors will be a real hash up to get it right, window cills would need replacing. The front elevation you show is originally how they where built, nice soft red brick front cheaper fletton brick at the side.1 point
-
We will be having a pantry next to our kitchen area in an open plan living room. It will house 2 compact dishwashers, a small sink, freezer and additional storage. Hopefully it will mean that the main room is quieter and less cluttered.1 point
-
I thought the same, so it being work ideal for me. I asked a sparky if I could do this on my build and he was reluctant, saying he wanted the whole job.1 point
-
These are popular in Austrailia from plans I've seen online. Rather than being a second kitchen, it's more of a utility sized (or smaller) area with both storage and some worktop, decoupled from the ktichen which is typically open-plan. The addition on a sink means they can be good for food prep too if required, and not just for hiding all the dirty stuff. We saw some Metricon (australian builder) layouts with them in and really like the idea, especially the layouts that have a butlers pantry between the kitchen and utility and stole the idea for our house too. We have slightly less storage cupboards in the kitchen because of this, and like @Dreadnaught we plan to put the freezer in here also, with frezzer and two full height 600mm storage units on one side and a counter-top with storage below on the other side. We've not starting building yet, but this is where we got the idea from: There is a walkthrough VR of this design here: https://www.metricon.com.au/new-home-designs/qld/riviera?category=virtualtours&photo=riviera&floorplan=54 The metricon website also have plenty of other, more modest designs, with this concept too. This is our intereptration of it (clear copy! bit smaller I think though, and with the addition of pocket doors)


 1 point
 -
Kudos to you @pocster for finding someone willing to work with you on the install, it seems like a sensible and pragmatic approach you've got going on there with photographic evidence and such. Pulling cables and doing back boxes is donkey work at the end of the day (no offence intended) so provided you're in agreement with the sparky theres no reason they can't be off earning elsewhere whilst you do the more manual work. (Usual disclaimers apply, if unsure seek professional assistance, know your limits, follow the regs, and please please don't forget grommets on metal back boxes!! etc blah blah)1 point
-
I'm planning one for my forthcoming bungalow. A pantry of storage shelves which will also contain the (inevitably noisy) freezer and so keep it out of the open plan kitchen/living/dining room. In the kitchen proper I will only have an under counter fridge (no freezer and so quieter). The pantry will also have worktops and a (second) sink.1 point
-
Cut the end off the ash pan then it won't get locked.1 point
-
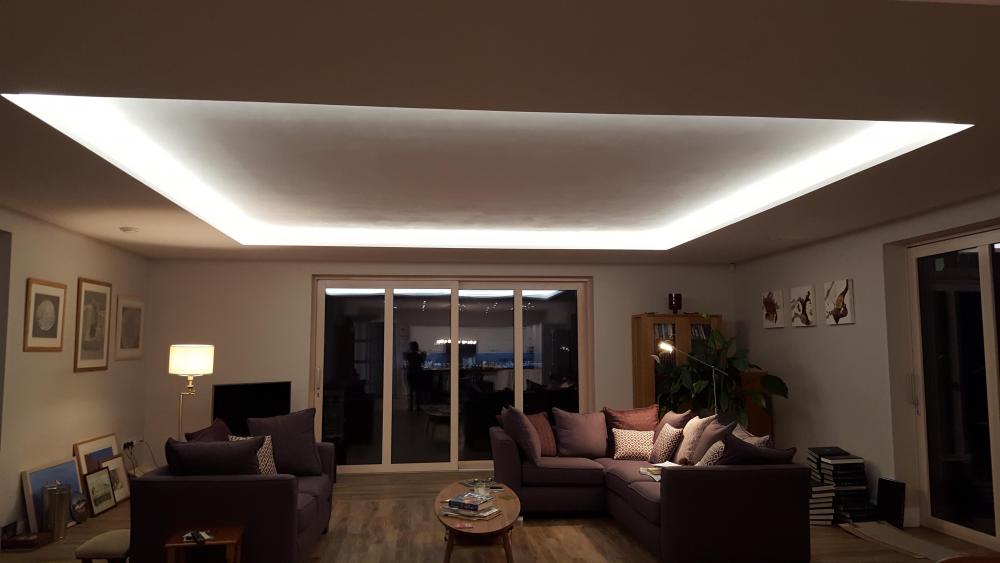
FWIW, this is how ours looks now.
 1 point
 -
Our sole plate is a single 300mm Steico I-beam which has OSB3 web strengtheners bonded underneath at intervals where the plate is bolted to the slab. The 300mm Steico I-beam studs are nailed to the sole plate.1 point
-
If it helps, as an LPA planner who works in enforcement I would advise you that if you stray from your approved plans in any way then you are exposing yourself to risk. Even if the chances are that nothing ever comes from it, you need to be aware that the risk exists. There are very few projects of any type which don't evolve at all between the planning application stage and finishing on site, and that's the simple reality. At the same time, the value of putting a set of drawings in when seeking permission is reduced if we don't then stick to those plans when we build, increasingly so the greater the differences between what we build and what we asked for permission to build. The idea that you should sweep all the minor changes up into one accurate plan is correct, but as best you can you should do that before you build, just in case the Council don't approve those changes.1 point
-
I was following then bid on a 2018taceuchi tb280 digger did not think i would get it as I was being tight with bids -- anyway i stopped at 9K--it went on to 12 k--still sounded cheap auction ended then I get a message from seller saying winning bid was from polland and it would be 4 weeks before he could pay "would I like it?" How much says me £8750 says seller please send me chassis number so I can check its clear of finance no suprise thats the last i heard from them . and he had 100sales +100% rating WATCH OUT BOYS plenty of scammers out there0 points
-
Ha ha ive just been working on a job An electrician brought two pairs of shiny yellow steps on to the site The site manager led them down and ordered the tele handler driver to run over them Hilarious He reckons he had only got them out of his van so he could get his tools out0 points

.jpg.3406fe88ddd91a451dc587545170b6a6.jpg)


This leaderboard is set to London/GMT+01:00