
Leaderboard


Popular Content
Showing content with the highest reputation on 11/01/19 in all areas
-
A little update on this: The Wayleave was eventually found a couple of days before we exchanged which stated a 6-month termination period from either party. After a quick visit from a nice chap at UKPN, they've agreed to underground the cables entirely at their own cost along the boundary in exchange for an easement - which is fair enough - so a good outcome all told.5 points
-
I'm posting this as a single blog entry for a number of reasons. One as it's the biggest bit of work we've done without professional help. Two as sheet roofing seems to be a topic of interest on BH and three because this stuff was hard going, with minimal information available on fitting guidance, so hopefully this might help others. We are using eternit profile 6 sheet roofing. It is fibre cement board and we initially chose it due to some perceived benefits over wriggly tin (principally acoustics, condensation management and durability). Cost wise it seems to come out roughly similar (from what I could tell). One of the biggest differences is in weight. Each cement board sheet is in the order of 55kg. All 54 were manhandled on to the scaffolding, and the roof. Without doubt this is the biggest downside and I'd strongly recommend anyone considering using this stuff to be sure they have a way of moving it safely. Another challenging aspect is the sheet thickness. At around 7mm thick, this means potentially 28mm thickness where 4 sheets overlap. To avoid this, the sheets are mitred, which is a pain to do accurately on a curved sheet. The profiled wavelength and amplitude is greater than on most metal sheeting which when combined with the sheet thickness makes neat fitting around velux quite hard, irrespective of the pre-planning we did. A profile 3 sheet is available which is more similar to traditional metal sheeting. This probably sounds highly negative, but we're pretty pleased with how it looks. We've had a few downpours recently and it's looking quite solid. Still a couple of small bits to complete, but nearly done. As to whether I'd use it again, jury's still out... While it's still fresh in my mind, the other things I'll note are: -there is a right and wrong way to overlap sheets which is not obvious in the eternit guidance. It's not crucial for weatherproofness, but it can make the roof appear bumpy if not done correctly. -eternit helpline was not hugely helpful, but the local reps were definitely worth speaking to and very useful. Anyway, the photos: Above shows the sheet overlaps, with the mitre clearly visible. When the top right sheet is added, this disappears. Above shows the sheet overlap in section, but it also helps illustrates the sheet thickness. Below are a couple of more general shots of the finished product.4 points
-
well if that’s all you can agree to then I am very obviously wasting your time so I will refrain from trying to help / advise and will just observe Quite literally unbelievable, what a very poor interpretation of my efforts to offer guidance. good luck with the build. signing of. regards cpd4 points
-
This thread is a joke. I'll do my best to help anybody, but Zoot is on another level. No advice taken, and round and round in circles. The answer is simple, but he just won't do it. Anybody other than the big boss who comes to site is told to go away. Phone call to big boss to say you want to have an on-site meeting with him. Meeting with big boss. Simple questions written down that you want answers too. What will be the difference between my existing finish floor level and the finish floor level on the ground floor of my extension ? What will the height be between my extension finish floor, and the ceiling above ? What will be the height of the first floor space from finished floor to ceiling. I am having a door cut in, (already there) at first floor level. Will this door be full height ? It's not hard or unreasonable to seek answers to the above questions directly from the person who you are either paying or going to be paying. You won't do it..........instead you will carry on writing pages, and pages, and pages. I bet you a fiver, I'm right. You have been man enough to do a drawing, commission a builder. SO HAVE THE MEETING.3 points
-
Or leave well alone, i've said this before - you are not capable of managing this job (or whatever it is you're trying to do, I'm not clear). You have no idea what you are doing, and I personally think you are taking advantage of the good nature of people on here. You prattle on about issues with little context, take up time of members, create issues out of nothing but worst if all, don't bother your backside do do your own homework. Asking how thick screed should be? Really? Surprised when someone says 70mm? Please. Why does it even matter? Its your builders job, not yours. You seem to have taken on a task of second guessing everything your builder is doing. I'm amazed they haven't walked off your site. Your drawings are pretty much kids sketches and you wonder why things appear not clear? Your comment about 'pulling the job/lawyers' - either I've misunderstood the joke or you're taking the micky.3 points
-
To adapt the words of the song "Some girls do, some girls don't ", some days the grease gun lets me, and some days it won't. Today, it won't. Pump grease that is. The number of times I have used a grease gun successfully is far outweighed by the slippery-fingered-fulminating-damned-awful-annoyance-ridden efforts at loading and getting any out of the end of the connecting hose. 'S Friday innit. Off to the gym (to watch a load of stick insects commune with their iPhones) and then the pub. Sod it.2 points
-
No need to go back to the wood if it is stuck okay. Make sure you get rid of all those horrible little spiky bits, they may look small, but can cause s similar problem. A sanding discs on an angle grinder is the quick way to remove GRP. Don't worry about the dust, you are going to itch until you get in a shower or bath, for the next 30 years, at least.2 points
-
If you haven’t paid for it, who gives a shit, if it’s wrong and you are convinced you are right, tell them to pull it down and take the shit away if you are 100% convinced you are right stop work immediately and throw them off the site.2 points
-
Not quite. The cause of the cost over run was initially the nearly a year of delay caused by the borehole problems, so no water on site. That meant we paid out a fair bit more of the planned budget in finance cost, which then meant me doing more of the work myself to save labour cost, and that in turn took a lot longer which meant spending even more on finance. It got to the point towards the end where the only materials we could afford were from whatever I saved from my pension each month. Someone else has mentioned that cash flow is critical, and it really was in our case. We had an asset (our old house) plus some locked up savings we couldn't get at, plus the VAT that we knew we'd get back at the end (about £10k or so), but they aren't much help when you're trying to get the house finished. As soon as we were finished and had the VAT back, together with having sold our old house, we were fine, much lower monthly outgoings and our savings pot replenished.2 points
-
When doing bare root we tend to have 15/20 spares and they go into a corner to grow on. If there is a gap in the hedge a year later, one or two of these get transplanted into the gap - same batch so they tend to look and be the same size as the rest1 point
-
Time for another update. Most of our work this month has been focused upon finalising the kitchen design, stair, stove etc. Tangible work on the house has consisted of the taping and filling and fitting the last bit of ducting. Not terribly exciting, but it's all progress. Here are some photos. Next up I need to resolve an ongoing treatment tank problem which will be covered in a separate entry. We hope to start internal paint work in the next few week pr so.1 point
-
The view from those three Velux windows are stunning.1 point
-
There's Hep2O here I put in doing some mods (like upstairs CH) when we bought the place 20 years ago. Never had an issue.1 point
-
That looks like a Philmac stopcock. This brand has caused me similar anguish and like you I found the loose fit a problem, maybe Philmacs are only suitable for mutant plumbers with 4 arms. As it happens I have yet another slow leak in my shed at a Philmac connector and find Philmac connection collars have to be cranked down to the thread endstop before they stop leaking. A plumbing trade old-hand explained they were originally designed to accommodate two common pipe sizes in use decades ago. I suspect that original USP has become a liability today.1 point
-
Just measure the depth in the fitting from the step where the pipe/insert sits to the outer face of the fitting with the collar and grip ring off and use that distance to mark the pipe (or push the pipe in and mark it). Slip the collar and grip ring up the pipe, making sure the grip ring doesn't score the pipe (I like to hold them open slightly when sliding them on). Push the pipe into the fitting until it's fully home, then slip the grip ring and collar down and tighten. Doing it this way avoids the risk of scratching the seal area on the pipe by pushing it through the grip ring when it may be a bit tight, and also means the grip ring ends up being abutted to the O ring retaining flange, so when the collar is tightened the O ring gets compressed on to the pipe slightly before that flange bottoms out on the end of the fitting.1 point
-
I wanted to follow that advice but since it is not possible to predict many turns before the collar is fully tight I was not sure where to put the mark. Do you push the pipe fully home to the mark with the collar disconnected further down the pipe?1 point
-
Pipestock: A word of warning, their much publicized next day delivery does not apply to Plasson connectors because they do not keep Plasson stock which means any order with Plasson bits will go to "back order" and take a few days longer. Like the OP @pocsterI found Philmac connectors difficult to use and deeply regret allowing Pipestock to substitute Philmac connectors when I ordered Plassons.1 point
-
@KimBI haven't heard of them and I work in the industry. However, that doesn't mean much in the grand scheme of things as I tend to work on larger scale flood risk jobs. If you can get some recommendations, all the better. As with all professional services, the key aspect is what you are getting for your money. Are you paying them simply to get an independent rubber stamp of something you already know? Or are they potentially going to inform your design? Flood risk assessments can sometimes give clients an answer they don't want, but a good consultant will be able to help steer you through any problems. A bad one will just write a report assessing the level of risk and leave it up to you as to what to do next. The single biggest area of disagreement is usually when a client expects a flood risk assessment to give a clean bill of health and it doesn't do that. If it were me, I'd want to know the scope of their work, will it completely deal with planning requirements, might you need to do any more complicated assessment if this one turns up something concerning etc...?1 point
-
Garage is fine. You'll need fire sleeves on duct through wall into house. Put distribution boxes in house side. Consider paying a co like bpc for a design.that will hero a lot1 point
-
I'm good at latching on to nipples ; my gun needs a small nozzle to fit into the recessed nipples - that's not the problem. @Onoff, Thanks for the clear set of instructions. I will have a try on Monday. This weekend is OFFFFFFFski. Lie in. Breakfast in bed. Gym. Gym swim swim. Sleep sleep. Eat eat. Doze Rugby.1 point
-
I would want to see a vertical DPC where the frame abuts the existing wall.1 point
-
In our experience (full footprint basement) get your chosen SE to spec what they need from the GI report and then take that brief to a number of GI companies to get quotes. You may want to wait until you have the PP in hand as there could be conditions on contamination, etc.. - we had these and folded in the necessary tests into the brief. Also needed soil WACS classification for the basement contractor so they could price muck away disposal. We had a mix of dynamic probing (10m) and cores (5m) - our build up is chalk / river gravel and clay - typical for the Thames Valley. The big concern here are 'solution features' aka cavities in the chalk layer, so the survey was designed around that. A few of the cores were sleeved and capped to monitor for gas and ground water. GI usually also does a historic survey to identify old workings or sources of contamination. Our GI was a bit of a car crash as the original supervising engineer mislocated some probes and drew the wrong conclusions (made ground = piling & £££). The crew had to come back (at a discounted rate) and do it again with a more positive outcome (no made ground, no piles). I also found out, after the fact, that the GI should zero rate any disruptive or tool based parts of the work (digging, probing etc) whereas the walkover and desk work (reports etc) attract standard VAT. You can access the national borehole database and see if there is anything near you - this is really just for guidance as local conditions can always vary. https://www.bgs.ac.uk/data/boreholescans/home.html1 point
-
kW is a unit of power, so the measure of the maximum output at any instant that the system can deliver. With generation systems it's common to add a "p" as a suffix to indicate that this is the peak power, not the average power, or the power on a dull day. The kWp figure is the absolute maximum that the panels are likely to be able to deliver under their rated conditions. kWh is a unit of energy, so power delivered over 1 hour. Power is generally a less useful way of describing a system, in much the same way as it can be for cars. Using the car analogy, the maximum amount of power available determines how fast the car will go, yet most of the time cars are driven at speeds that are much lower, so many might be more interested in how much energy they use, i.e. how many miles per gallon can the car achieve. DNOs are mainly interested in the maximum power that a system can deliver to their network, though, as all they are bothered about is whether their cables, transformers etc are able to accept the maximum generated power whilst staying within limits for the local grid voltage. The maximum "bang for the buck" isn't determined by the peak power, but by the amount of energy generated over the course of a year. Matching the positioning of the panels to the times when the house uses most energy may give a better outcome, in terms of value for money, than having a system that generates more peak power, but over a narrower window during the day.1 point
-
best thing I ever did was get a clip-on coupler.1 point
-
That's an impressively sized project. Pales mine into relative insignificance. Good work and very reassuring.1 point
-
Its not a Q of asking how he's going to achieve BRegs in the floor Joe: unless I ask if we can go 50mm, he'll just put in default 100mm. He understands my H predicament alot more fully after today's comprehensive goings-over on this issue which he was very accomodating about in fact, didn't once get annoyed with my many Q's & obvious high stress on the subject (in both rooms' H now, now I know final figs of 2.1m lower & 2.2m upper), so is asking our BCO monday. Once I showed him how little we actually have to play with (if all figs correctly done, & gel with actual figs seen once hole knocked thru..) his eyebrows were raising & alot of very careful sums ensued.. then he wasn't laughing no more. I was dead-on with my concerns. we may well have got very cm-lucky, or, the TFrame Co did a superb job of calculating.. but more likely somewhat of a fluke has happened with the 3cm to spare sweat-on figure. Thanks. Top room walls all up, tops braced for wind over wknd. amazing how fast.1 point
-
Here’s one such option but it all comes down to what your buyer’s lender will accept. They all have different rules https://gcs-title.co.uk/instant-issue/policies-glance/building-standards/ list for England and Wales https://www.cml.org.uk/lenders-handbook/englandandwales/question-list/1913/1 point
-
Anything over 2m deep and you are into major risks to you or anyone you employ in the trenches, and you'll need to plan to avoid those risks. I would take a structural engineer's advice on how deep to take a soil sample from and be guided by them in the best approach. I expect a raft would be off the table as you need to take out 50% of the foundation depth, and that in the end piles plus ringbeam will be a good option.1 point
-
Welcome, @Mally Amazon - Homebuilders bible, read back to back, gives you a grounding in all areas. Check out the blogs here, all different. Pitfalls of a plot more suited to the Highlands, Local development plans, does the plot fall with in? Services, you need a plot in mind before you can even answer that. Electricity is the worse, don't assume any thing until you have quote from SSE Access roads can be expensive - if you obtain a large enough plot you might have access to 'rotten rock'. Avoid plots that have peaty ground or lots of bedrock. If you are buying a croft, this has loads of considerations in it's own right. Our build is a 1.5 timber frame on our croft on Skye.1 point
-
@Ferdinand It is still an area where i need to focus much more attention and properly do all the finance scenarios and calculations so we can see the impact. But loosely... Current house: £150k value, no mortgage. Flat: £90k mortgage (actual value £90k or less.....an unfortunate casualty of the 2008 recession. Originally bought for £120k) Total development cost: £400-420k Required finance to do self build: £300k. (not including any properties above) Hence, I was originally looking at staying in current home and taking a full self build mortgage for the full amount (£300k). It would look like this.. (pains me each time I see how much I have to give away! to finance people in fees). High level mortgage drawdown interest referenced above: (actually for a 12 mont period with 9 month build...) The interest payments would be halved here by moving back to flat but possibly negated by the fact we have to pay the flat mortgage (400/month) but at least those payments were paying off my mortgage) We only get 450/month for rent. Plus selling it would free up £150k and provide ready cash so we can head off any cash issues and not so reliant on mortgage companies. So yes - definitely worth mentioning thanks and an area I need to to do the hard and fats numbers on. But need to get firm on what it's actually going to costs and how much I need to borrow. I was unsure how well a mortgage company would react to releasing equity from current home to fund self build. but this is a very cheap option at circa £125/month on interest only against £120 (80% ltv) plus would allow us to stay here in comfort!

 1 point
 -
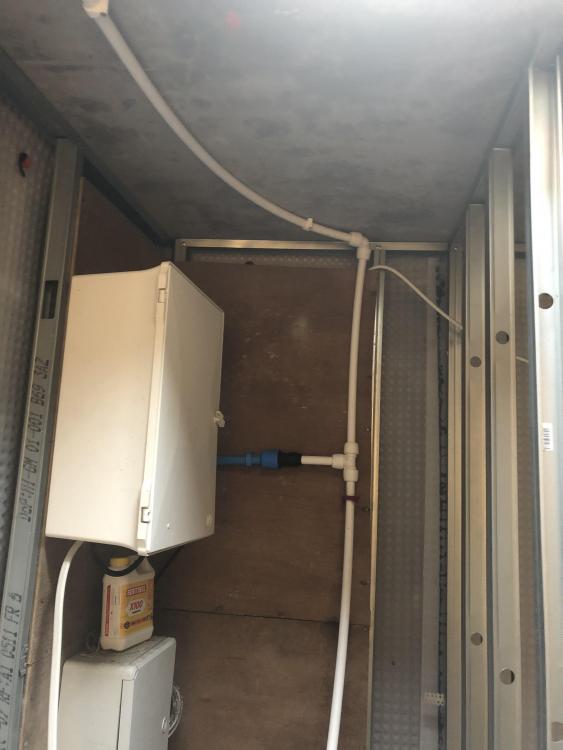
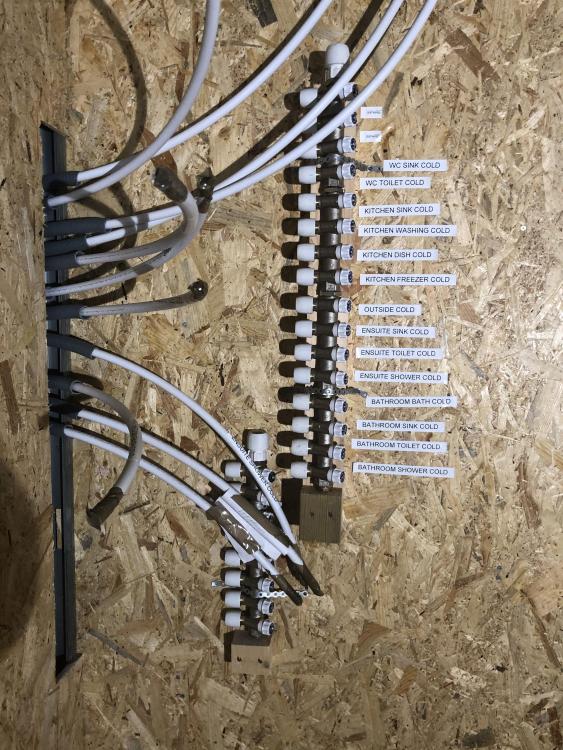
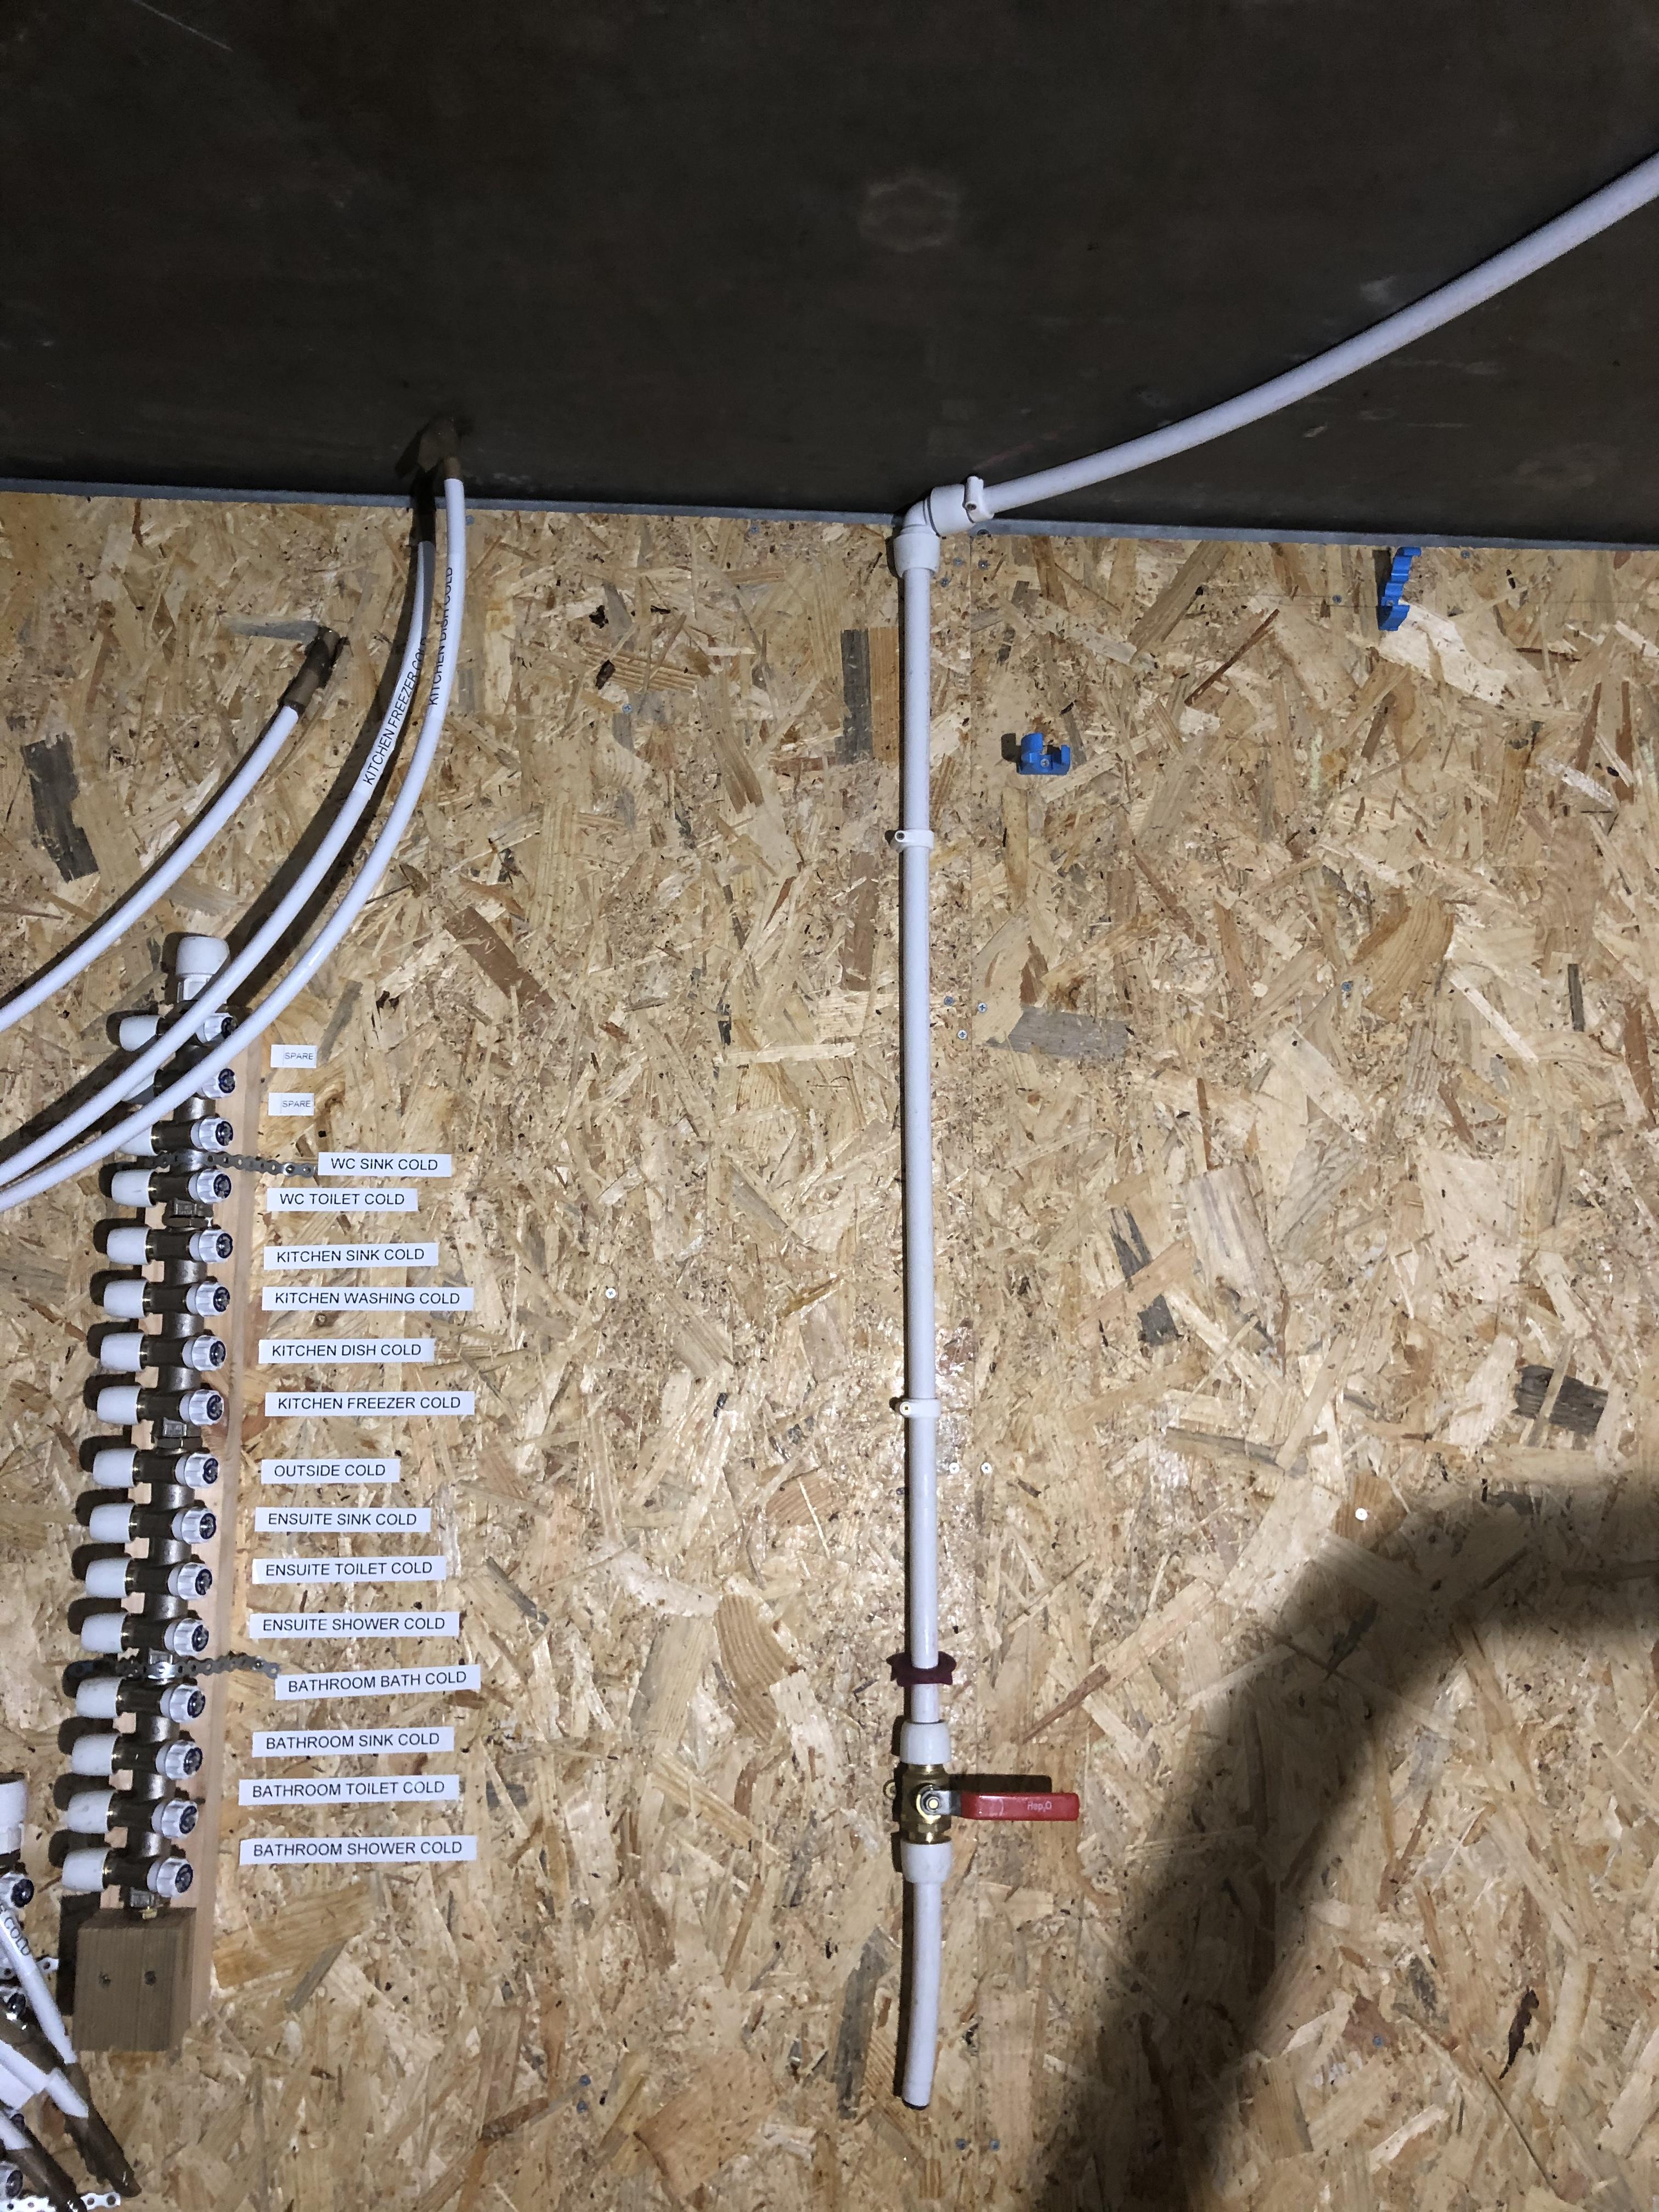
So ! I replaced mdpe with Hep2o. So as Hep2o is a lot more forgiving on bends I now have just 2 tee’s where it crosses the ceiling . These joints will always be exposed so can always get to them . Hep2o much easier to work with; only issues I experienced. Once the pipe inserts are in they are in unlike mdpe ones you can remove . Not an issue though . Hep2o 22mm more difficult to dismount - but then the key isn’t like the 15mm or perhaps it’s just me . Hep2o fittings that go Hep2o to plastic thread ( say for a tap ) leak no matter how much plumbers tape and washers I use ( hence why tap is upside down to reduce leak ! ) . Will change this to a brass wall plate I think . Tested manifolds off the main tap - leak free now .

 1 point
 -
Yes, with mechanical handling bales are much larger, small ones can still be sourced if you find the right farmer, also the “tension” can be adjusted (with the builds I was involved in the farmer was asked to make them as dense as possible to reduce the “give”).1 point
-
Yes I found it extremely difficult to grow a pair!1 point
-
Our piles where cheaper than I expected approx £350 per pile 6-7m deep my ringbeam cost £7000 to complete but that was with me doing all the labour, but mines in excess of 100LM if you only have 41LM then that’s fairly small and should be only a few days work to do.1 point
-
We had all labour quotes in some months before starting as well so we knew exactly what we would be paying for labour1 point
-
Love these Typos. He means TPO. ? (The best recent one I saw recently was the turning of "sweet spot" - @epsilonGreedy referring to the best option - into "sweat spot". Covering the bases there ?.) And ... bonjour. Ferdinand1 point
-
Just a small point but what you refer to as your plan is in fact a section. A plan is normally looking down on the site. A set of plans may contain a plan view, elevations and sections. Unless your "plan" and has been conveyed to the builder electronically then you're going to have a hard time going after him. As in proving what you get isn't what you agreed. It is fixable if you stop what is happening by informing him electronically of your concerns, reiterating his mistake on the depth and what you want to happen to rectify it i.e for him to rectify, by adding a lower section or building the land back up to raise everything at his cost.1 point
-
We rented for what turned out to be 2 years. A big lump of cash gone, but with 2 teenage kids studying, it kept family life on an even keel whilst the build was progressing. If we'd tried the caravan option, I'm pretty sure I'd only be seeing the kids every other weekend now!1 point
-
Sometimes a brush with bristles cut short used in a hard stippling manner can help get bubbles out.1 point
-
Hi, I had to get planning permission for our front extension as it was beyond the front building line. The planning officer suggested squaring off the existing bay window ... good idea said I! However, that was amendment to the existing approved application so I had to pay £35 to get this amendment through. Things work very slowly in the planning world. I had no idea a minor amendment could take two months to pass; and it was his idea! Now with 18mm ply (heavy!) added: Thanks Mr Punter! I did wonder about adding more resin fixings at the brackets. I’ve only gone into the outer skin with with existing fixings. However, my main concern has been the turning moment from the whole structure pulling the whole wall away from the house. I’ve mitigated this by fixing the upper part of the frame to the roof rafters. I’ve added extra 4x2 timbers to make a triangle with the hypotenuse formed by the rafters. It seems pretty solid ...I’ve been hanging off it most of the afternoon!
 1 point
 -
Doesn't sound unreasonable for use in cold conditions, TBH. I've seen hotter mixes used before now, usually by people who just want to speed a job up and aren't too fussy about quality. If the resin was a bit warmer than the roof, I wonder if that may have had the effect of pulling moisture out? Not sure, TBH, but the GRP roofs I've done (years ago) were done during the summer, in dry weather, and the problem we had with one of them was stopping the resin curing too quickly. It was a matter of mixing it and immediately empting the bucket on the roof, spreading it out, to try and stop it warming up and curing too quickly.1 point
-
My Orangery is not yet finished, it will probably be the last bit of the build to get completed. But the frame was designed and built by the same builders that built the house frame so it was erected at the same time. The windows will almost certainly be the same Rationel Aura plus aluminium clad windows fitted to the rest of the house. What little "wall" there is on the orangery will be clad in timber. Work in progress:
 1 point
 -
My French doors (upstairs) are alu clad timber, triple glazed and outward opening. Not sure about orangeries, but could be worth giving my supplier a call - Norrsken.1 point
-
PS Silly questions do not exist. ?1 point
-
how long is the bund you need to cover ..? 5-7 plants per metre is a good estimate - we use this company for most of ours. https://www.hedgesdirect.co.uk/acatalog/Blackthorn-based-40-60-cm-bare-rootsx100.html#SID=330 Enough in that pack for 15-20m. If you need tree guards I’ve got about 3,000 spare somewhere ... someone didn’t read that there were 10 spirals of 10 per pack....... not 10 per pack ...1 point
-
I agree with @Russell griffiths about getting the hedging in now - we ordered our bare root "whips" for this time last year - Can be cheap as chips depending on size etc - We used Scotplants direct - and I have some additional ones on order for this November, just to plug the gaps. The photo below shows how well they come on - at time of photo, they had only been planted in for 8 months! Also, the rabbit guards are an absolute necessary - we lost a few whips to the hares before mine arrived!! Can't help with the drainage issue - sorry.
 1 point
 -
@Tennentslager I thought it looked like an old carpet from 70s, hopefully it will be warm. It was very itchy and scratchy to handle. @Redoctober UFH is an option for a suspended timber floor. I think @ProDave has done this on his I believe you use a dry screed mix on top of the subfloor, don't know whether the system differs. At the moment our heating is going to be electric and our stove. I want to utilise the firewood on our croft and hopefully next year make a peat stack. The house is classed as a crofter's cottage, so looking to use the croft to heat the house where possible. I want to use the electric radiators really just as a quick boost early in the morning. Hopefully the amount of south facing will provide sufficient solar gains for most of the day. Although it can be windy here, generally the temperatures are fairly mild through the winter and the recent snow was fairly rare. The house is well sheltered from the prevailing wind coming off those mountains behind the gable end and from those cold north winds behind the house. Here is a couple more that my wife took when I was working overtime in the office ?

 1 point
 -
@Redoctober The material we have around the site is called 'Rotten Rock' it breakdowns and settles to form a very compact surface. When the storage container goes off the site we will take the material around the front and bring up the level up to whatever the gap required is between the ground and DPC. Therefore keeping the ramp height to a minimum. We are going a bit against the norm here with the suspended timber floor and no underfloor heating, but I'm hoping that when insulated the floor will feel warmer than a slab with no underfloor heating and realistically this will probably be sufficient but for all of the very coldest days, which being on the west coast are pretty rare.1 point
-
Thank you. It took a fair bit of work for the creation of the access. We had a lot of trees to fell but we have enough firewood for quite a number of years for our stove. : ) We have planted quite a few oak trees which are growing well.
 1 point


This leaderboard is set to London/GMT+01:00