
Leaderboard


Popular Content
Showing content with the highest reputation on 08/20/19 in all areas
-
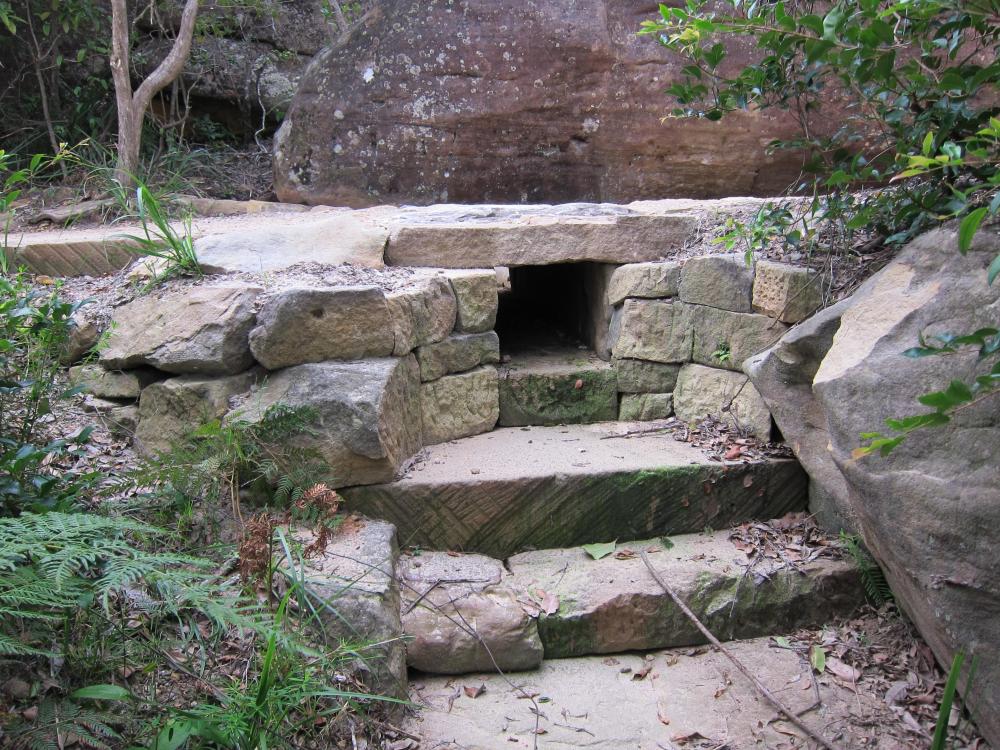
Have you got loads of stone, time to waste and want it to look great ! Here’s one I built in Australia, must have put about 10 of these in this road each one custom built to fit into its surroundings, if the ground slopes away at the end then consider some sort of retailer / spillway to prevent erosion.
 2 points
 -
We dug out an old pipe a few years back as it was blocking constantly we then cut the ends off of 3 45 gallon drums and chucked them in the stream so the water flowed through them, cover the top in two layers of reinforcement mesh and 150mm of concrete, as the drums rust away it leaves a perfect shuttered round pipe.2 points
-
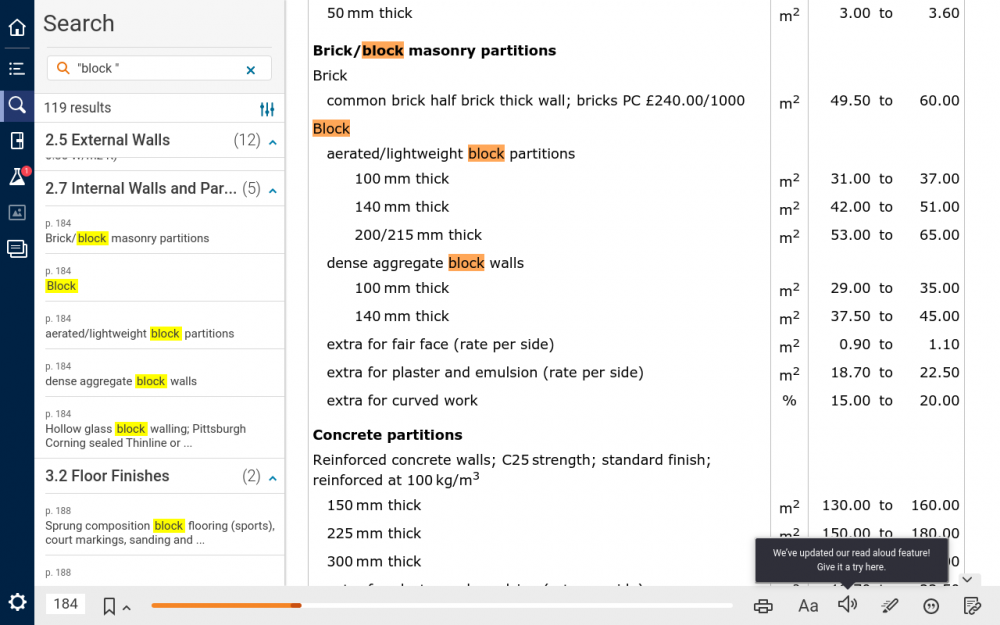
£2.30 per block from Spons is surely the price of the wall as built i.e. including cost of the block, mortar, ties etc?2 points
-
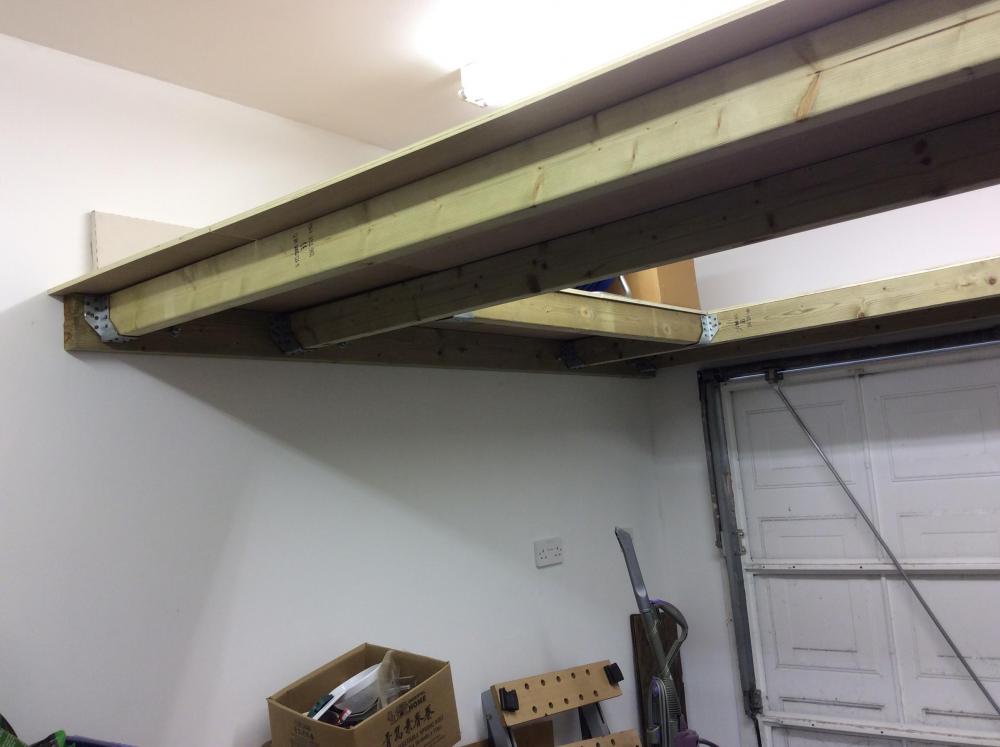
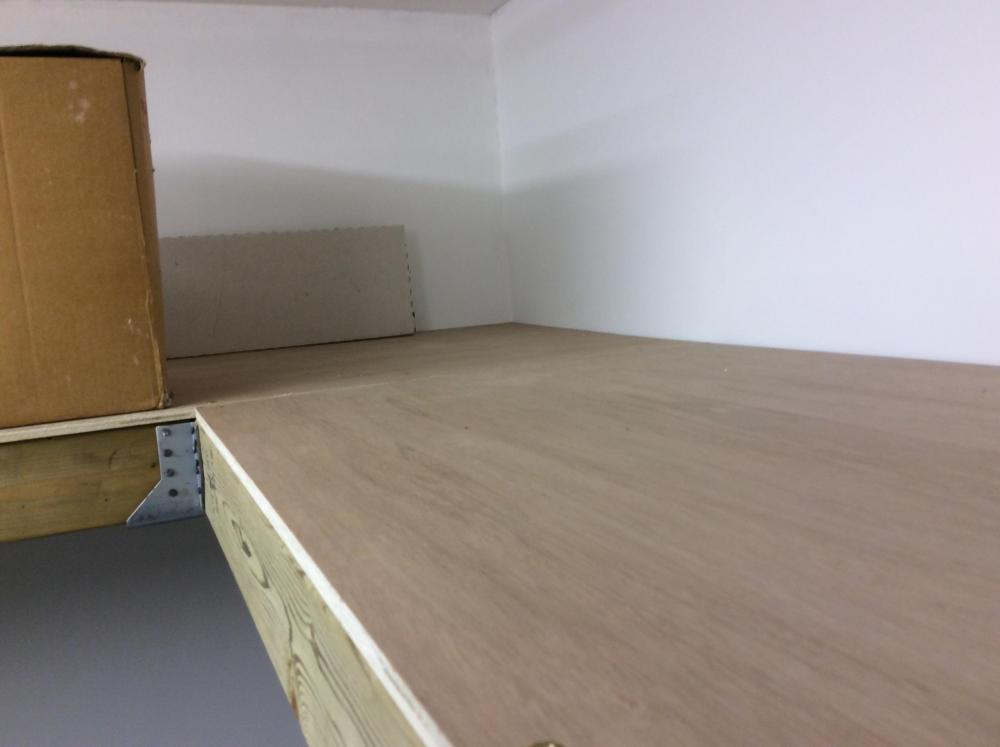
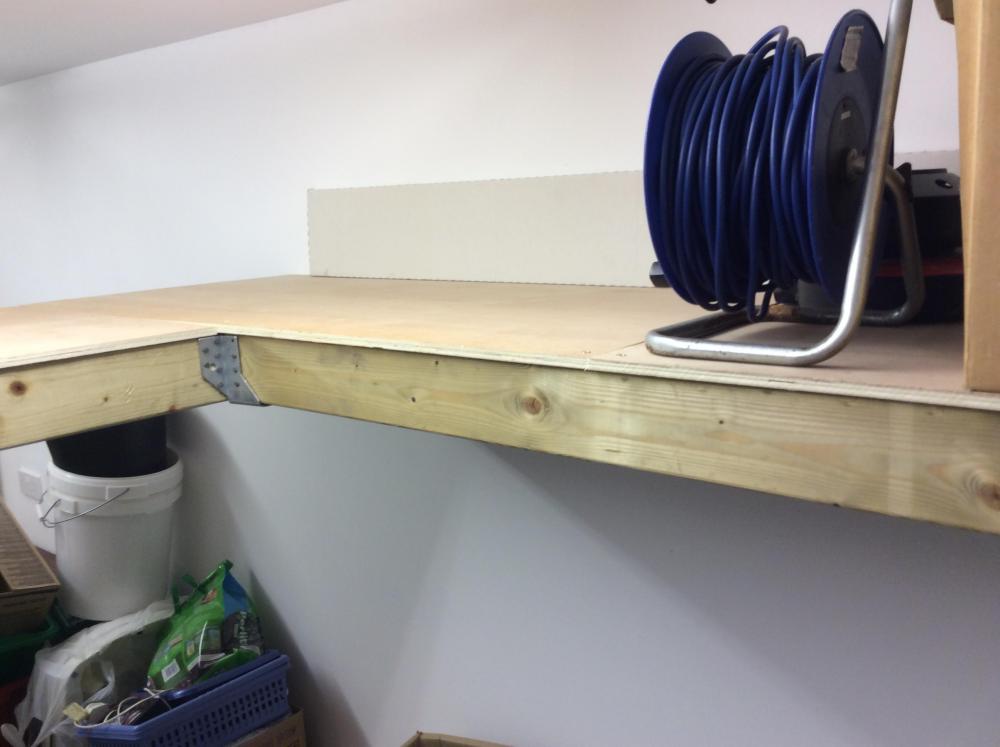
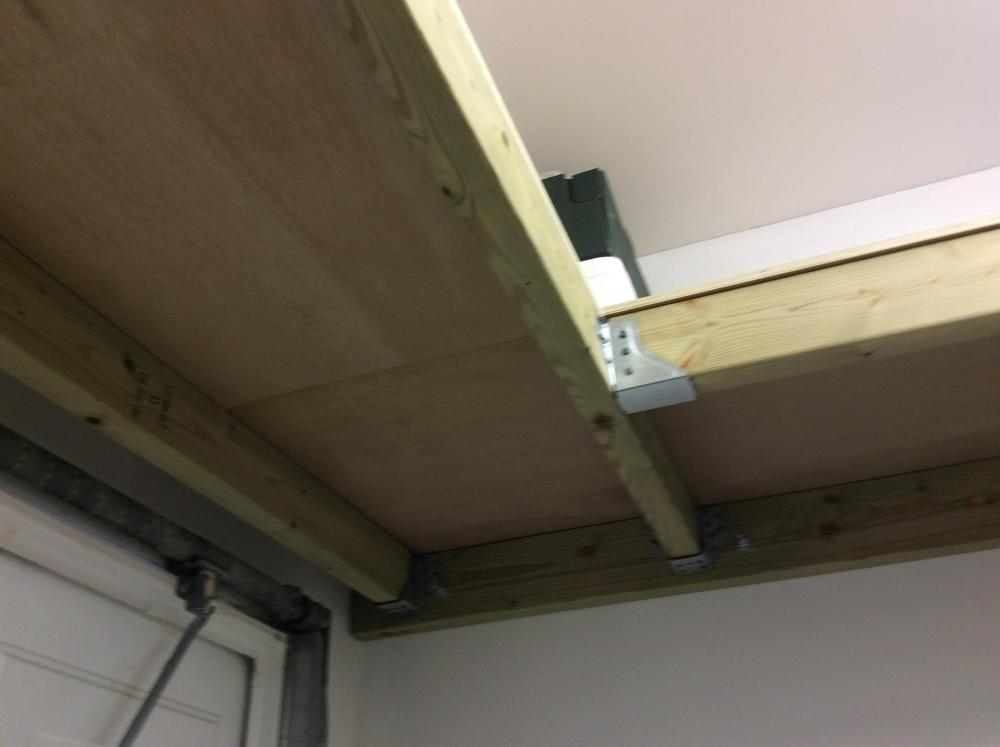
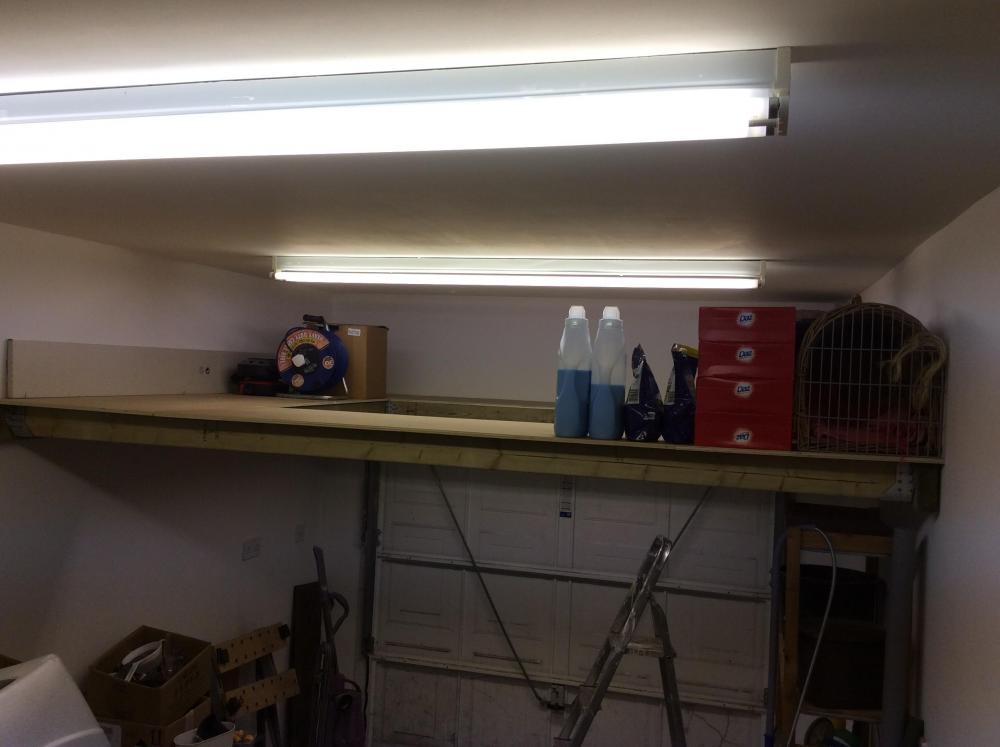
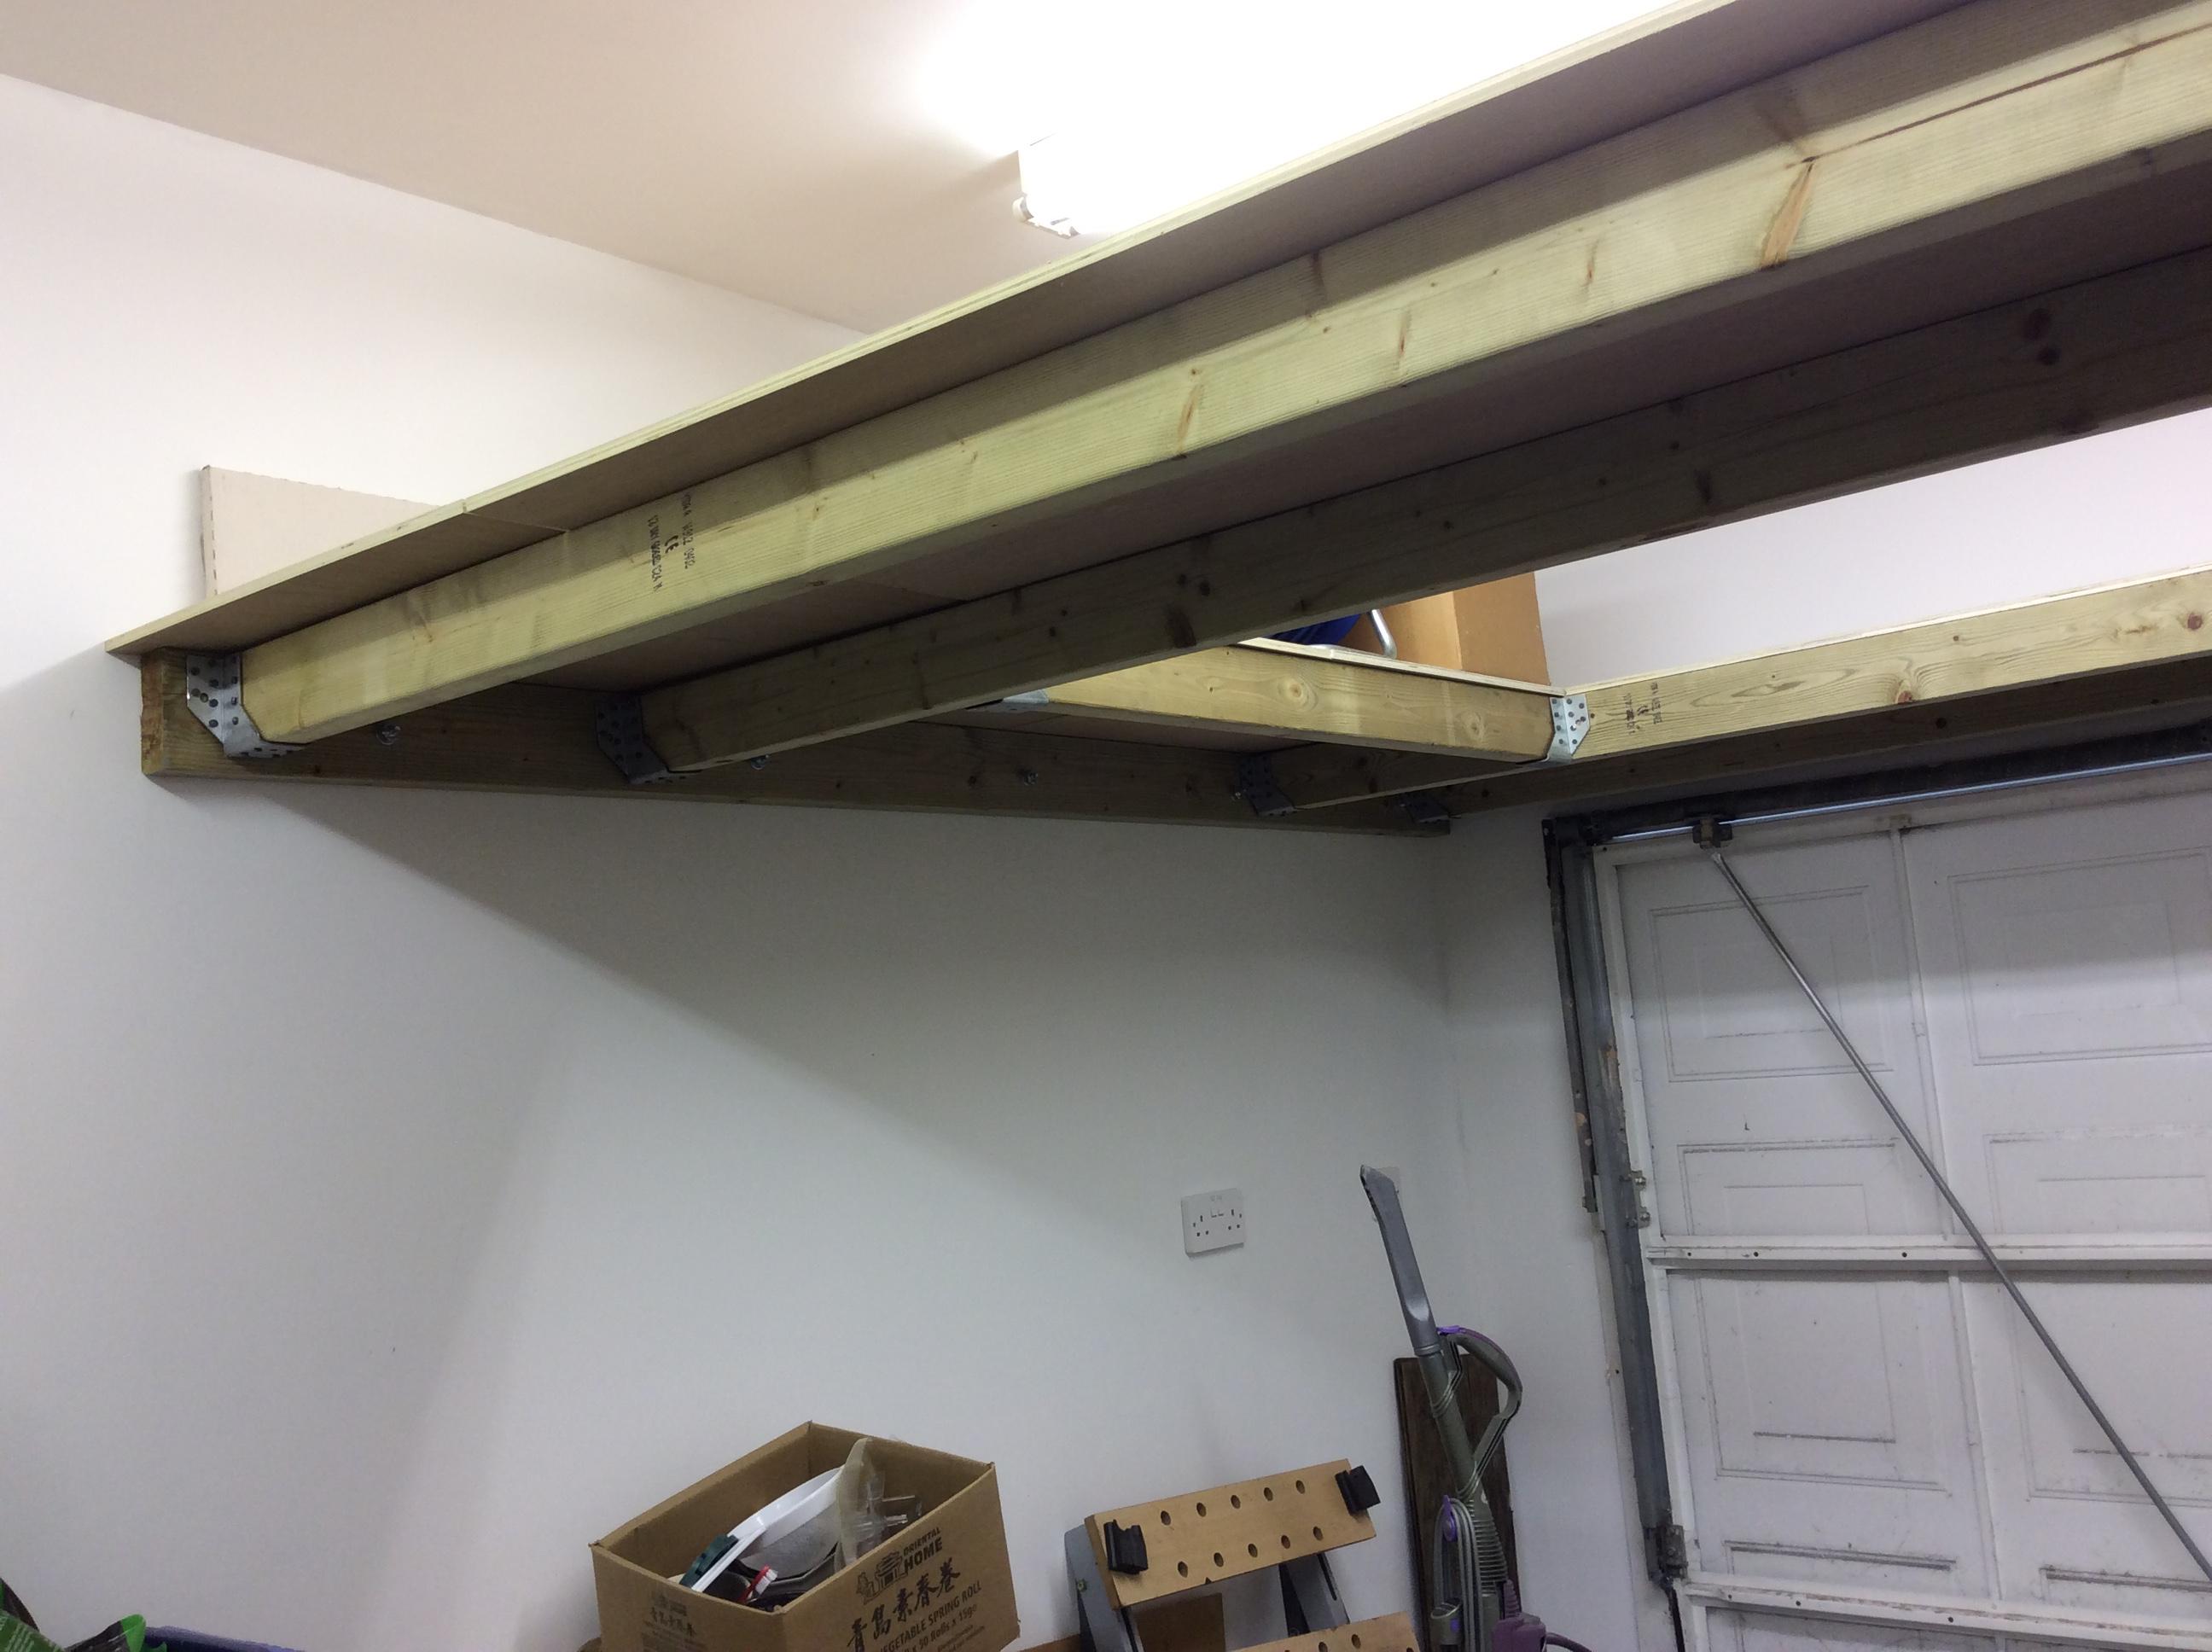
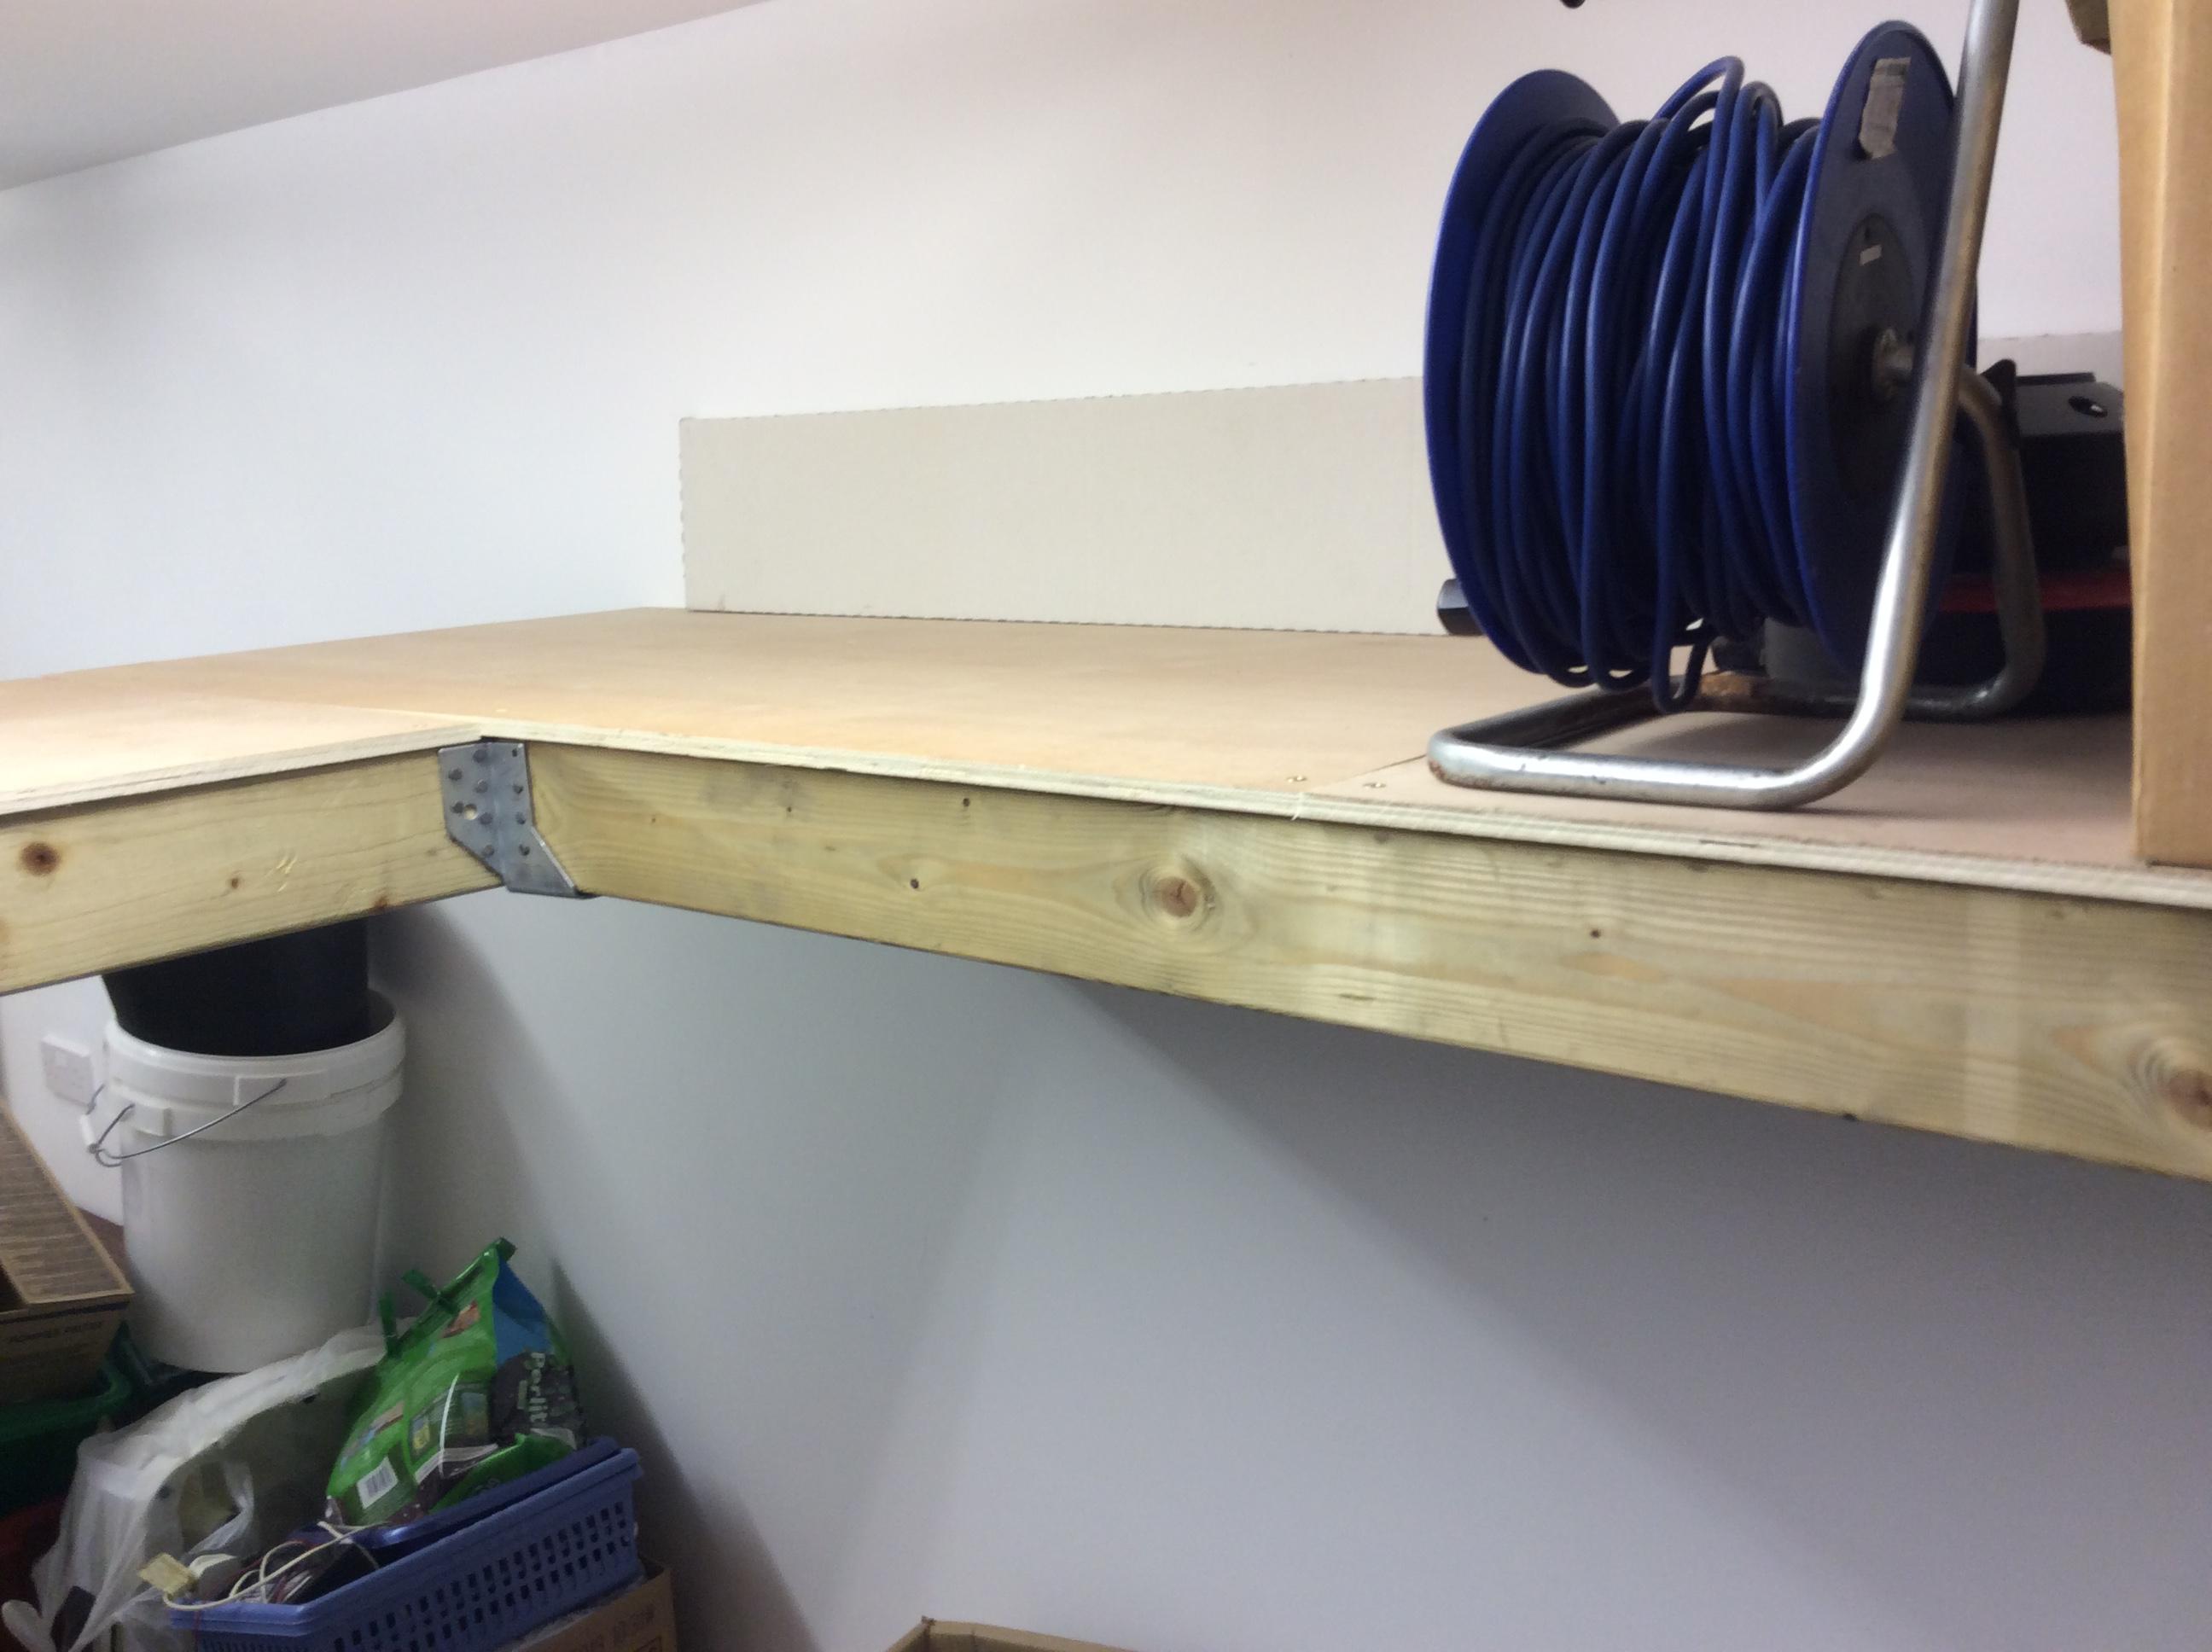
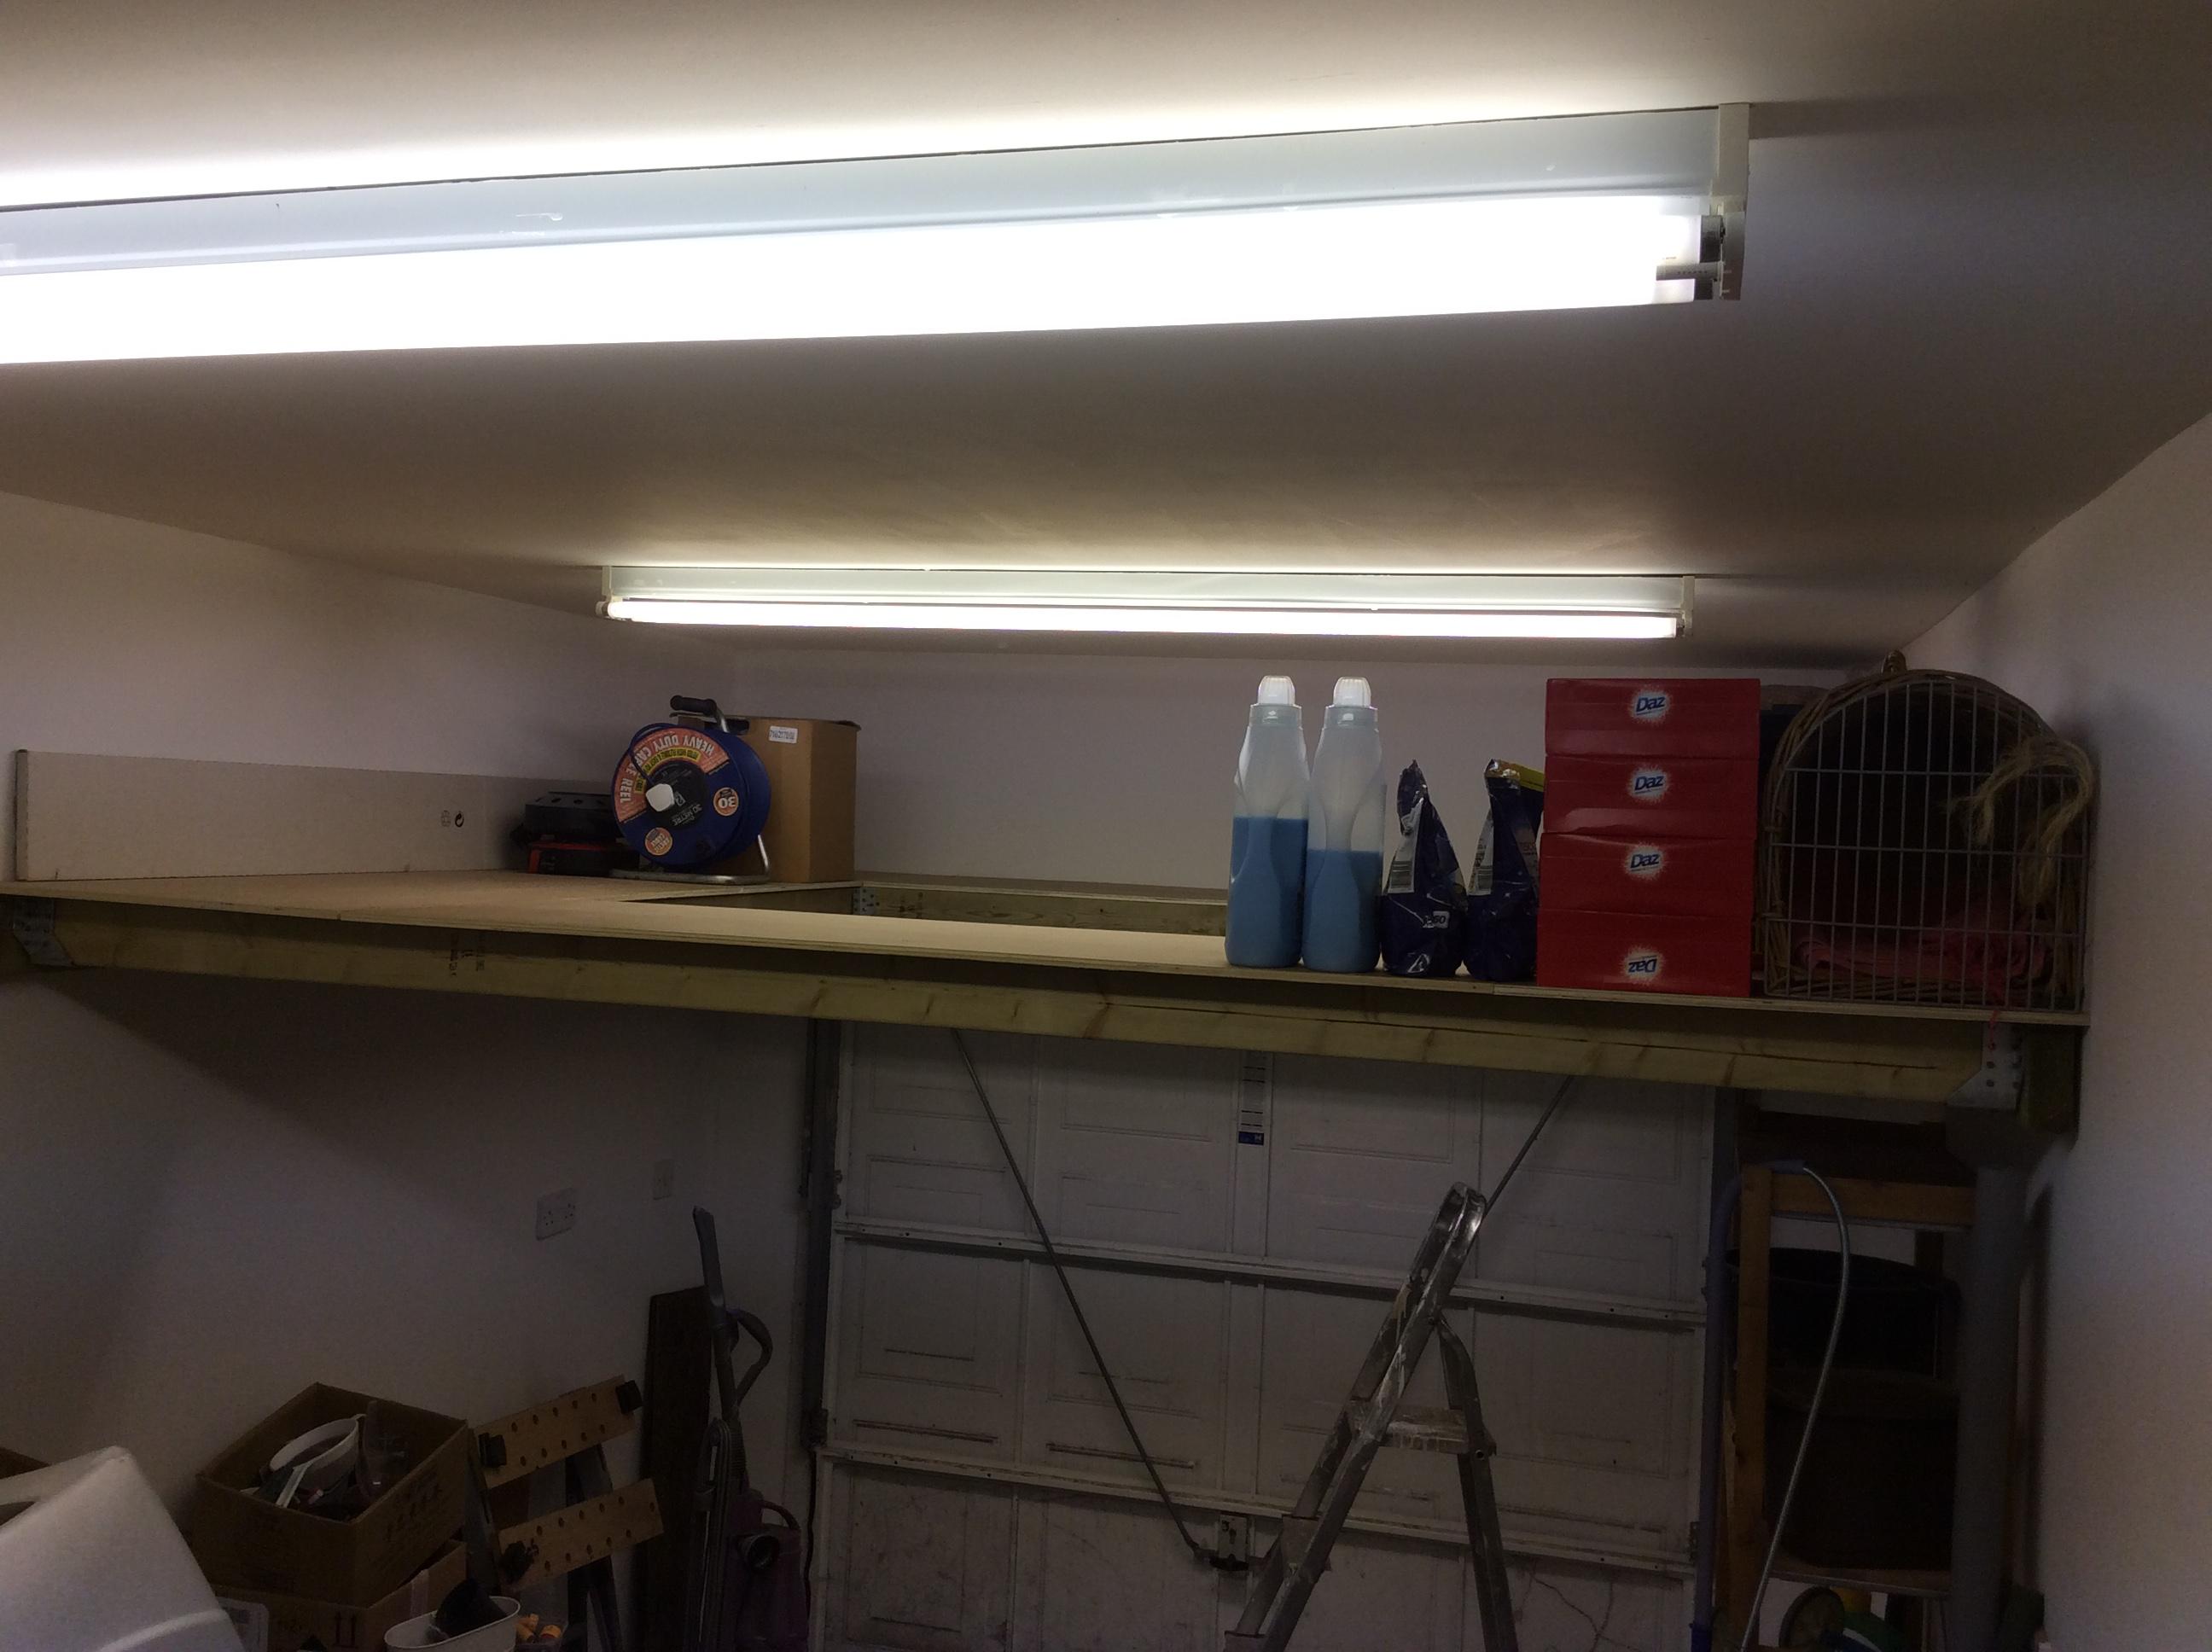
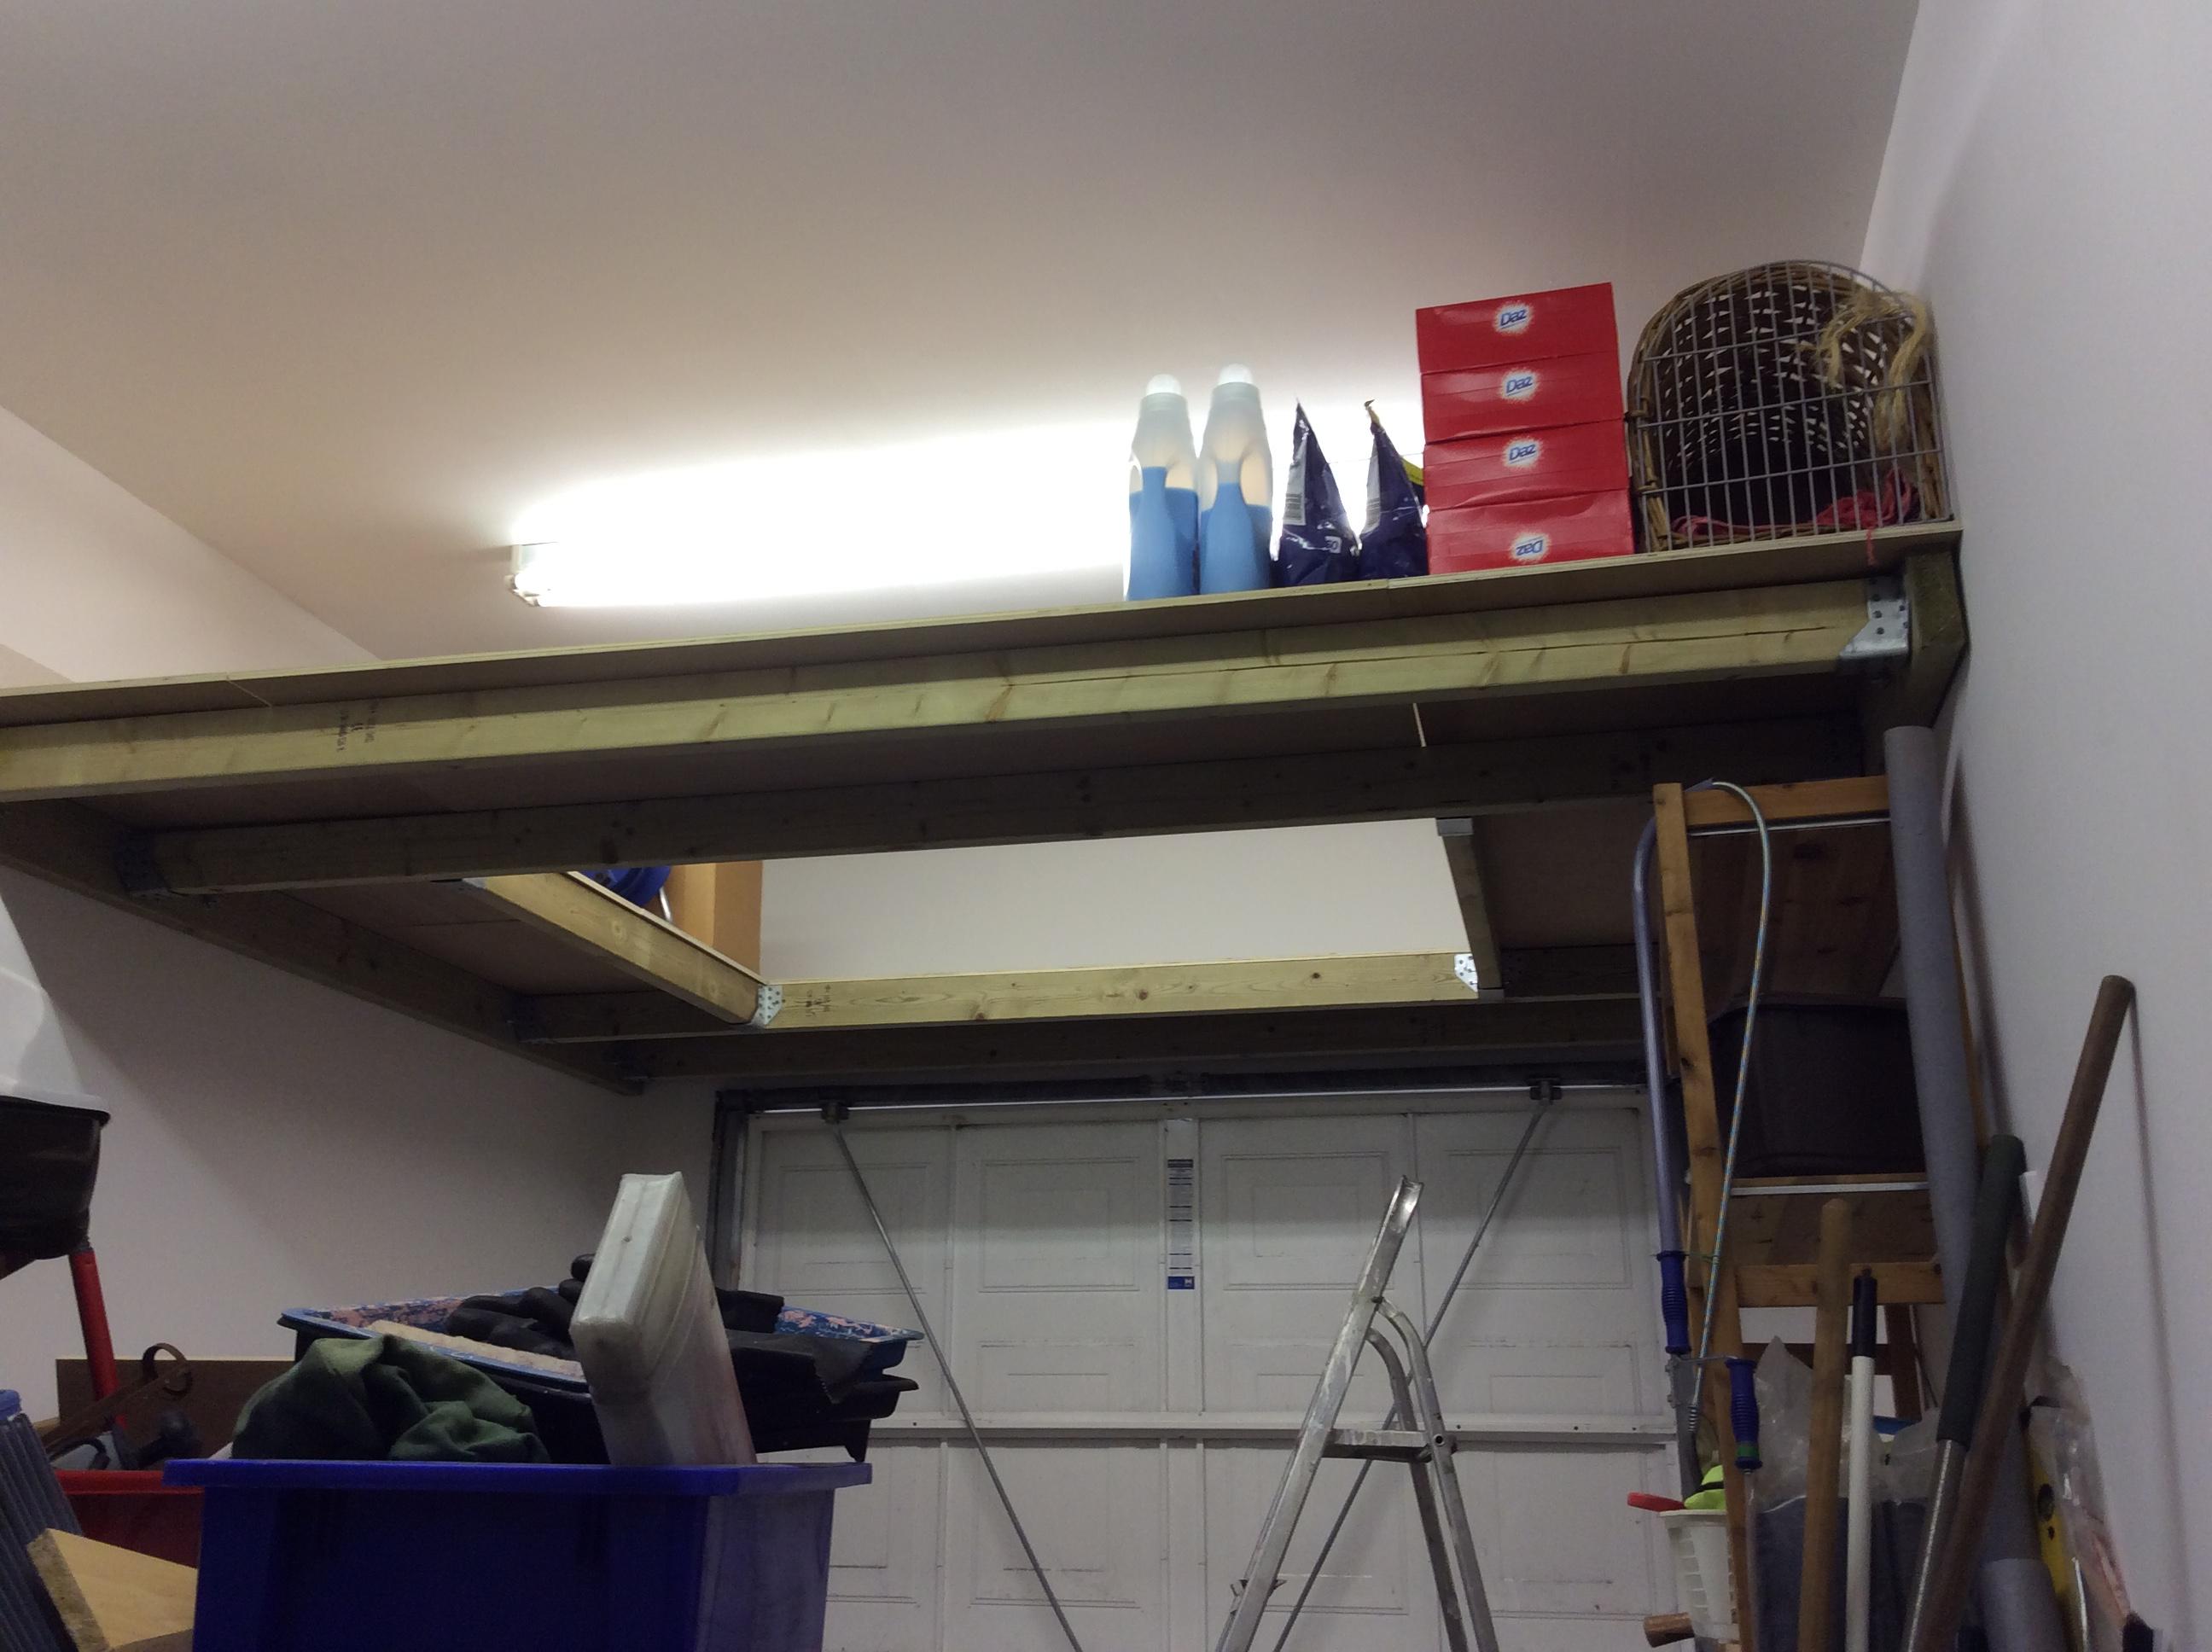
Thanks for these ideas. I will have to think about what I will do. Lighting using LED lights is the way to go for sure. The twin fluorescent strip will be near the middle of my planned shelving. So I will augment it with some led once shelving is up. Well the shelving is up and all good. I have been up on the shelves while I was fixing the shelf to the joists and no movement at all. I also hung from each joist and they barely bent at all. in the end I went with 120x47x2400 wall plates and 95x47x2700 joists (cut down from 3000 to fit) using M12x160 resin anchors five per wall plate, 12mm hardwood ply for shelves fixed down with 5.0x40 twin cut multi purpose screws - 6 per sheet. I am very pleased with the result.
 2 points
 -
if your doors rattle when closed that isnt the door design, that is poor workmanship by the guy that fitted them, all too often i see guys just drill a hole where the latch goes rather than cut a sloped cut, also when fitting door stops the door should touch top and bottom and have a little bit of a "spring" (and i do mean a tiny bit) to be able to latch, this keeps the door from rattling, admittedly it takes a little bit longer but the finished job is so much better2 points
-
Ah I see. That is helpful thanks. I'm trying to get 1.5m spacing so thats 50% more area to light per lamp. We have roof windows and it is easier to fit lights around them with this larger spacing. I like the idea of increasing the overlap, so we could go above 60° if I can find something suitable.1 point
-
Stub vent only has to be higher than the water level in the highest trap, so about 1200mm assuming there is no window in that back wall..? Take the tee you linked and drill out one of the bosses and insert a 40mm rubber insert. Then run the shower into that. WC goes into the top of the stack - not keen on those elbows with a waste Access but if it’s not a regularly used bathroom then it’s ok. The other 110mm branch goes out the back wall, 90 degree elbow and up the wall, ending with a mushroom cap.1 point
-
At that figures I would be doing a DIY, just came across a samsung 9kw monoblock plus control box for £2600 inc vat.1 point
-
Brought a tear to my eye. You’re sounding like a pro already. Just need to top it off with “ no way I can get there this month” & “ would help if you get it bumped out for me.” :))1 point
-
Re: the cost of an F gas installation versus the cost of antifreeze in a monobloc. I can directly compare the two, as I recently has a quote to vacuum, leak check and gas a split. The comparison is: Cost of F gas chap coming out to vacuum, leak check , gas and commision a 2.5 kW split (would be much the same for a larger one) £300, inc VAT Cost of antifreeze/inhibitor £42 (enough for a system with a primary circuit volume of 40 litres, mine's about 25 litres)1 point
-
With the rough casting having completed its two month cleansing period, I was keen to get painting. I started with a roller but found it to be ineffective in getting into all the nooks and crannies, therefore this was going to be a brush job. Most of the time was spend dealing with the edges near windows, cladding and soffits. The use of insulation sheets provided a good screen to any paint gone in the wind. I concentrated on the gables first and was able to use trestles to paint the rest. A good few weekends, evenings and days off later we were able to take down the remaining scaffolding. I have a bit more to do but will have the levels brought up around the house first. Tiring but satisfying work and it was good to see how the white contrasts with the cladding and windows. The next external job will be fitting the treatment plant and bringing up the levels. A separate entry will deal with our progress inside.1 point
-
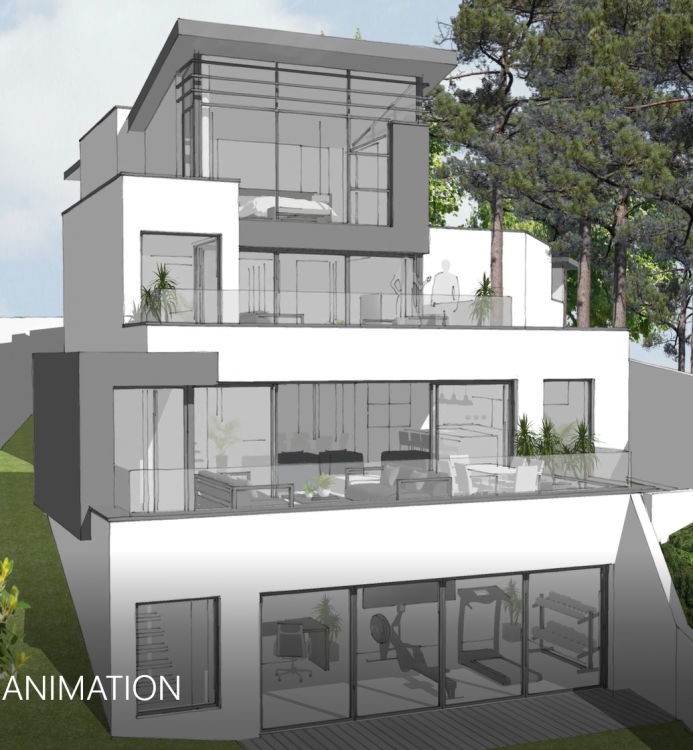
A superb looking house in a fantastic setting.1 point
-
Sounds like it was written by @Onoff? This could give his bathroom a run for its money!! (Hope you get the answers you are looking for)1 point
-
Good idea! Here goes:
 1 point
 -
I would caution here .... Whilst your BCO is signing off your build, they aren’t experts in construction (ask @JSHarris about this...) Is this private or Council BCO ..? You need to meet the Building Regulations and there are lots of options how to do that, some just have a set way of doing things. If you’ve got to go to 1.6m, and use ClayBoard then seriously consider an insulated slab for the whole build as it is borderline cost at those sorts of depths.1 point
-
The Deox-C instructions suggest much better.1 point
-
Bathtime. I will be having a bath vaguely like this, though it may be square ended. The gap I have between shower screen and wall is about 830mm, and I need the bath plus a gap big enough to clean sensibly. I think that limits me to a 700 wide bath, and length can be 1700 or maybe even 1800mm. It will be a wall mounted filler, and the overflow should ideally be at the end away from the corner. I am looking at the one above from Cheeky Bathrooms, who have supplied me excellent quality previously. Unfortunately it is 750 wide. https://cheekybathrooms.co.uk/product/j-shaped-curved-rh-lh-1700-x-750mm-single-ended-bath/ Can anyone recommend one of these that is 700 wide? Thanks Ferdinand
 1 point
 -
Partly, yes, and partly because I think BMW are using their electric car model range to explore new materials. Being electric removes some of the constraints in design, as the drive train is a lot more compact. This is what the "chassis" of my car looks like, with all the plastic panels removed:
 1 point
 -
It's easier to just get the remaining paint off and then treat the rust, either by electrolysis or by using phosphoric acid. I've not used electrolysis, but used to use loads of phosphoric acid when I had a side line in repairing rusty Minis years ago. Phosphoric acid has the slight advantage that it provides reasonable protection against future rust formation, as the black iron phosphate coating it leaves behind is chemically bonded to the steel, so good in terms of acting as a first stage paint primer. For best results get the paint off, remove the loose stuff, get all traces of oil and grease off, then either brush on or immerse the part in phosphoric acid.1 point
-
So... welcome ..! I know your architect, and I know why you’re going to be challenged to build that for the budget ..!! I would have a serious look at those wall specs as some are wrong (Party wall and internal stud wall) and some are just overkill. Why use sound block plasterboard on blockwork walls for example ..?? Firstly, seriously consider a straight render on block scheme, and lose some of the CaSil board on render detail as you don’t need it. There is a lot of cost for no benefit. Next, you do not need a party wall build up into a garage - it’s just classed as an external wall with insulation Thirdly, the differing insulation types and detail will give you a headache - switching from cavity fibre to external PIR on batten is pretty pointless and will just create cold bridges on transitions. You could do some serious value engineering on that and save a lot of money and make it much easier to build and still get the same effect. Out of interest, what are the sections through the floors and roof, and what’s the roof finish ..??1 point
-
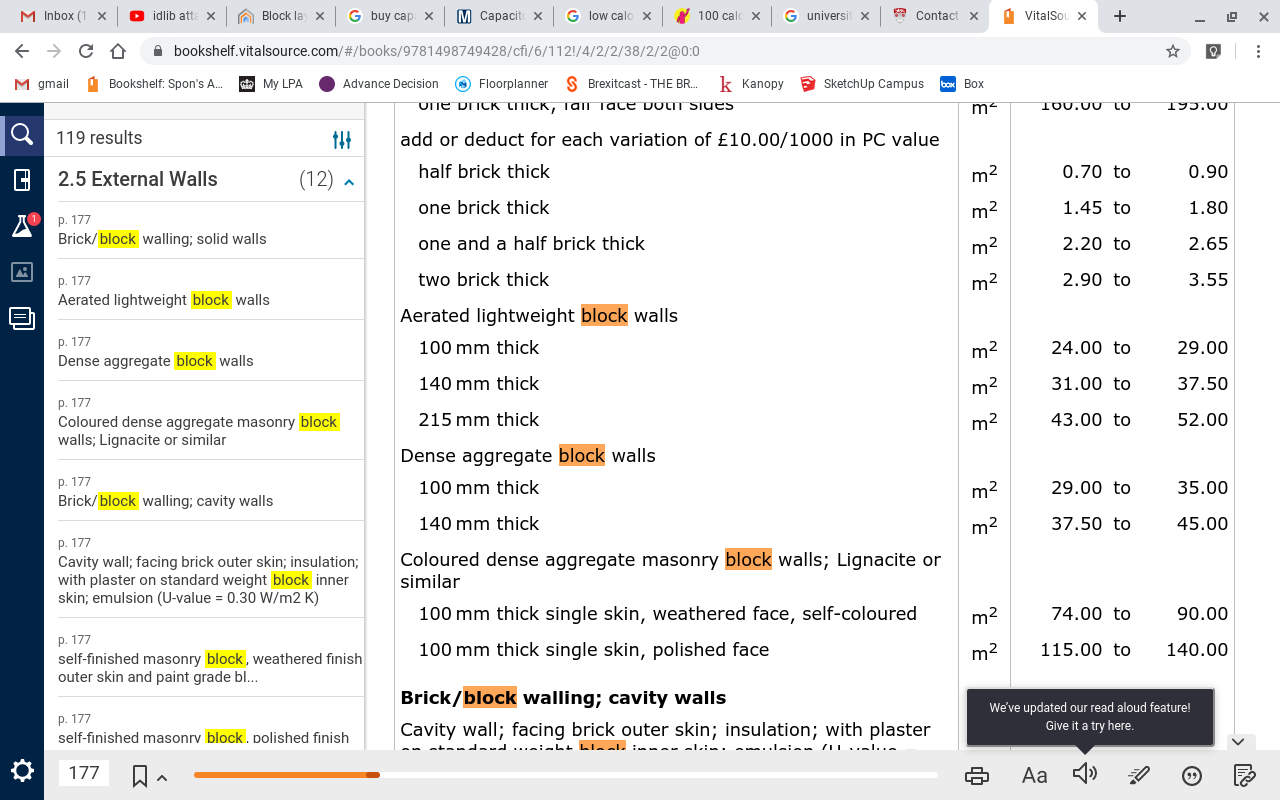
Morning @K78 Here you are .... this is based on SPONS 2016 prices - I'm not sure how to convert 100mm blocks to square meters - guess 10(?) If I'm right, that would be (24*0.96) / sq meter - say £23 per sq meter / by 10 = £2.30 per block. This screenshot is for EXTERNAL walls - Just in case you meant INTERNAL walls .... The numbers above are for Outer London, so multiply by 0.96 for Lancashire. (SPONS 2016, online downloaded 2019 ) Ian

 1 point
 -
I think I would look at doing the downstairs reno yourself, and having a contracytor do the big stuff. Mine was gutted to 3 walls and a hole by the previous owner and they extended in two directions and added 3 beds and a bath upstairs. Generally a good job, but it took about 3-4 years. Then they moved out within 3 years. So do not underestimate the value of time living happily in your renovated house drinking cocktails as opposed to spending your evenings and weekends working on it. The idea is that living the dream aims to be a larger chunk of your life than building the dream. Have a look at moduloft, who bring the whole new floor in sections, and you probably have more local less radical options who will nevertheless do the whole loft bit for you. IMO think about renovating the existing to at least current building regs for newbuild for each element, and probably better. Then when you have to compromise on one or two things you still have a liveable house. Ferdinand
 1 point
 -
"Interest free loan" does not sound very "gifted". ? The Council probably view that the previous person had the discount. You may get it off the VOA list by disconnecting things or gutting it, but that may be such a battle that you would be better off doing a sponsored unicycle to Coldstream in December and back to get the same money. Ferdinand1 point
-
For the sake of £2 worth of rope put it in.1 point
-
1 point
-
solid core oak from £50 https://www.leaderdoors.co.uk/doors-c14/internal-doors-c111/oak-internal-doors-c119/internal-oak-unfinished-pattern-10-door-iopat10-p51732 I always keep an eye on these guys having purchased 7 engineered wood doors from them at £10 each (+ £60 delivery) and finding them to be really solid, easily 25kg each.1 point
-
@ProDave don't forget you've got a suspended ground floor with void which helps I understood some sycamores to be strong rooted. I built within 7m of a London plane. 1.5m deep. 1m of clayboard never had any problems and was a lovely tree1 point
-
Interesting discussion. We have at least 2 types of Willow, Goat and Pussey. Most people seem to think they spell disaster. I guess our foundations are a metre and a half or more down, having stripped over half a metre of top soil then dug the strip foundations. The SE and BC were happy, the only stipulation from the SE (having witnessed me dig some test pits) was the foundations must be down into the "sandy clay" sub soil. At that depth here it is always wet (bottom of the valley next to a burn) I can't see it ever drying at that depth. And that was well below any sign of any roots even small ones. Most of our trees are right on the edge of the burn. No prizes for guessing where most of their roots go and where they get most of their water from. We will be thinning them out, but only gradually and not felling any completely, just thinning and reducing their bulk.1 point
-
I too hate “rattley doors, mine are oak but I use small bump stops mainly sold for kitchen doors etc, self adhesive and clear, one at the top and one at the bottom. I don’t need draft proof doors as we have MVHR.1 point
-
For me a large part of the "solid" feel of a door is how well it sits in the frame (jamb) when closed and the mechanism of closing. I noticed this visiting Switzerland, Austria & Germany last year and realized it was because of the rebated door design and rubber seal / baffle that all the doors use there. As well as a much more satisfying action on closing and opening, there's absolutely no "rattle" to the doors when closed which made me seek this style out for our renovation as we have a trainline nearby which mostly don't notice except around 4am there's a heavy goods train of some sort that can rattle the current lightweight doors. This is about the only supplier I found in UK for European doors, happily not too far from us https://www.doors4uk.co.uk/what-is-a-european-style-door-with-frame-and-architrave As you see there they sell the benefits of reducing drafts and energy saving -- not so relevant if the whole house is well insulated and draft-proofed (not to mention building regs + MVHR require 1cm gaps under the door anyway), but it's mostly for that well engineered rattle resistant sold feel I'm going for them.1 point
-
The £1150 is for labour and materials to build the house (inc VAT) fees were £11k and tools add up to £12k, including a digger at £5k, a small pedestrian dumper at £1800 and scaffold at £4k, these will be sold after the build. landscaping will be extra, I’m thinking I’ll need to spend around £15k, this will include tarmacing the drive and hard landscaping materials. Just added up the VAT reclaim and it’s around £15k so far, possibly around £20k when I’ve finished.1 point
-
Similar answer to above I’m afraid We have multiple lines of ash trees Shallow rooted medium amounts of water On Clay also My first thoughts where to chop them down But our SE explained that it would have the opposite effect and advised foundations at 1.8 and clay board around the perimeter to cope with the heave1 point
-
It’s the same answer - depending on soil type you dig deeper. I went 1500mm in places next to a sycamore and we found no roots at all and this is on sand and gravel. You may also get asked to go beam and block to leave a void, or use clayboard that allows ground deformation if it is anything other than a free draining subsoil.1 point
-
If you are on shrinkable clay, removal of trees that would have an impact on foundations is often something to do before you even apply for planning. Even small young trees are calculated at full maturity. Most of the warranty providers do a foundation depth calculator. Because your BCO has seen the trees before removal he may want deeper foundations and some Clayshield heave prevention on the inside face.1 point
-
Yes to the foundation, you need something, it's been a fireplace so there may be some "concrete" but it may not take the load of a wall and was probably just a base for the fireplace, I would carefully dig down and see what you have. I would not be surprised if that wall has no foundation like you would expect to find nowadays. You need to be careful, a big heavy foundation next to a "stone on ground" build could have issues such as differential settlement, the existing wall can move as ground conditions change, dry out in summer and become wet in the winter, a concrete found will change the way in which your new wall would move, so I would first work it all out, work out your ground conditions then get in a found of some sort that is sympathetic to the original construction. Once you dig out don't leave it open for too long, the removed material can cause the ground around to settle into the space which could cause cracking. I'd want to dig it out, work it out and have it refilled within a day. A lightweight found may be the answer - the original may just be large pieces of stone upon which the rest is built - you could mimic this with some trench block and a light concrete at the base to level it all out. Only disturb as much soil as you need this means your new construction can sit on undisturbed sub-soil - never a good idea to dig down then fill it back in as you end up with a layer that will settle which is why founds are poured directly onto a solid undisturbed sub layer. At the end of the day it is a couple of hundred bricks to tidy up a wall and I would not get too hung up on it all but at the same time be aware of conditions or you may end up with the new wall popping away from the old. It all depends on what you are trying to achieve, are you just going to brick in the gap flush with the rest and follow the shape of the opening? Are you going to build out a chimney breast feature? You will need to tie the new wall - you can little L shape ties which can be fixed as and when they are needed. You could possibly use a wall starter tie kit on the two vertical sections but I think that may be overkill. In terms of the slant then yes as it's not a structural wall and really just a facade - other wise you end up with a straight wall against a slanted wall and it would look daft. I would use lime mortar too, not ordinary Portland to give a better match and keep it looking shall we say... "rough". Those bricks look nice.1 point
-
The sparkie had done his bit and we were now waiting on the plumber. Not much to see here just your standard first fix plumbing. We had a couple of dust sheets removed before the scaffold went down. It was great to have our kitchen view back it had been almost a year. Moving onto the ducting I had previously ordered. A 45 degree bend was deemed easier to fit so now I got to get that ordered. We also had our brickie complete the stove blockwork. We were keen to incorporate some meaty concrete blocks around the stove. Next up is plasterboarding and the end of first fix.1 point
-
It's not a question of need but want. Where we live having wall and roof U values of less than 0.1 meant not needing to have a conventional central heating system ie UFH or radiators. This was one of our wants. I ran a lot of iterations of PHPP to arrive at this value. This is of course dependent on shape of house, weather etc, but works for us.1 point
-
You'd get there in the required overall thickness by having a 140 timber frame filled with PIR and with a 150mm layer of external PIR insulation then a ventilated rainscreen timber facade1 point
-
With brick and block you may get 0.12 - 0.13 with rigid insulation, insulated plasterboard and lightweight block inner leaf.1 point
-
An ICF wall with a 150mm core and 200mm EPS will give you 0.15. for u value of 0.1 you are talking a 450mm thick wall.1 point
-
I can't see how it would be possible with brick and block. We have wall U values of 0.09 but that is with a 495mm overall thickness I-beam timber frame.1 point
-
@moldy, you are going to need something like 250mm of PIR/PUR in a timber frame with 50mm eps insulation on the outside and ewi render directly applied (no cavity)1 point
-
Try this: https://www.cba-blocks.org.uk/u-value-calculator/ I don't think you would get that low with brick and / or block. Kingspan have a calculator, might be worth trying.1 point
-
Managed to grab an image from the animation that may make this clearer to grasp (from a solar gain perspective). Some changes since this was created.
 1 point


This leaderboard is set to London/GMT+01:00