
Leaderboard


Popular Content
Showing content with the highest reputation on 04/02/19 in all areas
-
With the 2019 season now here, I've spent the last couple of weekends doing a bit of tarting up around the outside of the wee house. Little things that you don't think really matter, but the end result looks far more 'finished'. I was never very sure how to complete the gable ends of the house- whether to box them in or not- but eventually decided to kill two birds with one stone and use the space for a log store. I think it looks pretty good, and it's tempting to do the same on every side of the house, although those elevations do see a lot more wind and rain. My current obsession with processing my log pile is all down to a fantastic book I was given: 'Norwegian Wood- chopping, stacking, and drying wood the Scandinavian way'. Highly recommended, and an absorbing read even if you never intend to ever light a fire. The other bit of work has been to create a gravel path around the side of the house, and so properly edge the gravel area underneath the house. The only downside of all this work is that it makes the lumpy lawn look even worse than it did before3 points
-
Not very much if the heat is wet and derived from an ASHP FWIW, I would not recommend an electric unit TBH, as they seem to be less 'gentle' in the heat delivery and a bit more 'noticeable' in the air. Electric units usually pass the set point of the thermostat, with a far coarser hysteresis from a thermo-mechanical control device, so are nowhere near as favourable as bringing in the heat via a wet source.2 points
-
Work out how you are going to board it, and put them in according to your board sizes.2 points
-
After the rock 'n' roll plastering at the start of the month, the last 2 weeks have been all about getting stoned outside. The only drugs involved were caffeine and sugar, however, and the stone was for the perimeter drains around the house along with a few other bits. Inside, I've been busy decorating, of course, but photos of white rooms are getting a bit samey now, so they will be limited for the moment. I've been using Richard Moore Contractors for this phase of the groundworks, and they've been a pleasure to have on site. Really nice guys who know their stuff and got on with the job with a minimum of fuss and hassle. One of the big advantages for me of using a larger firm for this part of the work is their access to all their own plant and equipment - everything they needed was on hand when and where they needed it and I didn't need to organise anything for hire or delivery. A financial advantage of this is that the cost of the equipment is, effectively, free of VAT for me as everything is zero rated within the cost of the works. With a job this size, that can make a sizeable difference when compared with using non VAT registered labour only for jobs. This is at the start of the work, with trenches still being dug out and making sure the services that run around the perimeter of the garage are all staying in place. At this stage, everything was still in its post-winter boggy state, and the reduced dig left around the house was still looking like a very mucky moat. The moat was showing no sign of emptying so the guys pumped it out once they were ready to get started in there. Although the water around the house needed to go, we wanted to retain as much run-off from the roof as possible and divert this to the pond. To this end, all the guttering runs get collected into drains running around the western side of the house then to the pond via a drain that's been buried and comes out towards the top of the south tip of the pond. The outlet has been kept high where it exits to the pond to make sure that it doesn't flow back towards the house if the pond ever gets that full; there is also a decent fall on the pipe itself. This is part of the storm water drain that goes around the lounge, facing west. As well as putting the drains in, I asked the team to stone up for 1m beyond the building. This needs to be done anyway, but I also needed to get this done so that there is a firm base around the building for the next part of the team to put the stone cladding on, and also, once that's one, for the Contrasol guys to fit the brise soleil rails and fins outside the stairwell window. Here's the stoned up pathway along the front, going around to the west face. Whilst we're looking at the front door, I'm delighted to be able to post the following photo. For a few months now, the front approach to the house has been a bit on the wet side of things as the concrete that was spread there last autumn has gradually deteriorated with the lorries, vans and cars that have travelled over it on a daily basis. As well as having to walk the plank over some particularly deep puddles, the trigged up pallets and boards bridging the moat directly in front of the door was becoming increasingly perilous. Danger no more, however, as we now have solid ground in front of the building - luxury! A peep a little further around the corner shows the continuation of the path and the sewage tank going in. Prior to the tank going in, the old septic tank had been desludged - a nasty little hole in the ground that no one wanted to fall into. This was back-filled with stone and rubble then covered over when the spoil from the site was re-distributed. When we originally bought the site, the garden for the old bungalow ran to the north, parallel with the lane. The land has a slope to it going from the field down towards the lane, but there was pronounced hollow running the length of the garden that we had wanted to level out as this should make the area more useable in the winter, when there is a tendency for everything to get waterlogged. There was still some spoil left over from the pond, as well as everything that was dug out for the drains, so that was used to backfill. We have kept the topsoil that was scraped off the pond area, too, and this will be spread over the clay to give something decent to plant into. We are having an area of hardstanding next to the garage because, knowing what we're like, we will only be able to fit one car into the garage by the time we've filled it up with all the other stuff that can be put into an area like that, so we will need somewhere decent to park the cars. It's also useful for the sewage lorry to be able to pull in there and sling a hose over to the sewage treatment plant for de-sludging without blocking the lane. The guys have done a lovely job around there, and it's all nicely edged with kerb stones that flow into the edges of the driveway and down onto where it meets the lane. The amount of stone that's been put down on the site is large, over 100 tons, but then there's been a lot to do and we've also stoned up on the corner between the stairwell and the lounge where will we will form a patio of some sort. Here's a view of the hard standing going in, taken from the balcony. You can see where all the stones have been concreted in. And another taken from ground level. The hard standing merges into the driveway in front of the garage. The roadside edge of this has been increased in width by 2 kerb stones each side, on the advice of Matt, the groundworker. Besides looking better, it gives a much easier sweep up to the garage as there is quite a height difference between the garage floor and the lane, so turning in will be much easier with the more open drive. Here's the first of many lots of stone going down to build up the level. More of the same from the lane: Then with the kerb stones concreted in. And finally, with the kerbs along the lane/drive border. Everything there is ready and waiting for the final layer of tarmac, which will go down some time next week. Meanwhile, I've been doing yet more painting indoors, as previously mentioned. The large airless paint sprayer I borrowed from Jeremy is a little poorly at the moment and will be in the sprayer hospital tomorrow to have its tubes cleared out and should be back in service very shortly. I will need it again as I still have one bedroom to spray and I need the power of the large machine to reach up to the vaulted ceilings. However, I still needed to get the mists coats done on the landing, stairwell and hallway last week, as it was the ideal opportunity to get these high traffic areas done since I was the only one in the building. I was a bit stumped initially, but I had noticed the little electric sprayers in Lidl on Monday and then Weebles mentioned that they had bought one from Aldi. I figured nothing ventured, nothing gained and for £25 it was worth a shot. So I dashed down to the nearest Lidl in Blandford and got one of these little beauties. As it turned out, it was perfect for the job. The stairwell, in particular, is a little confined and with operating off a youngman board balanced between the scaffolding tower and a trestle on the landing, it would have been tricky to manoeuvre the larger machine around there. The little hand held sprayer did the job nicely and was much easier in the tight space, here: The results from the little sprayer are very different from the big airless system and you get a much more textured finish, but pleasant and perfectly acceptable. It is a pain having to refill the reservoir all the time, but not difficult. I poured the contract white into a big bucket and diluted in there, pouring into the reservoir. I confess that I didn't strain the paint and found that it was fine. The only time it gummed a bit was if I'd left it open overnight, but wherever there were any splatty spatters I just left them to dry and sanded them the day after. Sanding was quicker and less messy than straining many litres of paint. A couple of not very exciting photos of the hallway all masked up and misted: You can see from the masking you have to do that it would be tricky to get this part of the painting done if there were others working in the building at the same time. I've now put the vinyl coat on these areas too, but I was too knackered to take photos of that as I only finished them yesterday, so that morsel of excitement will have to be eagerly anticipated. I've also been painting the Howdens primed MDF doors and I'm pleased with how they turned out. I used a small fine textured roller and eggshell acrylic on top of 1 layer of white primer and very nice they look, too. Next week, Harry the carpenter (he's much too young to get all the Harry Carpenter jokes, we gave up ages ago) is back so he can get the kitchen finished off as the last of the laminate splashback arrived last week. He can also get on with some door hanging and then the utility units arrive next week. The bathrooms and loos need to be done in their entirety, the MVHR unit needs to be installed in the loft and all the plant needs to be put into the garage. For my part, I have what feels like miles of skirting and architrave to get on with, some paint snagging to do and I need to organise timings on the cladding and brise soleil. I can't think too much beyond that right now, but I know there's plenty more to do after that - isn't there always?! Stay tuned, folks!1 point
-
Yeah, just realised what I wrote there... Anyway... I have some stud walls that are over 3m high.... 2 noggins per vertical?1 point
-
Paslode IM350+ Li-ion or similar. BiL has one. Not that I'm jealous!1 point
-
1200 is max height for the lightswitches... if you want to put noggins at 1200 then switches in drywall back boxes can always go lower ?1 point
-
You bad man, Ed.1 point
-
I would. First at 1200 to upset the sparks then another at 2400 to catch the edge of the board1 point
-
There is the flip side in my reply. Nothing wrong with heating with wood. When the power plants go down and gas is banned people with wood heating will be the ones that survive the cold winters!1 point
-
Yes but they help you by delaying anything at all going to the Council until the payment is in their sticky fingers. How thoughtful.1 point
-
@sam I built my system the way it is because I have a convenient split that allows me to measure generation and usage separately. I agree it is unusual to be able to do that. I did previously at the last house have a Arduino based system with a single current transformer that sensed direction of current flow, but it's measurement was far from perfect. If you are going to build your own diverter to work from a single current transformer, you would be better off using a design that is based on an electricity meter chip which will have perfected how to measure and sense direction of current from a single probe. More than one design has been published and @JSHarris has built one based on this and may be able to advise better than me.1 point
-
Presumably, this duct heater/cooler would only be in operation as a cooler when the summer bypass is open on the MVHR Unit? So, there would be no issue with throwing away the cooling....1 point
-
Figured carry on this thread: I have a number of perfectly serviceable 18V tools of various, dubious, here today gone tomorrow brands. All bought on a whim, dirt cheap or got as a present: Champion circular saw Rolson 4 1/2" grinder Performance Power hedge trimmer Jigsaw, can't remember make. These came with Nicads originally. There is some interchangeability between batteries though I think with the hedge trimmer the + & - are reversed. The grinder batteries fit but the wrong way round and with the aid of some tape. Some batteries fit and work but the holding clips are in the wrong place. Tbh I'd use them more if they had good batteries that lasted and the charge times weren't "3-5 hours" and you didn't need multiple chargers. (OK, the grinder is 1 hour). So here's the plan: I had considered 3D printing but found these Makita battery Stealth Mounts moulded from tough ABS at £15 for 4. Aim is to graft these onto the top of the various tool batteries, the section that slots in. Then a couple of down pointing tags to line up with the Makita batteries + & -: These are injection moulded rather than 3D printed btw. Watch this space but don't wait up!1 point
-
thanks for that. Unfortunately the Online process vandalises the filled-in form in several ways when you download it so you cannot use that for a PP application ... for example it leaves off the box where you sign. It is intended to only be useable as a draft record. And so on. They are being well naughty.1 point
-
https://newatlas.com/cct-silicon-energy-battery-thermal-energy-storage/59098/ https://www.fircroft.com/blogs/worlds-first-thermal-battery-could-revolutionise-energy-storage-99111535454 Edit to add: possibly the first one going into production, that can return the stored energy as electricity?1 point
-
I pay £6+vat per tonne extra for glass fibres1 point
-
Where's the "I laughed so hard my head fell off" emoji? They apparently "add value" by hitting users with a £20 surcharge just for making a payment! And passionate? Really?1 point
-
We had very few requirements in our PP and the only vehicular one concerning the entrance used by construction traffic. There was none imposed on direction of the vehicle leaving the driveway. That said, our lane is (eventually) a no through road with very light traffic. We also have an additional shared parking area at the other end of the property.1 point
-
However, remember that such reports will contain valid dates and the LPA may ask for another one if expired or there has been time since for eg bats to arrive. The ones I have seen are validity of 2 years, and I have never seen an LPA use that as a reason. You could manage that risk by eg negotiating a 25% fee for an "update" when you order the initial exercise. Ferdinand1 point
-
It appears to apply to Agents at present, and I think to Householders who submit their own PP through the portal. At least in my neck of the woods I can still apply to the Local Authority in writing on a paper form but the process of creating a form at the Portal, printing it out, and submitting by post or hand is being deliberately impeded. Is there not a rule that Planning Depts can only charge the cost of their service (which is probably not completely recovered at present), and privatising it may be a way round that? The pitch to an LPA is it saves them processing the 25% of PPs that fail validation because the payment is wrong, and so boosts efficiency. The pitch to agents is in the FAQ: https://ecab.planningportal.co.uk/Uploads/PPQ_LPA_Guidance_and_FAQs.pdf The way payments are being simplfied is that nothing will be passed through to the LPA until the payment has been processed :-). Not clear whether that is adding value. For Agents there also seem to be some complications in that single payments will cover multiple Apps when paying back to you, and you get a list by CSV format email. @Mr Punter, to explain the extra to your customers ... ie you, you read this out to yourself in the bathroom mirror: I would say they are positioning themselves to be able to take over the service from LPAs using a cost saving / more efficient service at no cost to you argument should such a thing become law. There are about 400k Planning Applications per year in the UK for residential, so that is about £10m of potential revenue, and perhaps as much again for non-residential. Presumably Building Regs are potentially about the same. The £20 flat fee looks questionable to me, as that is up to 20%. IMO that needs a complaint to Trading Standards, or from a consumer client of an agent to their MP. It is a pretty strategy; the person who ultimately gets bent over only finds out after the fact. Ferdinand1 point
-
@jack That helps a lot. Obviously for majority of windows they should really be certified else the penalties would add up. But for the odd awkward one we can negotiate it. Very helpful input to be heading into detailed design with. Thank you. Yep the goal is certified EnerPHit.1 point
-
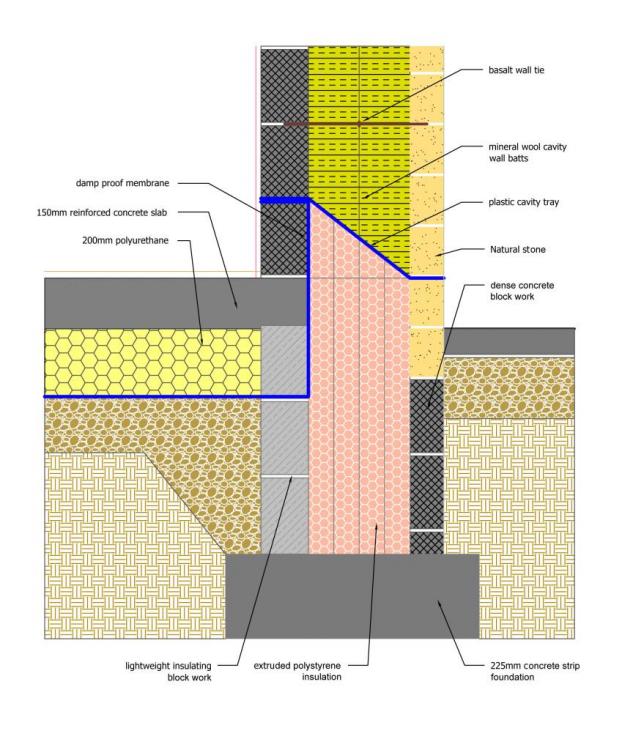
I too had insulation right down to the strip foundation, it was part of the insulation buildup to alleviate a cold bridge. I forget the name of the house that I copied this from on the internet but here is a drawing I supplied the BCO and they passed it with no question.
 1 point
 -
I am really impressed with this house. One of my Buildhub favourites. I also like @Tennentslager's build in a similar vein. Very well done.1 point
-
well, finally we have progress! after architect, (bar steward) and building control messing up warrant and having to get another which arrived friday, we are now out of the ground. the drains and tank went in at the beginning of the week and today the beam and block went down. water pipes tomorrow and soon the caravan can be connected. sooo glad to have progress.1 point
-
We do have a vented cavity behind the skin, so that will reduce the heat transmission a fair bit, but I've no idea how to try and model it. I could try and poke a temperature sensor into the cavity and see how warm it is in there, as that's probably closer to the temperature of the outside skin of the insulated wall itself. I might have a go at doing this tomorrow, just to see how effective the ventilated space is at reducing inward heat transmission.1 point
-
Have you poured the oversite yet? If not order a bit more, then you won't even have to mix it. If you have. Just get the all in ballast. (10/20mm washed, which ever is cheapest) Half a bag of cement and fill the mixer up. This time it really is just a gap filler1 point
-
He didn’t mention the 4 pairs of socks and 7 jumpers he wears.1 point
-
I too have not bothered with one, I have been told you can buy an indemnity IF we ever sell (which we don’t plan to do till we’re past it?).1 point
-
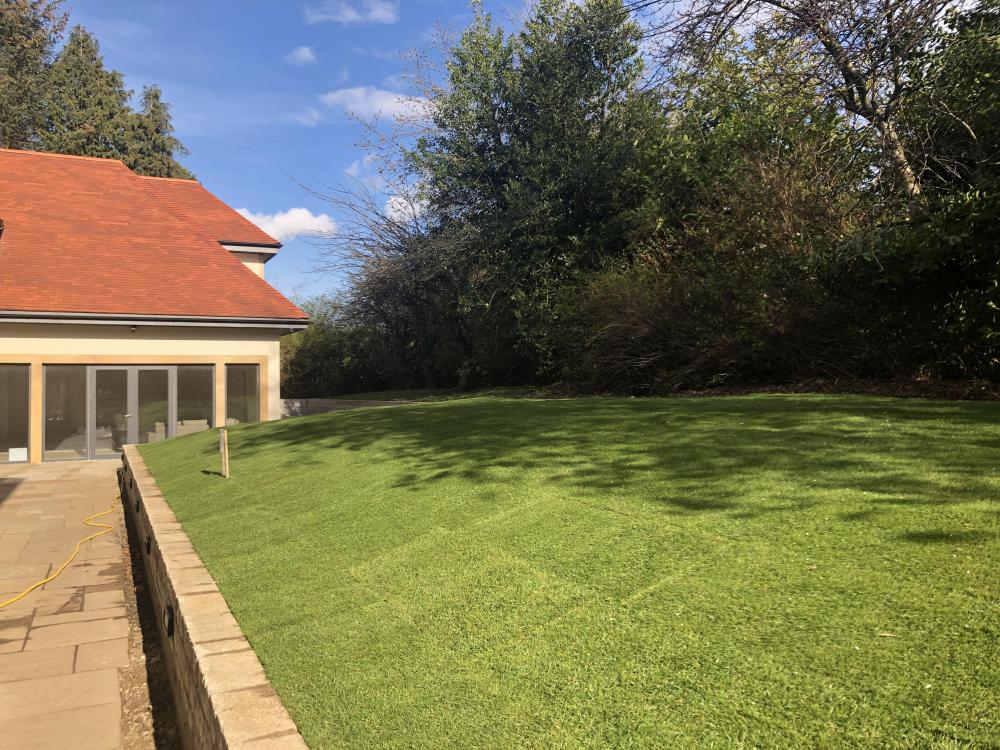
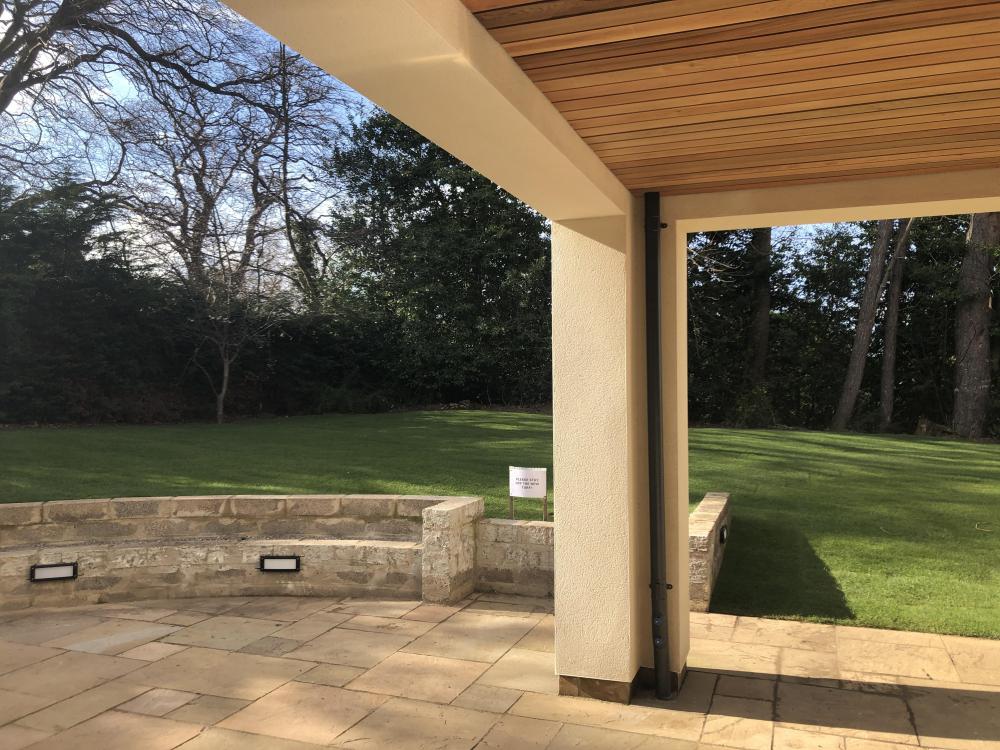
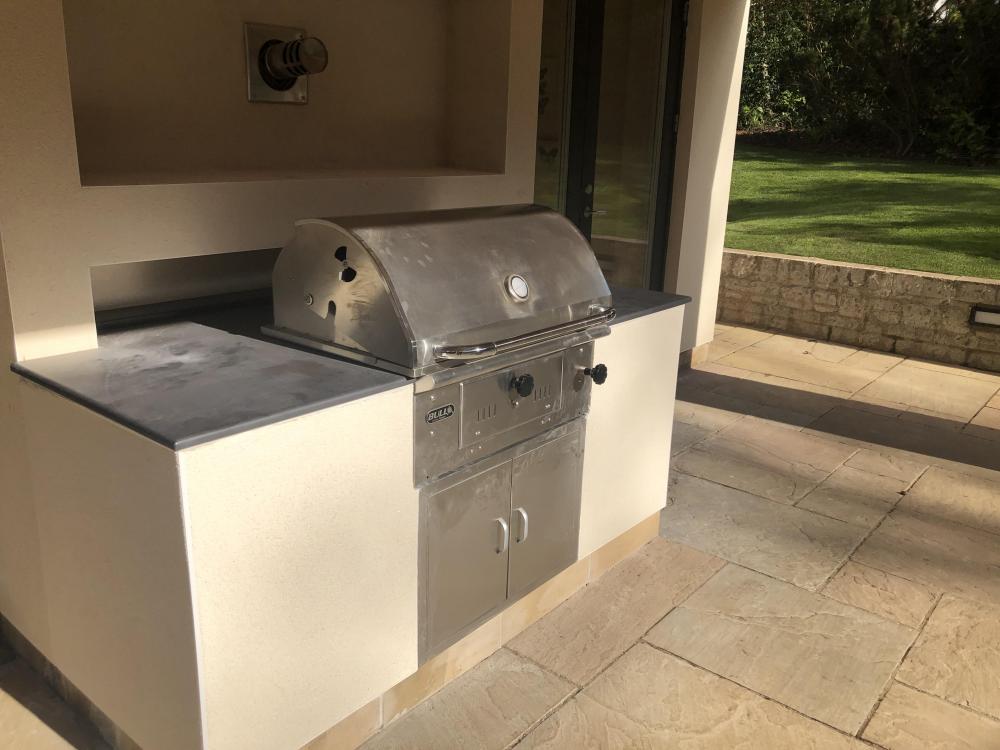
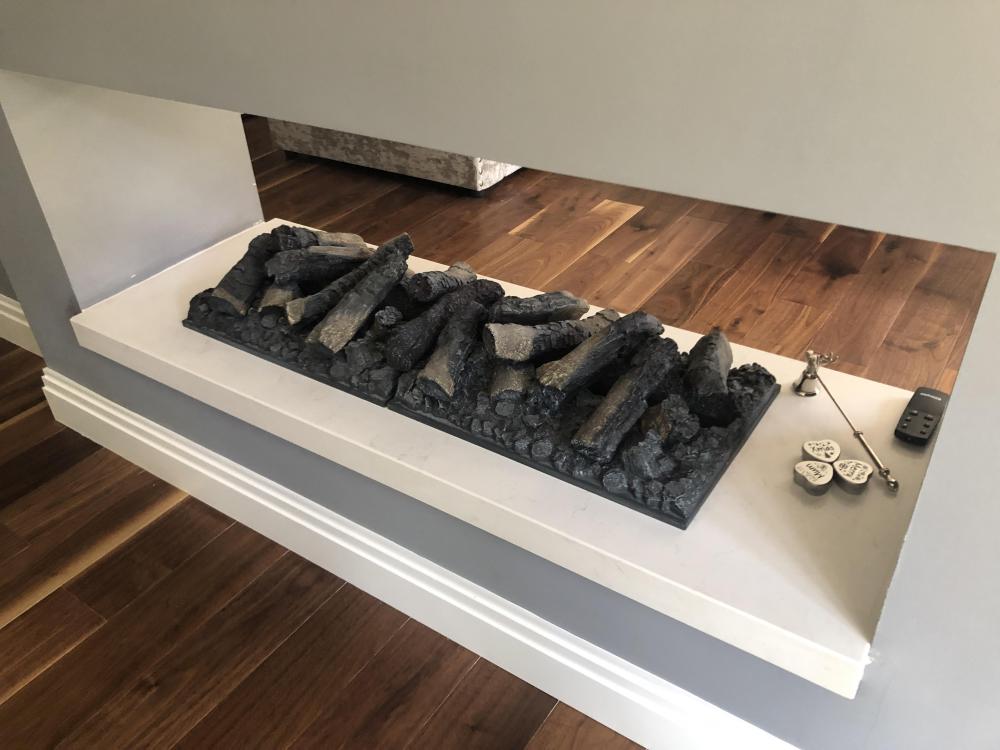
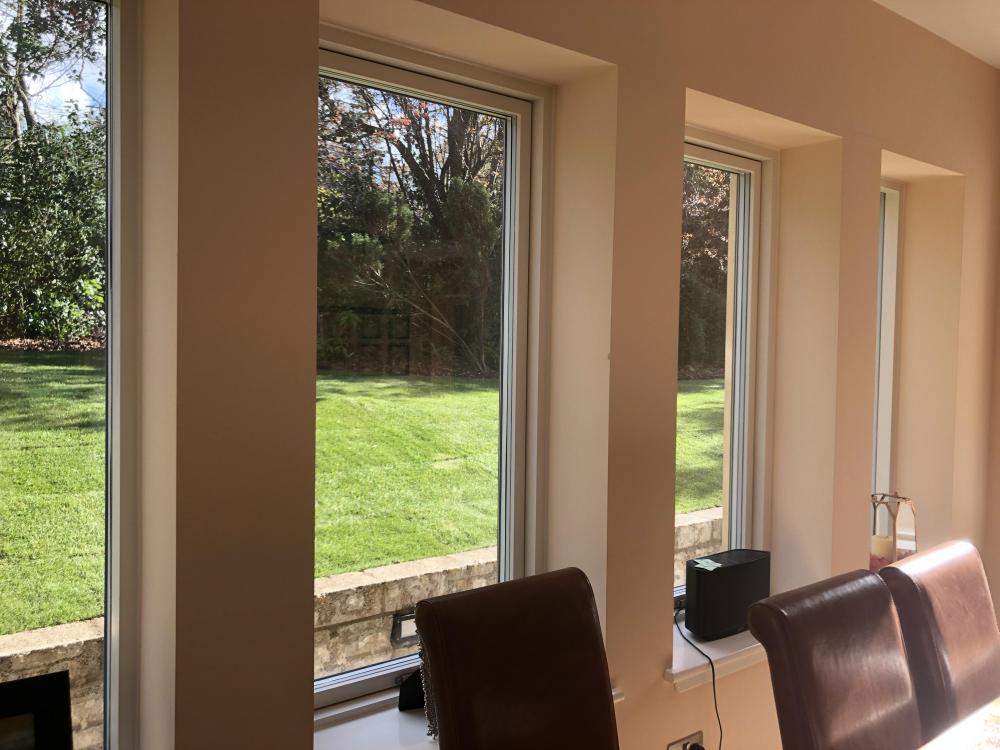
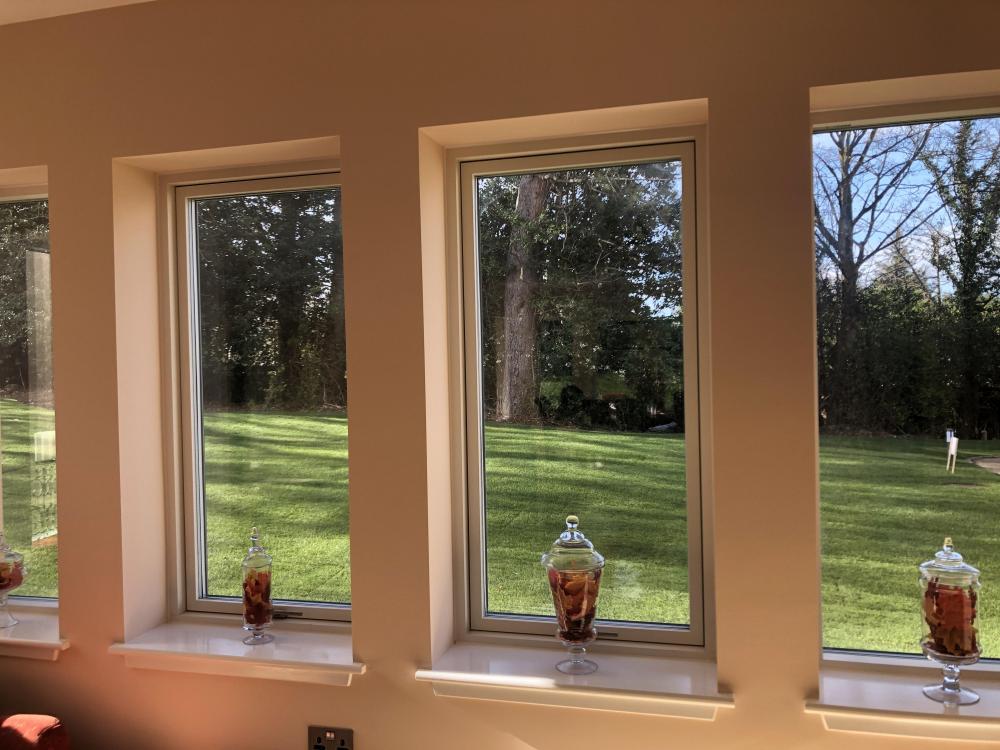
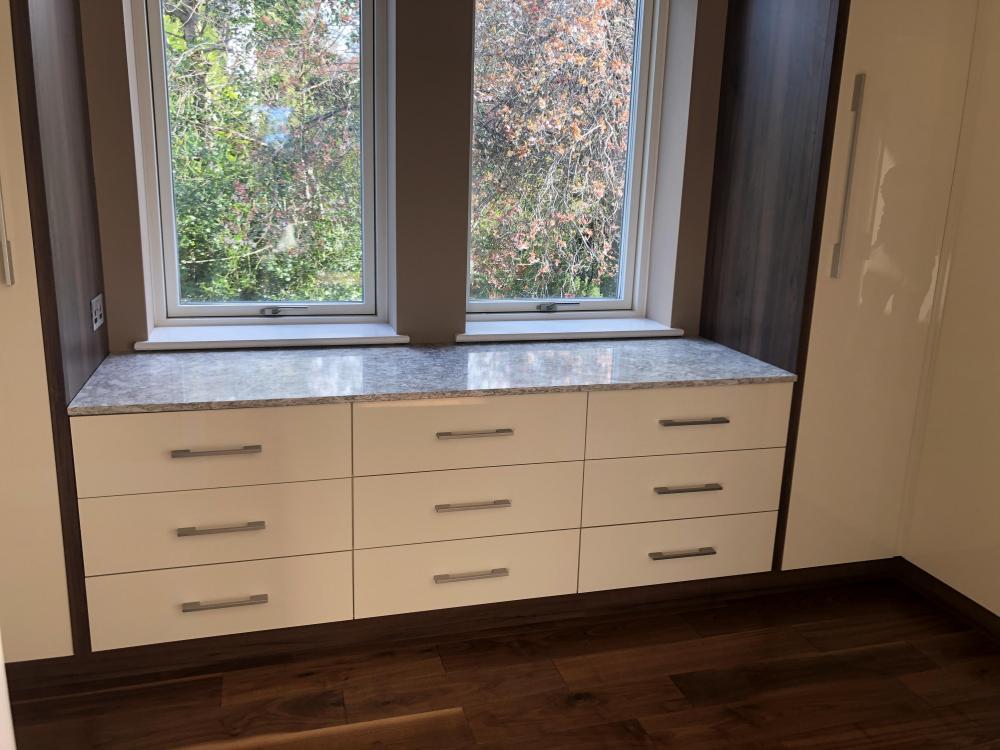
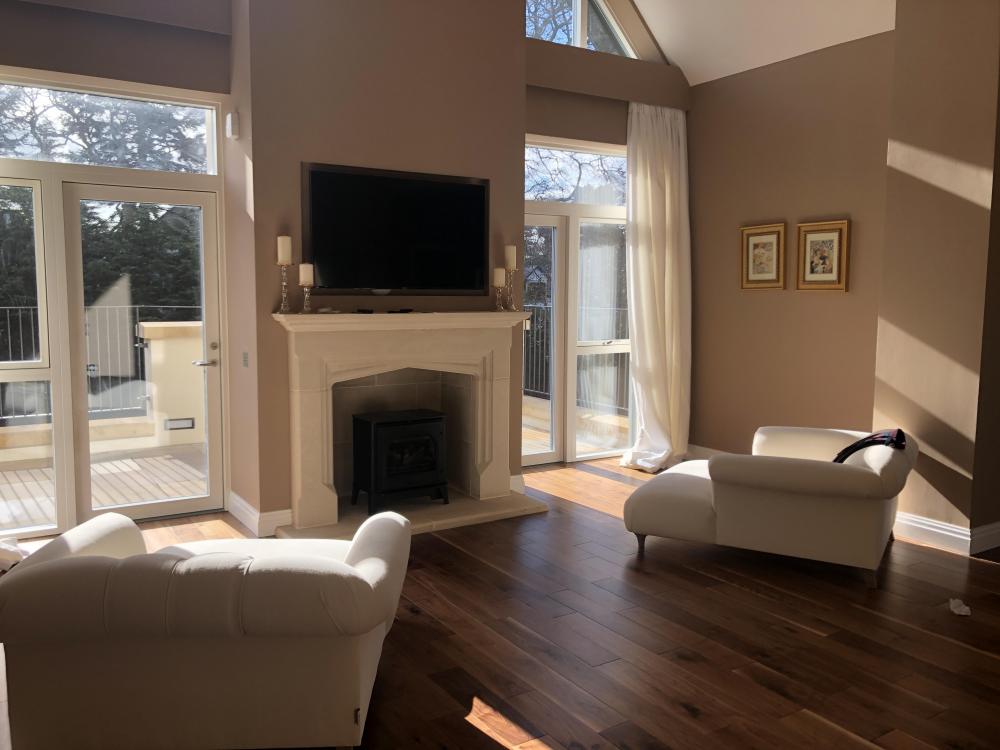
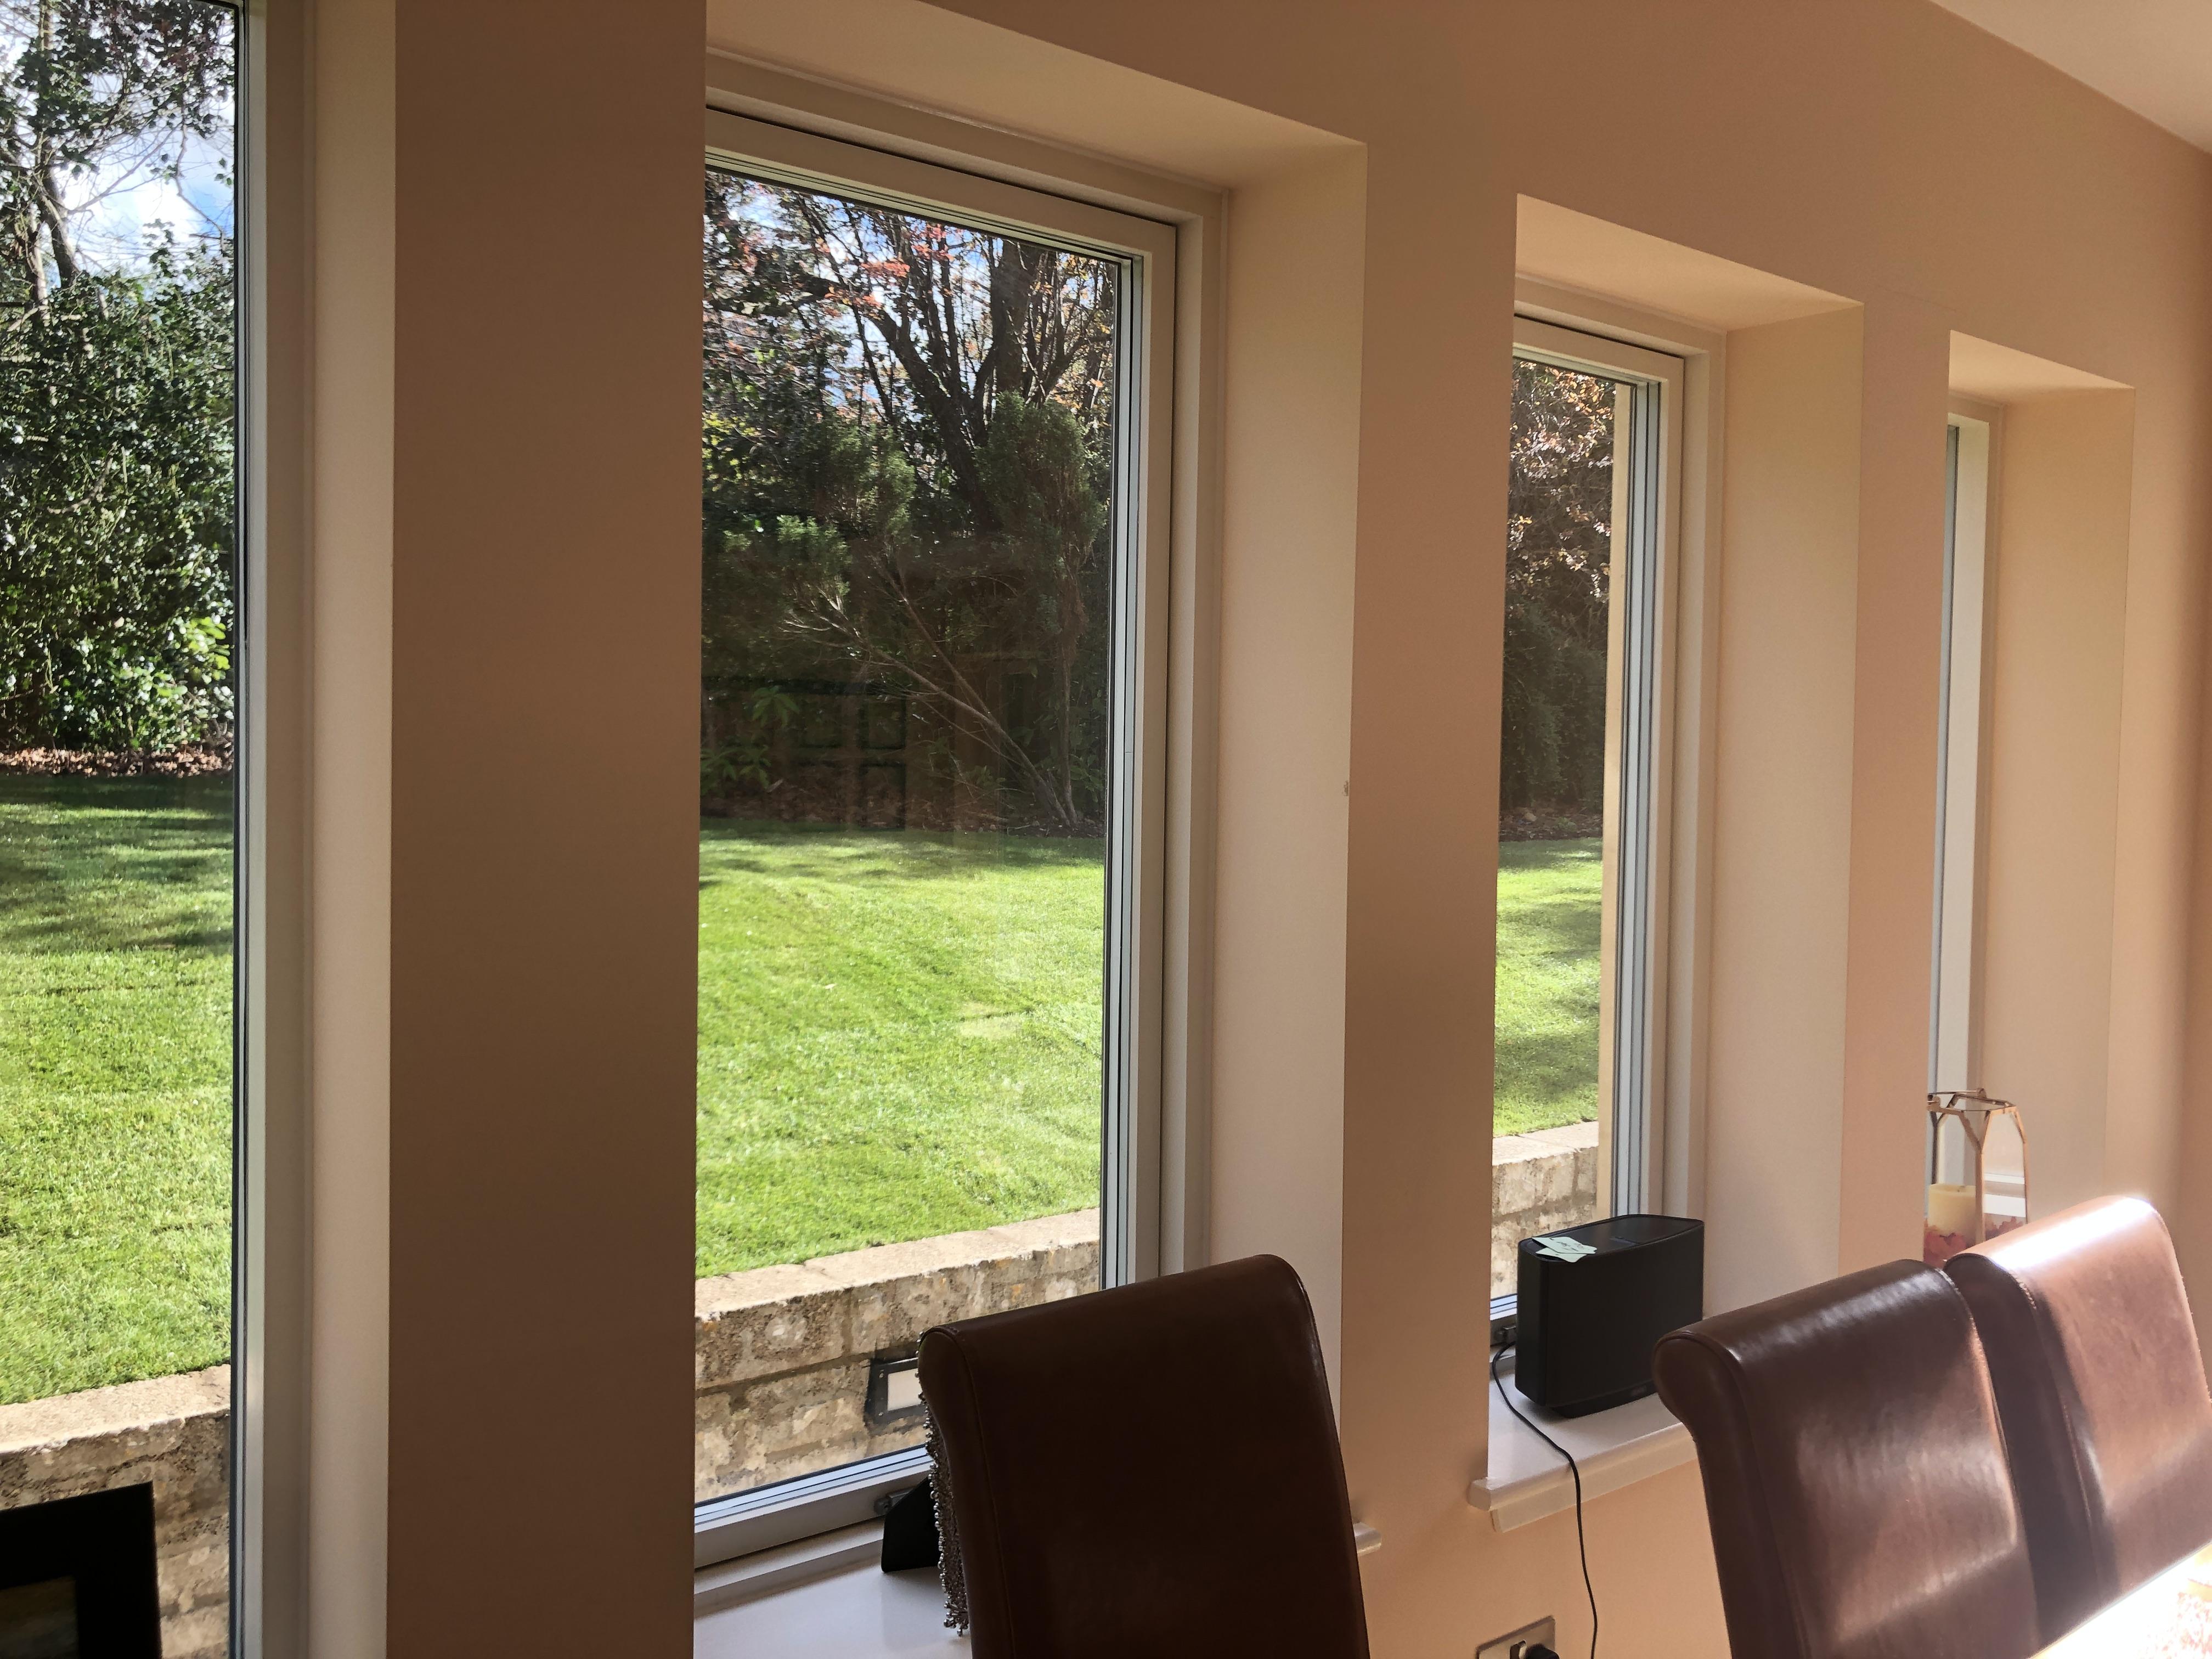
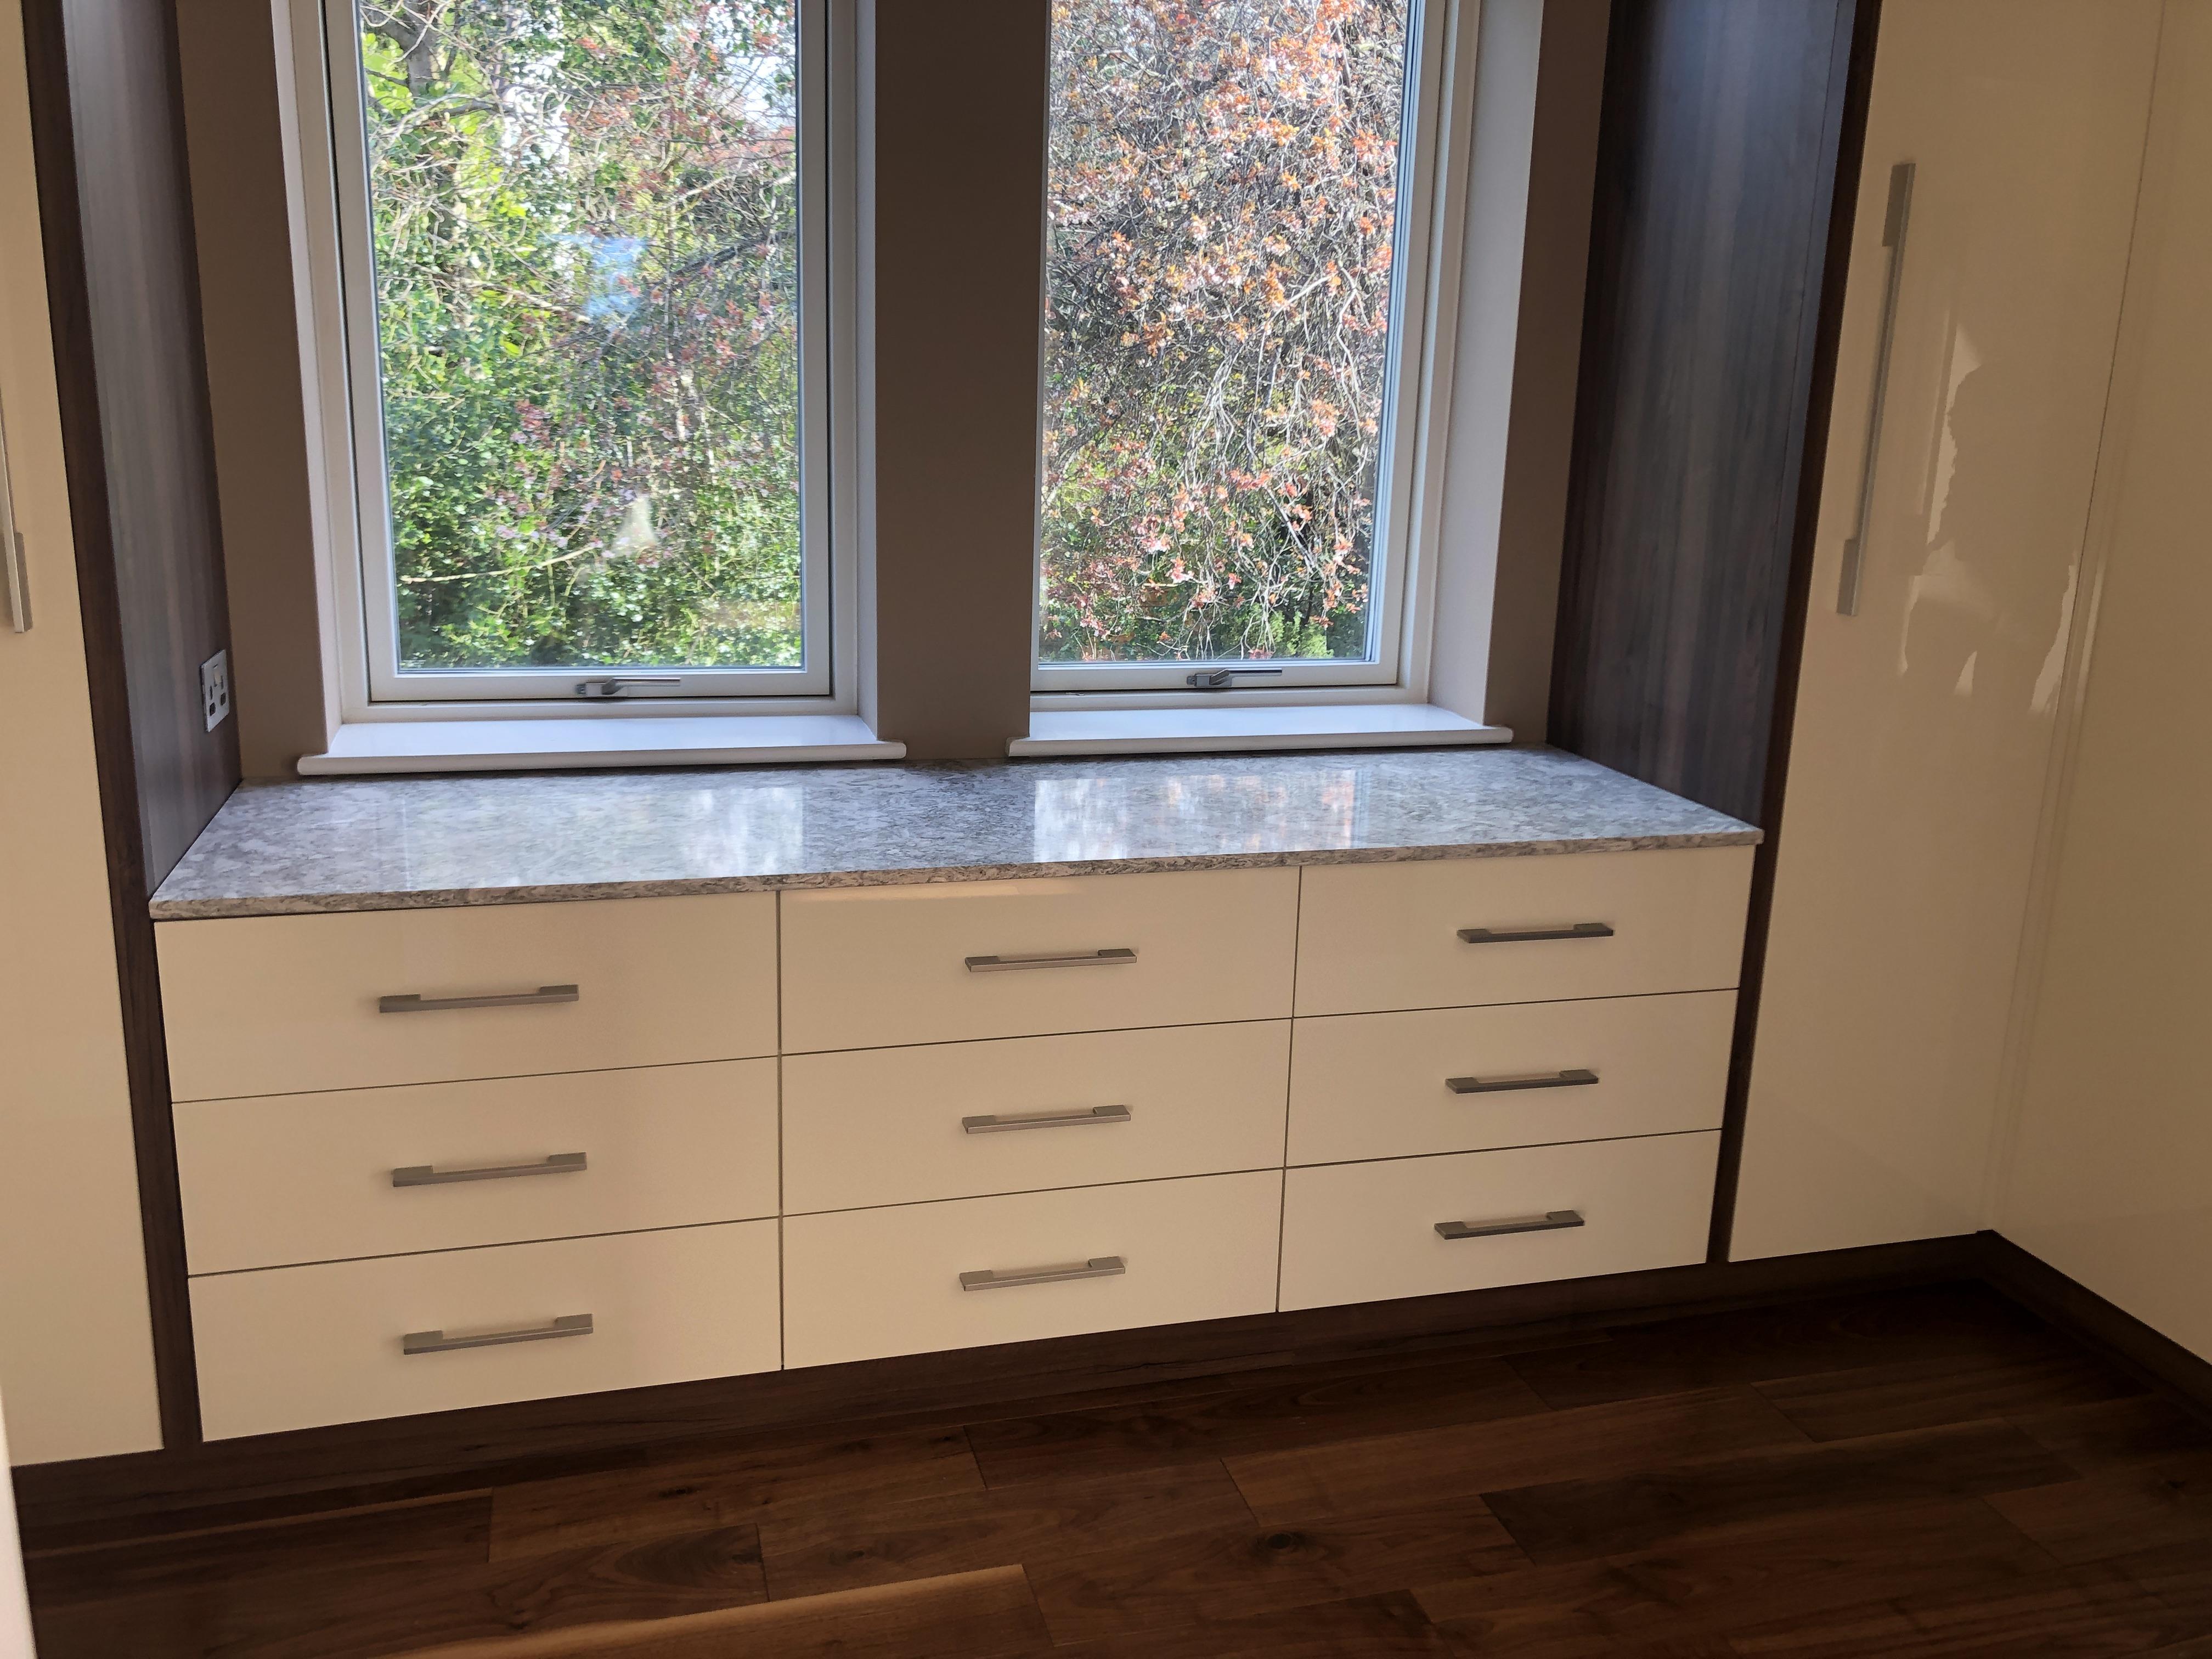
It seems that quite a few of us have had our turf laid this week. My wife loves it, it is so nice looking out on grass and not mud. The guys have done a lovely job. There are just a couple of snagging points left to do and we are done. We also need to have the garden walls rendered and copes put on. We also had a local company round to put various granite and marble shelves on, I was reticent as I thought it would be a pain to organise, but they were a pleasure to deal with. Finally this means that my built in barbecue is in, very excited for barbecue season, actually it is very nice today, we could probably have had one. Front of house Front coming in the driveway Back of house, looking towards pool Terrace off the kitchen Built in barbecue(Still a bit dusty) They used a Dekton top as they said this is the most heat resistant material Marble around Optimyst fire Back of house looking out from kitchen Front looking from kitchen Dressing room Furniture finally delivered for our bedroom, just waiting on a new bed now Decided to frame the hole in the wall fire as it looked too plain just sitting in the wall on its own


 1 point
 -
When I had my topography survey done, the surveyor said it will take you a year to get planning, i replied, watch this space mate I will have it all sorted in 6 months 16 months and £14600 later I started the foundations.??1 point


.jpg.c21f3ac78c9b7efd90cbdcb312744dc5.thumb.jpg.7adcad4c0e384f5ecd7d56b0618df6e5.jpg)


.thumb.jpg.bac90f3bbf6868cf2118d010d936c99d.jpg)


This leaderboard is set to London/GMT+01:00