
Leaderboard

.jpg.c21f3ac78c9b7efd90cbdcb312744dc5.thumb.jpg.7adcad4c0e384f5ecd7d56b0618df6e5.jpg)


Popular Content
Showing content with the highest reputation on 03/18/19 in all areas
-
Thank you for all the good wishes. Buildhub has been a lifeline for me over the past 2 years. The practical aspect with the shared knowledge & experiences, but, also the support & humour.6 points
-
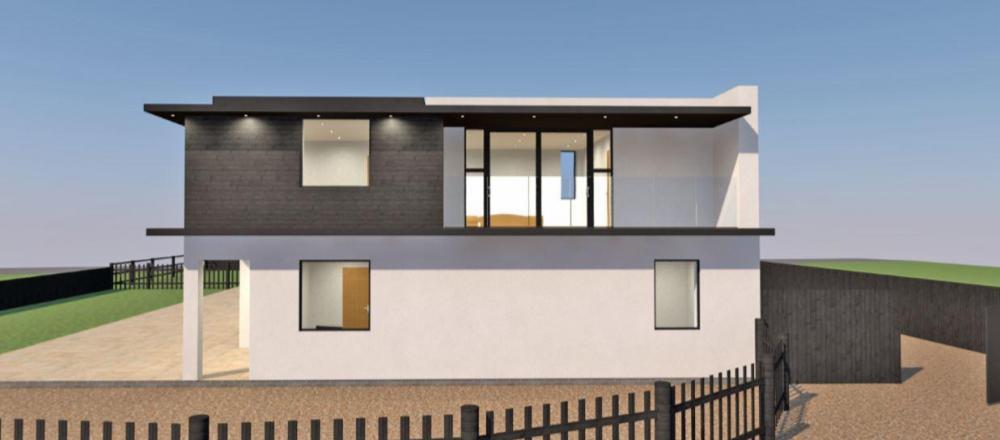
If plasterers were musicians, mine would be Elvis (except my plasterer is still alive, obvs!) or some arena-filling brain-melting rock god, because that's how good his plastering is. Others have been trying to coax Ian to work away for the last 3 weeks and they've had to accept failure as he doesn't travel (far). Anyhow, Ian the Plasterer has now left the building apart from a teensy last bit in the hallway that can't be done until the new stairs arrive, so 99% there. The week just gone saw the most challenging part of the plastering, which was the drop down the stairwell and the box section along the floor/upper ceiling run, which isn't one for a person with the slightest touch of vertigo. To get this done, the temporary staircase had to be removed and a compact but tall scaffold hired in to allow access. A youngman board was run across from the landing to the scaffold stage so that the width of the area could be accessed. As the last of the plasterboard was going up, we packed in as many of those pesky offcuts as we possibly could as this was our last chance to dispose of this within the walls of the house. It looked like some random form of plasterboard modern art as it was going up. Clearly, you can see that the stairs have been removed. Also moved temporarily was the UFH manifold that's been sitting comfortably under the stairs, as we didn't want any damage to come to that whilst Ian the Plasterer was doing his thing. Here's a not very good shot of the boarded stairwell and a peek at the edge of the PB lifter putting the board onto the hallway ceiling. The stairs are now on the floor in the lounge. Whether they will return to their original position depends on how long the permanent staircase takes to arrive, which is unknown right now as I need to have a chat with a couple of people about a couple of things, but I should be ordering it early next week. In the meantime, here's the stairway to nowhere. Back to the plastering, things are looking very different now that it's all done and drying out. The building instantly feels more solid and less like a construction site. The utility room is all done now and I intend to get in there next week with Jeremy's trust paint sprayer and then emulsion. There isn't that much going in the way of units going into the utility - just 4 in total. It will house a fridge, freezer and washing machine, then the units will continue along the same wall and have a work surface running above them. I've deliberately kept it less full as it's useful to have some empty space for all the things that fill up dumping grounds voids that most households naturally have. This is the other end of the utility, going through to the garage. Lying on the utility floor there, you can see my Howdens primed MDF doors, which are destined for upstairs and one between the utility and the main house. I hope to get started on painting these soon. The doors for most of the downstairs are currently in production over in the Netherlands, due to arrive around the 5th April, and these will be fully finished so no need to paint or anything, just add hardware and hang. After some research and a little back and forth, it turns out that the Netherlands is a great place to go for over-height doors. This is because what we consider to be over-height is entirely standard to them and you can get pretty much any size up to 2300 with no bother at all. Very handy for those large doorways of mine downstairs. We've planned to have low level lights in the hallway for some time now and I've copied ones that can be put in flush with the plasterboard and then plastered in (thanks, Barney12!). It sounded like a good idea so I ordered them and they arrived a few days later. Cue panic on my part as they appeared enormous and were way deeper than I was expecting. I had to measure them several times and be convinced that they wouldn't come out of the wall behind them. As it was, only a screwdriver point did that. The lights weigh a tonne - they are moulded plaster of Paris and very odd looking things, but look good once they go in. Here's the side view of the light that needs to be lost in the cavity of the stud wall. What a whopper! And here they are once they've been plastered in. Finishing off on the plastering, here's a view of the bottom part of the scaffold tower that I've hired for the occasion. Even though the stairwell is plastered, I've kept the tower as I need to paint the stairwell and the prep for this means masking the long window, so I need the extra height for this. Ian the Plasterer was cursing the weather that day as the sun was beating in and that long window faces almost due south. He was bemoaning the fact that you could see every single ripple in the plasterboard and even the slightest imperfection stuck out like a sore thumb. Overly critical of his own work as he is, he was very relieved when it was pointed out to him that there will be a brise soleil in front of that window eventually, which will smooth out his ripples in a jiffy. The last bit of plastering is a slight change of plan in the bathroom. Originally, the slanted wall opposite the door was going to be tiled all the way to the top and the MVHR extract hidden with a false panel covered by a tile. After some discussion, it was decided that this would look horrible as the side walls are only going to be tiled part way up. We still needed a work around for where the wall protrudes to house the cistern for the wall mounted loo and decided that continuing the theme of niches in the bathroom, a large portrait-style one above the loo would look good. I suggested that the MVHR outlet could then come down via the 'ceiling' of the niche, but a further move was made and it will be on the right hand side of the niche wall, above the bath, and so be virtually invisible (once the vents are covered!). As ever, a sharp bit of plastering from Ian. Plenty more has been going on inside, but let's step outside for a breath of air as it was busy there, too. The next set of groundworks have started. These comprise the surface water and foul water drainage, the driveway between the garage and the lane and the hard standing to the side of the garage. In addition, the surface water will now all be diverted to the pond, which overcomes the potential issue of how to deal with this on our heavy clay site. I've swapped groundworkers for this stage of the works. Sadly, my previous groundworker came through with a ridiculously inflated quote for the drainage work and as I already had another firm waiting in the wings as I have to install a dropped curb between my drive and the lane, I decided to use them for all the work as they were far more reasonable. I'm afraid there are no thrilling photos of the groundworks as it looks very similar to how the site has looked since the onset of winter - wet and boggy, with a few trenches here and there. However, I'm delighted that the drainage works are progressing, albeit with being called off for a few days due to the awful storms we've been having, as it means that as soon as they are done we can press on with the cladding and get the building properly watertight. As well as the groundworks, the balustrades for the balconies started going in last week. The east balcony is completed and the supports and railings are in on the west with the glass to follow shortly. There was a problem with a couple of panels not being the right size so I'm waiting on those, then the guys will be back to finish the installation. When I first ordered the balustrade, I had a minor panic shortly afterwards. I had requested that all the metal work should be powder coated in RAL 7016 to match the windows and be close to the colour of the slate. The panic was due to my wondering whether I should have gone for brushed steel or something a bit brighter. Come the day, however, the darker shade of anthracite grey was the right choice as it blends seamlessly with the windows and slate cladding on the upper storey, so much so that standing in the lane, the railings disappear and only the glass is obvious. Phew! Here's the balustrade viewed from the balcony. The same from the top of a pile of wood chippings in what will be the garden: And, finally, from the lane. The building looks very austere at the moment, but once the stone cladding goes on, it will be transformed again. It's a bit chilly outside, so let's go back indoors. Work has been continuing on the kitchen and the laminate worktop is in situ now, as well as the sink. Photos on that to follow next week once the clamps are off. I had been pondering the support post for the overhang on the island worksurface, and how to overcome my dislike for most of the ready made options out there. I really didn't want a metal post as it would look incongruous against everything else in the kitchen and so in one of those late night flashes of inspiration that occasionally come along, I decided to ask Harry the Carpenter to clad some timber with the laminate splashback to make a post that matched the underside of the breakfast bar part of the island. Harry did his thing, and I'm pleased with the result. Much as with the balustrade against the slates, it largely disappears into the background of the recess under the walnut worktop. I've been busy sanding and painting and all things decorating. The snug has now had its 2 coats of vinyl emulsion and I'm working my way through the prep for painting my ready-primed MDF skirting and architrave. I hate prep. Tedious, boring, and there's no way to get out of it. However, it will be worth it once all the 'woodwork' is all white and pristine. One thing that has become apparent since I painted the snug is the difference a paint base makes. The neutral colour that I'm using everywhere is called Borrowash, from Brewer's Albany paint range. In the snug and low traffic areas, I'm using standard vinyl emulsion but for the hallway and lounge, I'm using durable vinyl. All in the same shade, just a different base. So what, you may ask. Well, here's the thing. They come out different colours. I chose the colour on the basis of the standard vinyl - this is how it appears in the colour chart and sample pots, and it's a warm grey/beige, more beige than grey. The durable version, however, is much cooler and more grey than beige. I painted the lounge first with the durable stuff and a little while back did one of the bedrooms with the standard emulsion. I commented at the time how the light made them appear to be different colours except, as I now know, they really are different. It's not a problem as I like them both and they aren't next to each other in the same room, but it's worth bearing in mind if you plan to use the same colour in different bases. Here's the snug all painted up, looking out to the hallway. And another of the same. Finally, as I started the blog with Elvis, it seems appropriate to finish it with a bit of a light show. Team Blackmore worked hard on the ceiling feature in the lounge but up until now, it's been uncertain just how well (or not) it would work out with lights. Patience isn't always a virtue and so some LED strip lights on the feature were temporarily rigged up. All I can say is that Team Blackmore had a smile on its face when it saw this. Ladies and gentlemen, may I present the ceiling lights. p.s. I was on site to do a clean up today whilst it was nice and quiet there. There had been plenty of cursing during the week as work on the en suite shower for the master bedroom finally started. Foul things were coming out of both ends of the plumber the day after his curry night and the recalcitrant shower wasn't doing much to improve his mood. I noticed this today, written on a piece of board in the base of the shower recess.5 points
-
One house we owned had smooth tiles on the floor of the garage. Oh and a dent in the wall where a car had slid into it.2 points
-
Thanks guys. It was all really down to Henry's hard work & attention to detail. He sadly passed away on 5th March. Heartbreaking that he didn't get to see the house finished & move in. However, it stands as a huge achievement for him & it is lovely.2 points
-
Might find it works just fine with the two panels parallel connected. If it does, then it would be a better solution (in terms of maximising output). Can't do any harm to just try it and see how it works.1 point
-
Not as a structural upper floor, but you can have a screed or use ScreedBoard overlay.1 point
-
This seems to iwork as well: https://www.ebay.co.uk/itm/332895172548 ? F1 point
-
That's the plan. More time, more money, and no forwarding address for the kids.1 point
-
I loved a concrete floor upstairs. We’re doing the same again this time.1 point
-
All those tips you gave me haven't worked. I think you're a better glider than a teacher.1 point
-
Perhaps get a bunch of cheap ones from China. They probably come from there anyway.1 point
-
Had the air tightness test & EPC done this week. Not really ready but had to do it to meet the deadline for the FIT. House nowhere near finished, just plastered, have 2nd fix to do & MVHR not on yet. Air test result was 0.41 & EPC A rated at 99. (Of course if I fit solar thermal at a cost of £4000 it could score 101 & save £64 a year. What nonsense.) Huge relief. My husband would have been so chuffed.1 point
-
Thanks everyone for their responses!! Makes me feel a little easier about it1 point
-
It's just the join of the scrim cloth from the ceiling to the wall. It's a fairly regular thing to happen so nothing to worry about. Just let your house dry out and move and shrink and when it stops, about 18 months from the heating went on then you can start to sand and fill.1 point
-
Looks like normal shrinkage cracking, if this is a relatively new build. Pretty much any new build will tend to suffer from slight shrinkage/settlement cracks like this for the first year or two, as the house dries out and stabilises. It will generally be a bit worse if the house sits with a relatively low internal humidity level, as this will be a lot lower than when the house was built, and if the house was wet plastered then there will be a very big humidity difference between the period when it was being plastered, where it may literally have been dripping wet inside, and when completed when it will tend to be a lot less humid.1 point
-
We have quite a nice curry house a little further south, near the sea which just happens to be near a new build in need of expert plumbing advice later on in the year. Not as as good as my home town of course but growing up in Hayes, next door to Southall, where curry houses are 10 a penny, I have been through a few to find one I like.1 point
-
At least you're building a reputation...1 point
-
Summer of 2017 - photos of the paddock near the stable. Our daughter wanted wild flowers for her wedding but she then brought the day forward from June to May due to another family wedding clashing. The flowers looked beautiful on the original wedding day but were not out on the wet and wild day she actually got married on.

 1 point
 -
3rd Draft arrived this afternoon - I think we are there!!
.thumb.JPG.5b27cd550358faa4bfaa1286c6e26b4a.JPG)
.thumb.JPG.da8dec07946d3ee27789451cd40da56a.JPG)
 1 point
 -
Or with a different detail around the door...

 1 point
 -
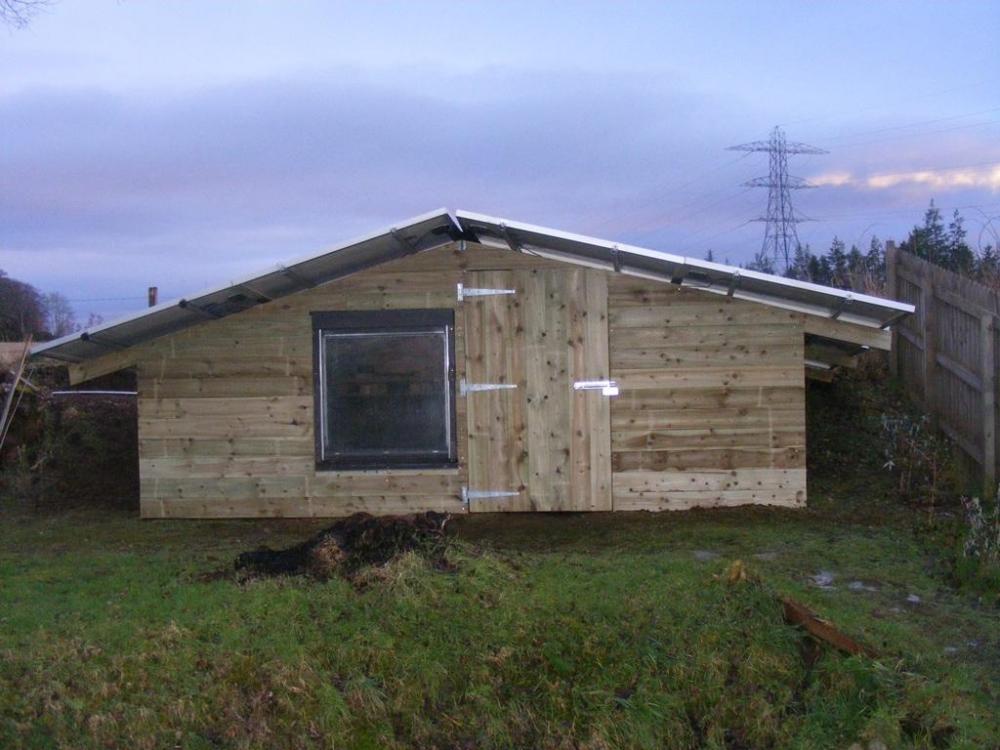
Well I have been busy with some timber, and enclosed the space under the panels to form a shed . Henceforth to be known as the Swiss chalet.
 1 point
 -
Building a house is easy. It's like riding a bike. Except the bike is on fire and you're on fire and everything is on fire and you're in hell.1 point
-
Been having a few thoughts about garages recently. Given that it is traditionally seem as the man zone, irrespective of how it might fly now, seems like we can have some design freedom in there. Where SWMBO gets to choose the crap that sits on the shelves and the shade of eggshell that the downstairs water closet gets painted, i thought of the following. Bolts of varying sizes stuck to the concrete much like those penny designs on floors, covered in a clear epoxy. Yes I know it might be a bit costly, but thing purely of the aesthetic aspect. Who would go for that?0 points
-
Looking good. Nice to see you’ve used the Tornado plaster lights. Should have asked Nick for a commission payment Oh and I can verify he has an arse like a sewer ?0 points
-
Looking great @vivienz. Love the 'never again' photo0 points


.JPG.d0cea172a4330a698ded61f20a83c82c.JPG)

.JPG.a1baf38bbdd8567a3324755864a9591d.JPG)


This leaderboard is set to London/GMT+01:00