
Leaderboard


Popular Content
Showing content with the highest reputation on 02/07/19 in all areas
-
As an update, I had 54 hooks printed in white nylon by 3DPRINTUK, mentioned by @Temp . I am very pleased with the result. The whole process was completely painless as they keep you informed about your order and the price was reasonable.
 5 points
 -
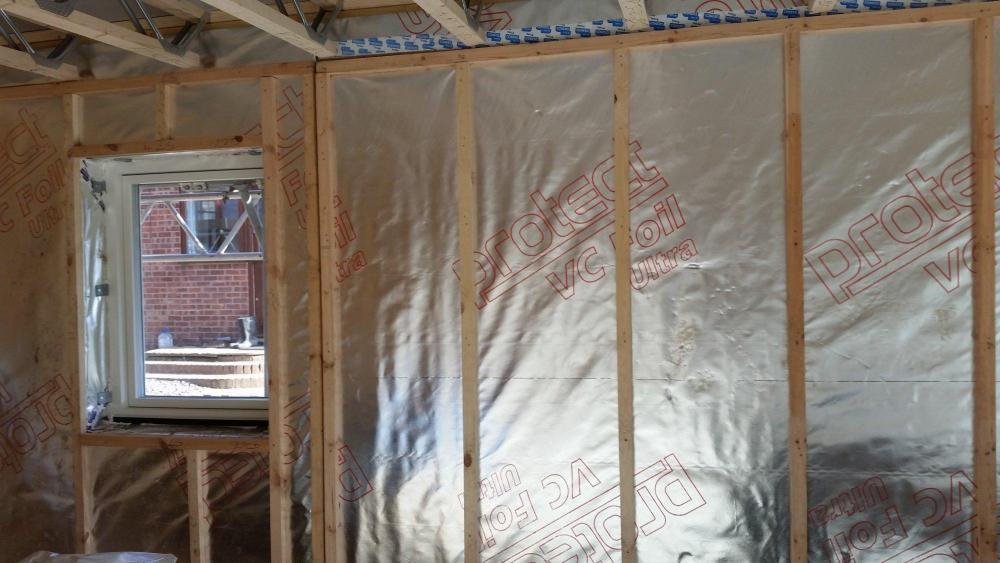
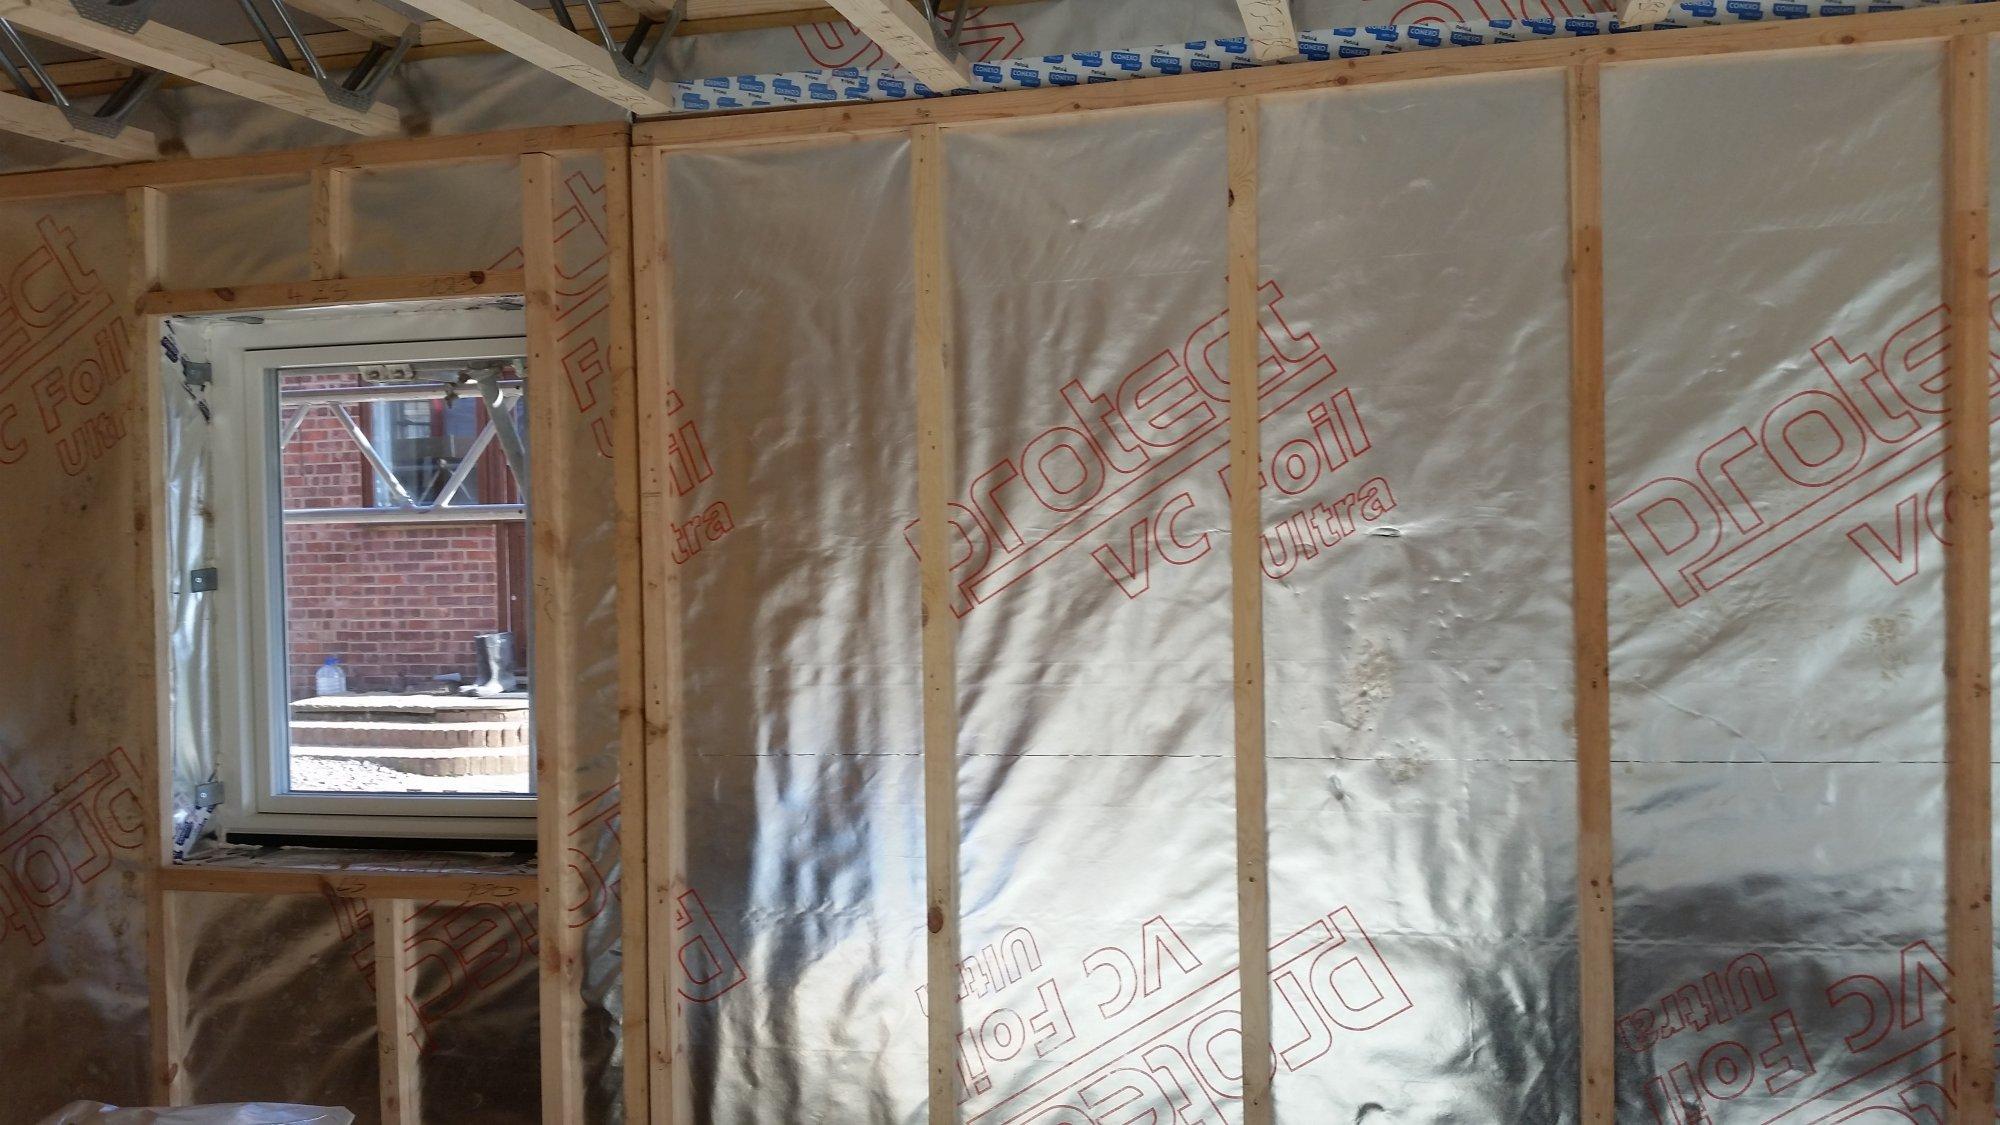
It's 3 weeks since my last blog entry and, as usual, things have been moving at a pace. The difference with the most recent round of work, though, it that the building is starting to look like a liveable house rather than a construction site. This is largely due to the glory coats of plaster and paint, but far more than that has been keeping everyone busy. The boarding started in earnest before Christmas and so the plasterers were in bright and early in the new year. We've got through an astonishing amount of board of various types - I thought I'd calculated reasonably well and had a mahooosive delivery of the stuff a while back, but it all seemed to disappear and the building was hungry for more. I bought all the board from Sydenhams as I found their price to be competitive. I've used standard 12.5mm plasterboard on all external walls, 15mm acoustic on all ceilings and internal walls, moisture board for bath/wet rooms, and pink fire board for the garage walls and ceiling. The garage is attached and so building regs require a fire door (FD30, sourced from Enfield Doors, though I've since found cheaper suppliers when looking at other stuff) and fire board throughout the garage, but only a single layer as there is no habitable space above it. I've had a board lifter on hire as it really helps the team position the boards up onto the ceilings without dropping anything on themselves or damaging either themselves or the boards. Here is the board going up on the lounge/dining area towards the kitchen area. The orange frame is the plaster board lifter. The black thing outside the window is my sewage treatment plant tank, which will be installed in a couple of weeks(ish). Looking in the opposite direction towards the lounge area: There have been plenty of plasterboard offcuts and so we have followed @JSHarris's tip of stuffing as much of this into the stud walls before boarding over. Double bubble - increasing the heat retaining ability of the house and no paying expensive disposal fees on waste plasterboard. As well as the boarding and plastering, first fix is underway, getting all the wiring, sockets and switch positions in and running vast amounts of cable through the building for all sorts of stuff. It's not just a case of chucking the cable in, he's done a great job of working out the flow of the building and the people in it, and how the building's circuitry should function best to suit them. It's a pity that it isn't more visual, but suffice it to say that at the last count, something like 2.9km of cable has gone into the building. It's in there somewhere! The room that forms the greater part of the ground floor is the kitchen/dining/lounge area and it's a very large space. From the outset, I've wanted to achieve some form of visual separation of the living area but without putting physical barriers in the way. It seems a waste to have gone to such great effort to create a lovely large space like that to then chop it up and close it in. I had inspiration for the solution from a couple of sources, the first of which is a tiny, crappy image on Pinterest when I was browsing cinema rooms. The second came about from chatting to another BH member, @Dreadnaught and a suggestion someone made to him to vary the heights of the ceiling throughout his proposed build. From this, I decided that I wanted a dropped section, like a frame, on the ceiling above the lounge area, with lighting recessed into the inner lip of the dropped section. Everyone pulled together really well to meet the challenge, and worked out what was needed from the carpentry, boarding, plastering and electrics contingents. The full ceiling was boarded out first, then the studwork frame put over it. The electrics were run through, then the frame was boarded and eventually plastered. Here's the completed framework and the first of the plasterboard going up. They're a cheerful bunch in their work! One thing I haven't skimped on is hire equipment to make the job of the plasterers and others easier. I figure it's a false economy to not get equipment like platforms and board lifters in as it will just cost me extra labour as the guys won't be able to work efficiently and possibly, not as well either. We had scaffold towers upstairs in the bedrooms for plastering and downstairs, we had a really big platform. I wouldn't do it any other way as the quality of the boarding and plastering is second to none. Once the studwork was boarded out, the inner ceiling section was plastered. The inner lip of the frame had an upstand added to it to make it appear more substantial and to hide the rows of LED lights behind them. We're going for a range of lighting intensity here, achieved by increasing amounts of lights, rather than dimmers. There will be 3 rows of LED lights hidden up there and we've used a car headlight analogy for want of better descriptions - the selection is dipped lights, main beam and rally lights. These are the only ceiling lights in this area as we plan to have floor lamps for specific task or reading lighting. Once the inner ceiling was plastered, the framework itself was done the following day. This photo is some way on from that, as you can see. By this stage, the whole of the downstairs main room has been done and recesses formed for the spotlights at the other end of the room. Not too long after this, the kitchen arrived from DIY Kitchens. Lovely quality units and everything is going together well. It did mean, though, that I had to get on with the painting up the kitchen end so that a start could be made on installation. A paragraph or two on painting is appropriate here. I put a brief post into the main decorating section here on BH regarding spray painting, but it deserves repetition. I've planned from the outset to do the painting myself. I'm competent and it's nice to get some hands on involvement in the build. But, and it really is a big one, there is a vast surface area to cover in this house, and the vaulted ceilings upstairs are really quite intimidating for a vertically challenged person such as myself. Mind you, I think a vault of 4.7m would make most people ponder their method of attack. I decided that by far the most effective approach for me was to spray the mist coats to seal the plaster and continue with white for the ceilings. I wasn't sure at that stage whether I would also apply the colour coats by spraying, so adopted a 'wait and see' approach. First off, masking takes ages, even with a relatively empty house, as that spray will get everywhere and anywhere. Once the masking is done and you've familiarised yourself with the sprayer itself, though, the speed of coverage is astonishing. I was able to comfortably do one large room per day - both mist coats and a couple of extra ones on the ceiling to get it opaque and full white. It was messy. Really messy! Especially as when I first got going I had the spray pressure a little too high, the mad angles of the vaulted ceilings meant that my nozzle was never going to be held at a constant 90 degrees to the surface, and it's just a messy process regardless. In addition, there is a vast amount of moisture in the air, particularly as we had plaster drying at the same time. I hired a commercial dehumidifier for a couple of weeks to help with this and it was very effective. I bought all my paint from Brewer's Decorator Centre, who are mainly based along the south coast of England. I opened a trade account with them and got 20% off the entirety of my first order, so I put everything I could think of onto that, including my antinox floor protection mats. Very useful they were, too. I used their contract matt white for the mist coat and ceilings. It's white, but not brilliant white and it's lovely. Very chalky, easy to sand and gives a nice highly matt finish. Also cheap as chips. Here's one of the bedrooms, masked up and sprayed. Here's another bedroom with that ceiling. My scaffold tower came into its own for reaching up to those heights. Then, finally, the kitchen area with its mist coat. The sprayer is the little beastie sitting on the plasterboard. I popped over on a weekend to also put the first colour coat on over at the kitchen area, whilst I could still get in easily before the kitchen started going in. I'm having splashbacks between the wall and base units, hence the odd looking finish level with the paint. These were all the kitchen units as they arrived, prior to painting. Everything was really well packaged and came with the doors on and drawers in. The delivery crew were pleasant and efficient, so all in all, a good experience. Moving away from painting and plastering, the ceiling plan for the lights was marked up on the floor, along with speakers and smoke detectors before the boards went on so that there was no guesswork involved in what was running where. Here's the marking plan: This is what the kitchen units look like at the moment. I made a cock up in ordering, purely out of ignorance, and I'm waiting for a few end deco panels to arrive. These didn't even occur to me as they will go between units and appliances to give a better appearance from face on. It made perfect sense when it was pointed out to me, so things have halted temporarily until those and my worktops arrive shortly. In the meantime, it's looking good: We also now have spotlights in place: Finally, for the curious, this is what karndean flooring looks like. It has been laid upstairs and the downstairs will be finished in a couple of weeks. Upstairs, it was all laid on ply that was feathered in at the edges and downstairs will have a latex feathering coat to level the floor and provide an even base. Next up is more of the same. The final session of boarding and plastering, lots more painting, the end of first fix and moving onto second fix. Outside, we need to get cracking on the rainwater goods, perimeter drain and exterior cladding. The cladding is due to arrive next week, so it will be interesting to see that and figure out the system. I hope to be able to report back on over height doors soon, as well, and my endeavours to find these at a reasonable price, but that's all for now. There's painting to be done.3 points
-
So, our ground floor walls are up, and ready for a concrete pour... almost! Despite our use of Logix ICF blocks, I had fallen in love with the simplicity of the joist hangers used by NUDURA. Essentially, all you do is slot metal plates through slits in the ICF blocks, hook them onto a bit of rebar in the wall, and pour the concrete. Then you wrap the end of your joists in a folded metal U-plate, and put tek-screws through the metal plates, through the U plate and into the joist. The shear strength of the metal plates and the tek-screws is what holds the joists up. So, before the pour, you end up with this: Some people choose to put battens under the joist hanger plates before the pour to stop them moving during. We didn't bother, because the steel rebar was holding them fairly well anyway, although most of them were also screwed to the blocks (we'd finagled the joist spacing to fit the stupid imperial measurements of the Logix blocks, which meant at least one plate for each joist was able to be screwed to a web in the ICF. So, the pour was uneventful in the end, apart from one tiny issue. Under that lovely 45-degree wall at the back of the garage, the block and beam floor was running under the angled wall. Which should be fine, but there must have been a small gap between the blocks somehow. After about 5 minutes of pouring concrete into the internal wall, we were getting a bit confused as to why the concrete level wasn't rising... ... It transpired that a 7N concrete block was now floating inside the wall, and the concrete was pouring through the resulting gap and under the block & beam floor in the garage, filling the void beneath. ? We only realised how far it had flowed under the garage when we started lifting floor blocks. In total, in those 5 minutes, we'd poured just under 3m3 of concrete into the void beneath the garage floor - the void had reduced from an average 750mm height to under 150mm in places! On the plus side, at least it didn't fill the void completely, given we still have to run services under there! Here's a photo showing how much it filled up: Still, the garage walls aren't going to shift anywhere now! And it only cost £300 in spilt concrete... Anyway, the rest of the pour went really well - no big bows (that we could see) and no bursts, despite all of the silly joints we had. Even little bits of PU foam seemed to withhold the weight of the concrete: (No, the string isn't supposed to be tight to the blocks - it was set so that a piece of CLS fit perfectly behind. And yes, that upright should have been screwed to the ICF blocks... except the observant among you will have noticed the webs don't line up between the courses. This was a deliberate decision made by me because of an alignment problem with the joist hangers above the bifold opening, and this seemed to fix it) So, concrete poured, and walls looking good: The internal walls (garage, kitchen and stairwell) were kept 1 course lower so that they could act as a bearing surface for our upstairs floor joists. Seemed like a good idea to me, anyway! Time for another ICF delivery... The big RSJ is for the 6m span between kitchen wall and garage wall, and will carry the load of the first floor joists in the middle 1/3 of the house. All well and good, but the massive trees at the front meant that getting a crane on site wasn't going to happen, and the cost of a crane that could clear the trees from the street was more than a little prohibitive... Time for some back-breaking lifting, because that beam weighs more than 1/4 of a tonne! Some swearing, and the death of a couple of ratchet straps, and the beam was lifted up into place... And the length was perfect - we had less than 10mm tolerance once you allow for the required bearing on the concrete walls! Timbers sailed past the end at the garage - I was too lazy to cut them at the time (and that came laziness back to bite me on the ar$e later in the build!) Say hello to the front of the house! Hallway window, nice doorway and the integral garage all present and correct Before we can carry on building the walls, we need to put the floor joists up and get a floor deck down: And time to start boarding it out: Which would have been easy if it weren't for the fact that the tolerances on the board joints wasn't so woeful: These boards were in the same pack, and the tongues varied by over 3mm. Biggest tongue we found across the lot was 20mm, and the smallest was 12mm. This meant we had to try mix-and-match for the floorboards, which took days longer than it should have... ? Nevertheless, 7 days later, and we had the floor down, and were building walls again. 3 more days, and we were cooking on gas - first floor walls were 2/3 up and we were erecting the bracing again: Time to put some lintels in for the windows (you can see the ICF cavity closer under the rebar links): It was at this point that we realised we had a bit of a problem... our house was too tall! Our planning permission showed a street scene, which had the ridge line of our house lower than next door's house. The drawing had been produced by asking the neighbour to measure the height of his eaves when he was clearing out a gutter - he'd used a tape measure, so I had no reason to doubt his figures... ...But we were out by nearly 600mm on the height. I had to go back one night, and put a laser on a staff, just to see how bad it was. Here's the picture, showing the laser line from the top of a 2.4m staff, shining on the neighbour's chimney: The upshot of this was a third planning application, and lots of sleepless nights, because we had to get a height increase approved (we first tried to use a minor non-material amendment, only to be told by the LPA Planning Services Manager that "a minor non-material amendment was not appropriate for securing an increase in height"... only to find out that the same Planning Services Manager had personally approved an increase in height on Chorley Nissan's planning application using a MNMA only 10 months prior! I wonder who had a nice Christmas present from Chorley Nissan that year?) Still, while we waited for approval (so that we could order the roof trusses) we could crack on with bracing up the first floor openings. And we had a ground floor that was giving us a sense of what it'd be like when it was finished: We were old hands at bracing openings now, having done it for the previous 2 floors of the house! Anyone else think it looks like something from an early 80s arcade game?2 points
-
When done you can stand on the front lip and it'll not move a jot. You'll need to allow the CT1 to have fully cured, so 72 hours is wise before doing any ass-robics2 points
-
Well with just days before we start we have our house block plan. All the bricks have ID's so all we have to do its put them in the right places. The blocks are coming loaded on pallets, each with it's own manifest. The scale of the kit is a bit daunting and having done my bit of Lego with the kids in the past I can't help remembering the fun of looking for that special brick that seems so illusive. Fingers crossed we don't end up with one left over after the last concrete poor. With site works just about to commence some of the details we thought were sorted are coming unravelled. Our rain water harvesting tank (RWH) which was nicely located on the edge of the property has had to be moved as the builder is concerned over the size of the hole next to the public highway. At 2.5M deep and 3.2M long. I can only agree, just a pity it didn't get mentioned until the week before we start digging. The tank is being moved to the rear garden along with all the associated changes to surface water collection drainage. While sorting this out it was spotted that the tank overflow was connected to the sewer, the sewer company takes a dim view of the idea of connecting surface water the sewer system. The fact that the tank capacity is very over specified and the overflow will probably never see any water is irrelevant. One of the main reasons we are an RWH was to take care of surface water as our plot is small and we could not get the 5 metre separation required by the building regs. There is a surface water drain in the road outside the plot but it's very deep which will make connecting to it prohibitively expensive. Just another detail to sort out that we would rather have handled before we started. Still no ones hurt so it's not serious... An 8 ton digger is scheduled for delivery first thing Monday and site setting out scheduled for Tuesday faternoon. Lots of lorries for waste and MOT. With the raft components being delivered the following Monday it's going to be a busy week. Hopefully we'll find no bodies on the site...1 point
-
Apologies - didn't check for typos, had meant to write, "I CAN quite believe that", my bad.1 point
-
Not enough to have to use the discount voucher1 point
-
Did you p*ss yourself laughing though!?1 point
-
I would respectfully beg to differ on that. I believe that in parts of the US the storage and harvesting of rainwater for domestic has been made illegal. On the surface this is to help stop the spread of certain water borne disease. I don't believe it's a coincidence that in some areas such as CA water is a scarce resource and this can be used as a form of control by forcing in effect the consumer to buy from approved sources at an ever-increasing price.1 point
-
3 coats of satin black Bedec barn paint on my gates (new, pine scaffold boards) and it looks as good as the day it was done. I have NEVER seen a "paint" cover bare wood so well with just the first coat. Expensive though. £50/5L from memory. Dries super quick between coats too. https://bedec.co.uk/bedec_products/barn-paint/1 point
-
Another user of Sadolin Classic on what is, effectively, a large fascia. Been on nearly seven years and was thinking of doing another coat this summer on the exposed face. The sheltered face still looks fine.1 point
-
I have to agree that an ASHP is so much cheaper. I too looked at GSHP initially. Even though at the time I had my own digger, so burying the pipe was just time and some diesel, the extra costs compared to an ASHP would never ever be repaid in the small saving in electricity compared to an ASHP. I did install (as in wire up) a shoebox once, I recall the instructions were far from clear, so much that I had to phone technical support when it did not work. Their technical support were far more helpful than the manual and we got it working.1 point
-
We used Sadolin Superdec Satin. Extensive range of colours but can also be ordered in any RAL colour. Painted our fascia/soffits in 7016 ordered from Buypaintsonline.co.uk and found them to be very reasonable on price and quick delivery. We painted ours close to 3 years ago now and still looks perfect.1 point
-
MOre complex systems, especially when you consider maintenance costs, have a very long payback if you have a good quality fabric which reduces your annual energy bills to say £500-1000. I would say that the era of Code for Sustainable Homes was all about complex ways of achieving things, That is often now done more easily by a fabric-first strategy, and leaving out the complex gubbins . IMO GSHP is now very niche, and imo things like Rainwater Harvesting have mainly had their time, if you do a high quality fabric approach. SImilarly for complex control systems - if you can heat your whole house with a few kilowatts, then room stat timers cease to be economic. Ferdinand1 point
-
I have used this combination on my oak seat that sits on top of a sea cliff and is fully exposed to the elements ! I applied it during the summer when it was bone dry and it has been bomb proof all winter, still looks as good as when it was first applied . I know it’s only one winter but the location is barbaric. The top coat is very flexable and seems a great solution to exposed timber that could and will move with the seasons. The wood protection/ stain can come in a veriaty of colours.

 1 point
 -
I take it you have calculated your water run off from the roof, I used to have a 5000ltr tank and could fill it in one night with a good shower. Get some pics up as soon as you start we have just put our last icf block in position, every item of clothing I own has expanding foam on it. Just about fed up with it now, ready for something new. Good luck, if your blocks are like my steel reinforcement, number 1 will be the last pallet you find.1 point
-
Looks like the price for the Shoebox hasn't changed much in recent years. I found Kensa to be extremely helpful, back when I was looking into the feasibility of installing a GSHP using a standing column collector. They were also the only manufacturer I found who were able to supply a small unit that met our needs. The only reason we switched to using an ASHP was cost. The total installed cost for the GSHP option came to close to £8k, and the improvement in COP over an ASHP wasn't enough over the expected life of the heat pump to ever recover the installed price difference - £6k buys a LOT of electricity. Our ASHP cost around £2k installed, which made the decision a bit of a no-brainer.1 point
-
I'm not convinced I saved that much cost using slinkies but so far I am averaging a COP of 5 with a Kensa Evo setup. Don't forget to budget for sand and moving that sand, if you need it. All the manufactures I spoke to said you would get the MCS quoted COP if you followed their installation guidelines.1 point
-
that should help your thoughts a bit LOL. without even looking at the small slinky ,which i doubt could give you the heat at a high COP you are wanting. plus when you look around further you will find that slinkies are not well liked by a lot of GSHP consultants . modern preferred method now is simple trench single pipe going up and down spaced at least 2-3m apart . read this http://sourceenergy.co.uk/how-much-space-do-you-need-for-a-ground-source-heat-pump/1 point
-
Yes I guess they must be some form of SIP panel. The interesting thing is that it is not a continuous panel the full length of the roof, an off thin panel was added at the top. But for the point of this discussion id does appear to have a (probably OSB) sarking layer on top.1 point
-
Vat registered we get everything ex vat really @nod then we collect vat from customer if applicable. Vat is just a cash flow exercise1 point
-
I was tempted but refrained. Nowhere to wash my hands yet! Did call my daughter in to do the first flush. "Now perhaps you'll start flushing the toilet!" I said.1 point
-
If you use 12.5 mil boards on the cielings All endges need to be supported Best to use 15 mill TP boards on the cielings As you can set your joists or trusses at 600 without any need for noggings Foil back boards to underside of trusses and any flat roofs With the exception of bathroom cielings No one does a foil back Moister So bc will accept either in 15 mil to bathrooms I ideally go with moister Moister 12.5 boards to bathroom walls and personal choice for wall Soundblock etc Or just 12.5 wallboards Abito boards are worth looking at Bit pricey Allow an exstra 60% for labour No good for fit and dab1 point
-
This is from VAT Notice 708 that the builders should be more familiar with: 11.2 Goods ‘incorporated’ by a builder If you are a builder, the rate of VAT you charge for your work normally determines the rate of VAT you charge on any goods you ‘incorporate’ in the building (or its site) - see paragraph 13.3 - whilst carrying out that work. So, if your work is zero-rated or reduced-rated, then so are the goods. https://www.gov.uk/government/publications/vat-notice-708-buildings-and-construction/vat-notice-708-buildings-and-construction#reduced-rating-the-renovation-or-alteration-of-empty-residential-premises1 point
-
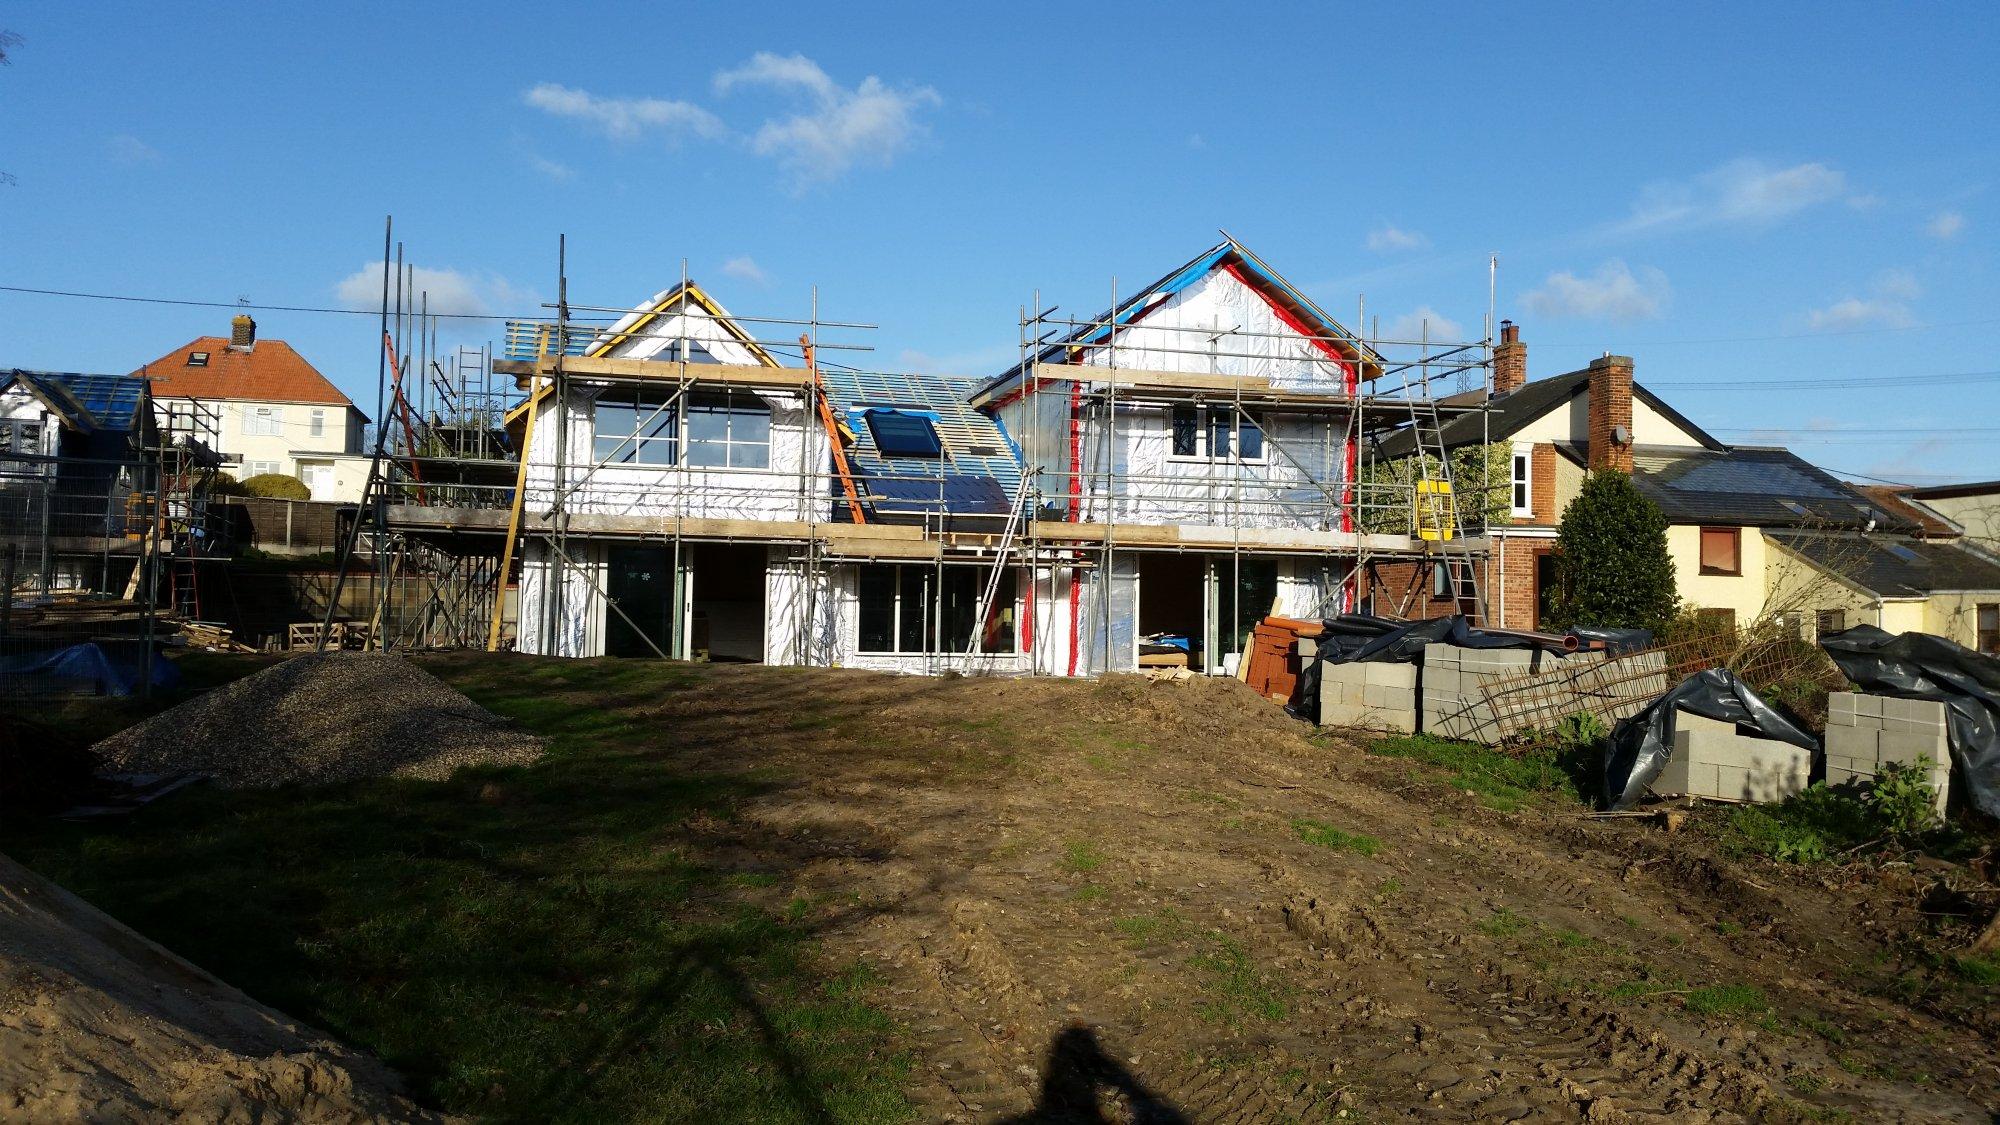
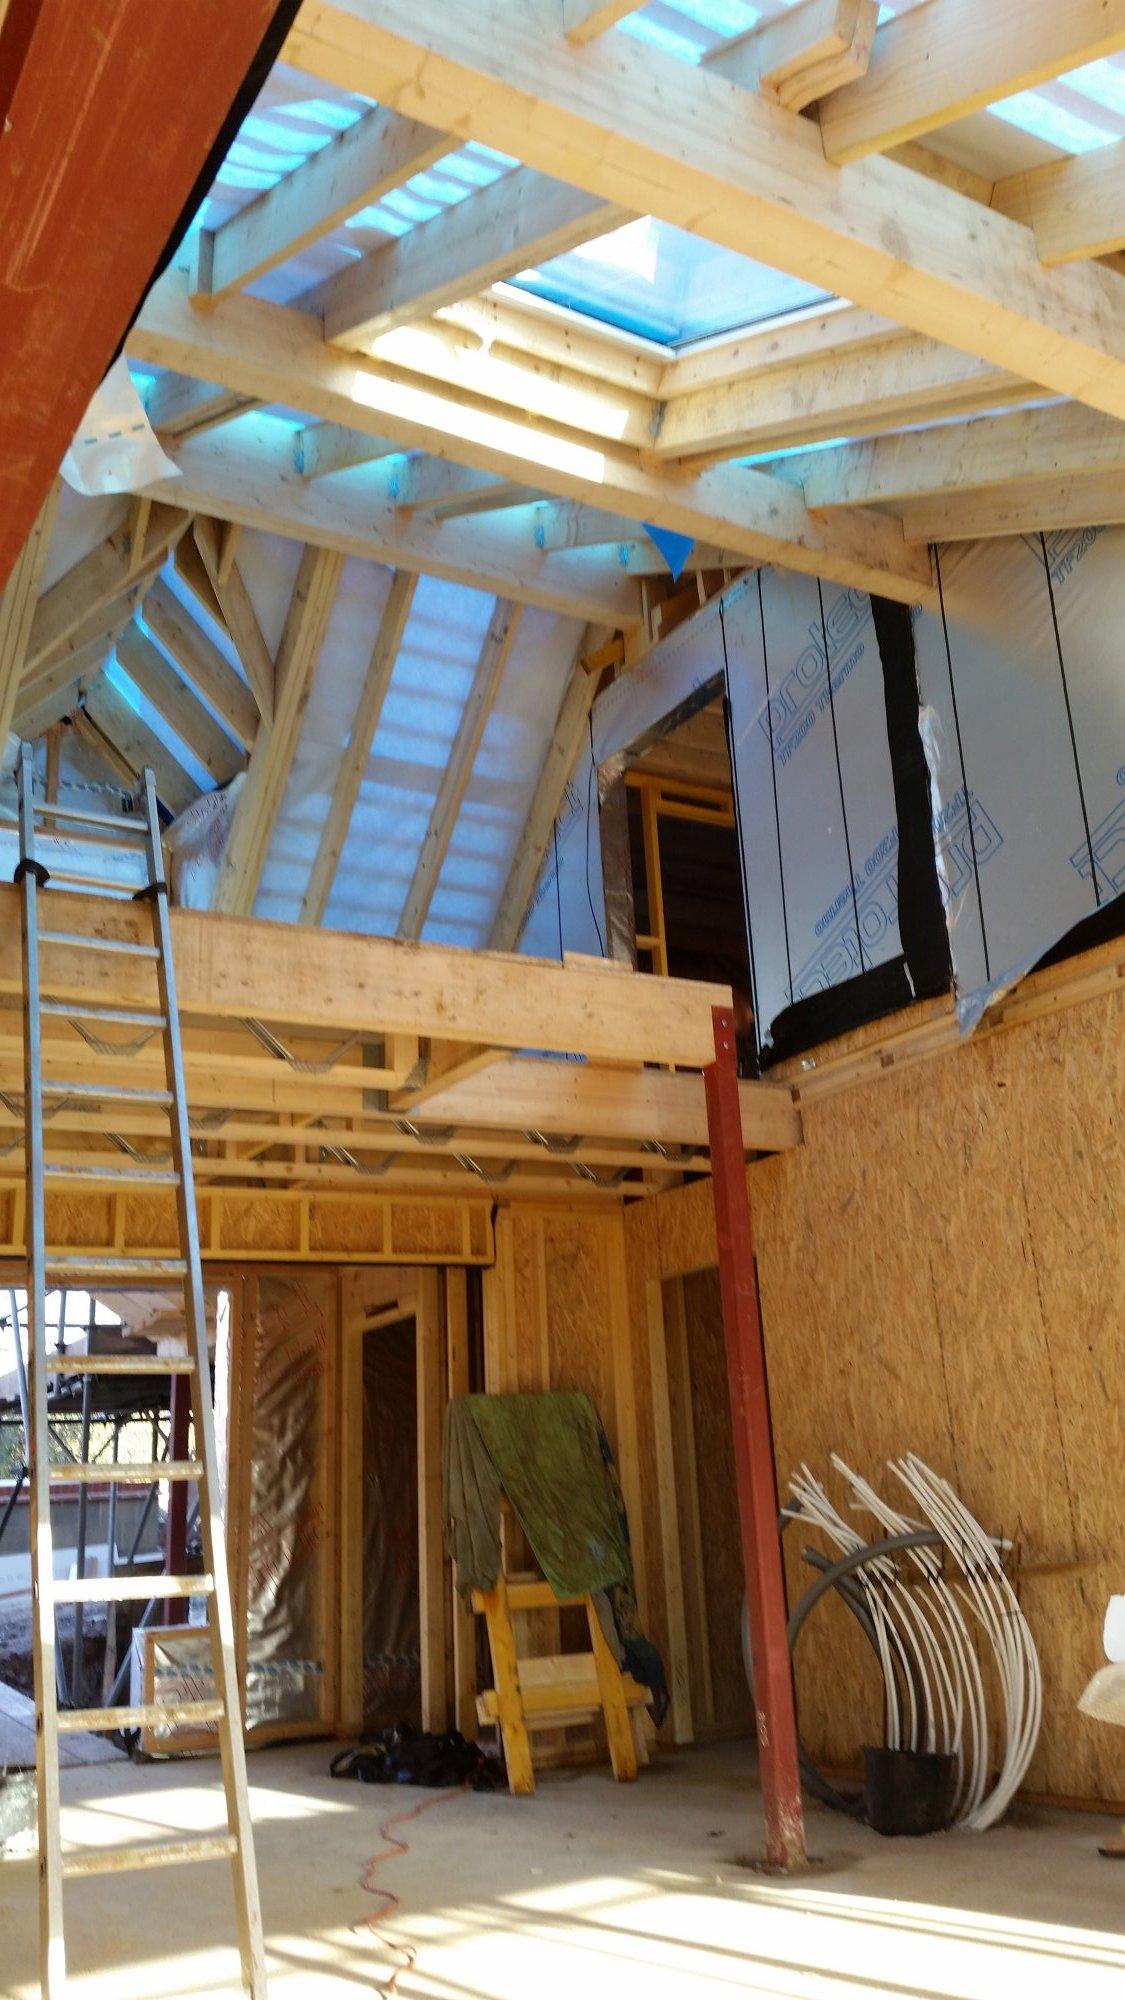
Following the example of @Weebles last year who we visited, we would like to invite fellow Buildhubbers who would like to come and see our MBC 140mm frame to get in touch and make arrangements to visit. We are located in North Essex about 8 miles west of Colchester. We briefly met @Dreadnaught and @vivienz when visiting @Weebles and we all agreed that seeing a real project was extremely useful. See photos below of the house from the rear + central section - taken just after MBC had completed frame erection and gone home for Christmas (the rooflight is 2m x 1m, triple glazed and weighs just over 180kg - we had fun getting that in place ?). The photo is a bit deceptive in that the ground does not slope as steeply as it seems, the house is set down in the ground - we had to dig out over 1,500 tonnes of soil due to the constraints those nice planners put on us ? - and there is more to come out once we start landscaping: At the moment we are reaching major milestones every month or so. November 2018 saw the slab poured, December 2018 the frame was erected and (most) windows/doors installed and PV array on roof, January 2019 the slate roof was nearly completed (slating should be finished this week). About half the house has a brick skin and brickwork starts tomorrow (weather permitting) and they are expecting to take about 5/6 weeks (weather permitting – I think I shall be saying that a lot in the coming weeks). The other half is rendered and the rendering team should start preparations within the next couple of weeks. We also have a couple of areas with brick slips, just to keep us on our toes (but that's another story for another day). MBC are due back during the second half of February to install the insulation in the roof and then make the building airtight. All the above means that there is plenty to see in terms of how the house is constructed. We have lots of lessons to share as well. We have contracted with MBC for them to deliver wall & roof u-values of 0.14 W/m2.K (achieved using Knauf Earthwool + PIR for the walls and similar for the roof) and the slab of 0.105 W/m2.K. I also have a belated apology to make to @Dreadnaught for not responding on his previous thread about the 140mm system – we have been distracted by non-build related issues in recent weeks as well as having plenty of build related issues to deal with. @Dreadnaught - see the photo below of the panels in situ (struggled a bit with the light I am afraid)

 1 point
 -
The S’Fix one is made of recycled bottle tops .... avoid ..! 1600x900 is an odd size in that room as you’ll end up with a very small sliver that will leak. Maybe better to give yourself a decent “gap” that could have a towel rail or similar so consider 1500x900 These ones are good - and heavy too1 point
-
Right. The pan is not 600mm wide, so what is the actual bow over the ~360-380mm width of the pan? Not really. The foam will compress in the middle and not at the outer edges, so will be worse than the CT1 as it'll have zero 'grab' as its not an adhesive. Basically you'll be giving the pan something to move on. Dry fit the pan, get it level, and then mask up the tiles and the pan. Loosen the fixings so you have a 5mm gap all round the pan, pump in the CT1 and then re-fit. When you tighten up you'll see the excess CT1 being displaced, and when the centre section stops displacing it you're good to go. Make sure the pan is not off centre or pointing 'in either direction' and then set about clearing off the excess with wipes, then de-mask, and then a final wipe up so there is a gap left for white silicone to be applied as a cosmetic finish ( after the CT1 has fully cured ). Once the CT1 has gone off, the thicker layers at the far left and right will have gone solid and will be creating a fix between the pan and the tiles, vs the foam gasket which would be doing neither.1 point


This leaderboard is set to London/GMT+01:00