
Leaderboard

.jpg.c21f3ac78c9b7efd90cbdcb312744dc5.thumb.jpg.7adcad4c0e384f5ecd7d56b0618df6e5.jpg)

Popular Content
Showing content with the highest reputation on 01/09/19 in all areas
-
Worth a try? Not sure if heating it before applying will make it easy to apply? Will still need squeezed but maybe easier. https://www.amazon.co.uk/Silicone-Sealant-Clear-Waterproof-70g/dp/B0036GEK9W I would also say that in terms of applicator guns, the Heavy Duty ones are the best, require significantly less effort. We have two, and I can barely use the 'standard' one. It's too hard even for me. I used this one as well which is actually quite good too. https://www.screwfix.com/p/no-nonsense-foil-and-cartridge-applicator-gun/133fr2 points
-
Those solutions are for outside walls with cladding panels, not sure if your walls are rendered panels or blockwork. Anyway, Galenco as referenced by @Russdl has solutions for different construction methods. https://galeco.pl/sites/all/pliki/do_pobrania_eng/katalog_bezokapowy_eng_24_08_2017.pdf2 points
-
If you want to talk to an engineer who knows about raft foundations, MBC used (and may still use) Hilliard Tanner. Website is http://www.tsd.ie/ Hilliard REALLY knows this stuff inside and out, and I found him very approachable when we had a few questions during our build.2 points
-
@MarkyP - thanks. The job was epic! There was only myself and husband to do the labour. We had looked at using a firm but the cost was absolutely prohibitive for us for the full 'mix and lay screed' job. We found a firm who would come and mix the lot and leave you to lay it, but glad we didn't do that as we couldn't have laid that much quickly enough - it would have been going off before it was laid! Luckily lime is a very forgiving material so continuing the following day and successfully fusing to yesterdays work is do-able because you can just rework the edge back up and carry on. Once started you have to finish though as you wouldn't want to leave it much more than 24 hours before joining to it - that's already a tricky-ish fuse. We used two Baron forced action mixer one E90 and one E200. Keeping those two going constantly was the limit of physical capacity for mixing and laying for two people. I used NHL-5 supplied by Eden HotLime, mixed with fine sharp sand + gravel at a ratio of 1 lime to 2.5 grit. Adding short fibres too. Mixed with enough water to get a consistency similar to biscuit dough and stirring for minimum 20 minutes after the last bit of water added to make sure the lime was fat before it was laid into the screed. While the twenty minutes was ticking on the clock I would fill the buckets with the next lot of materials ready to get straight on with the next batch. So it was mix, refine mix with water until happy, set timer, fill buckets, unload and deliver... start again... ad inifiitum. We used a laser level to make sure we got the finish level correct. Each batch was pummelled into shape with a tamper then polished up with a float. Towards the end (19 days solid - 7am to 11pm in total) we were adding more water to make the mix softer as the punishment on the hands was harder with a firmer mix. This still resulted in a good floor but we got more shrinkage cracks with the wetter mix of course. Nothing some filler couldn't sort out though. We took a gamble on the temperatures - basically because we had no choice and at a few points it was 3-4 degrees while mixing (outside) which made the ingredients stick to the mixers so I had to scrape it back in by hand to make sure it was all mixed thoroughly - it wasn't ideal (and a pain in the botty) but we got away with it, we were lucky it was no colder though. Inside was warmer 5+ degrees all the time which was good as that was where it mattered more. When it rained I had to keep the mixers covered so it didn't dilute the mixture to the wrong consistency. I had wanted to mix inside an outbuilding but my cables wouldn't reach, but actually I was glad I didn't in the end, as although it would have been easier in some ways, the dust from the lime would have been worse not dispersing freely outside.2 points
-
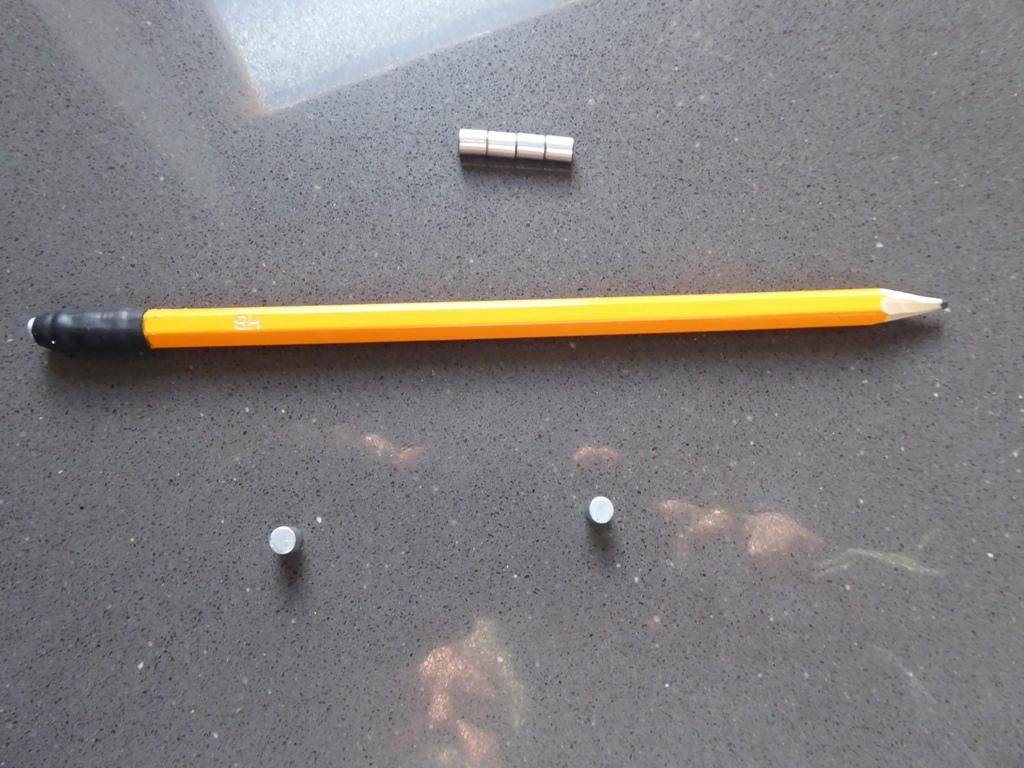
Here are some photos I've just taken showing the small magnets being used to find the centre of a stud: and this is one of the pencils I made up with a magnet in the end to find screws, pick up dropped screws etc, plus some of the small magnets:
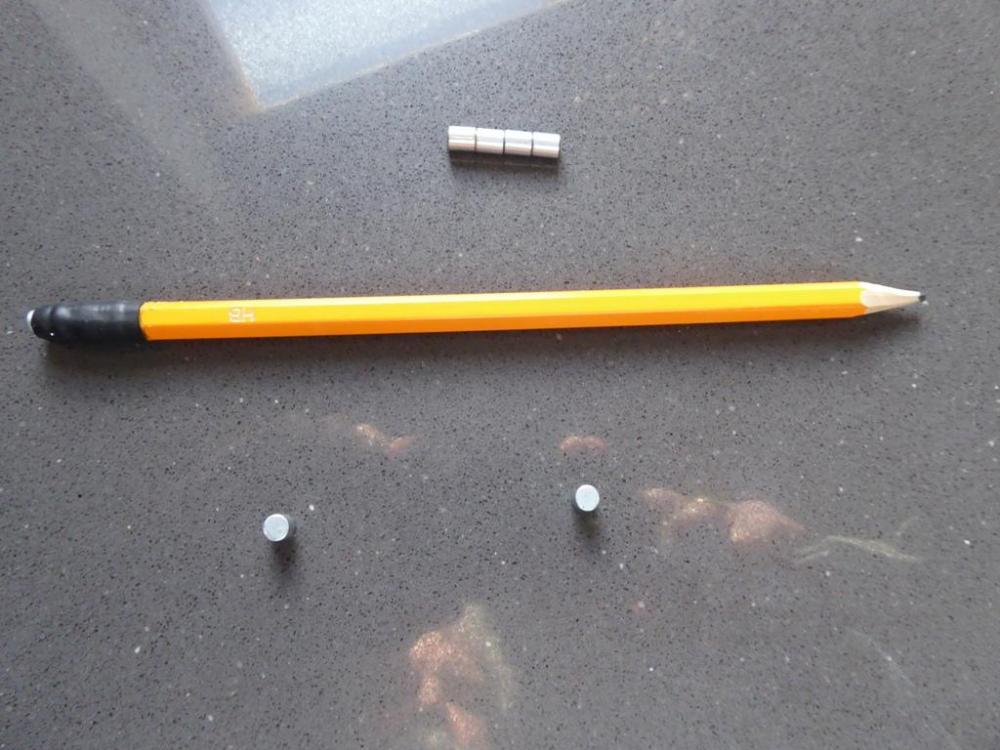
 2 points
 -
Just to put the floatation aspect into perspective, we have an 85m² slab, which is EPS that's 300mm deep. If the water level rose to the top of the slab (DPM level) then the upward acting buoyancy of the EPS would be around 242 kN. The mass of concrete and steel in the slab is around 14.5 tonnes, so that exerts a downwards force of around 142 kN. The mass of the house built on top of the slab is around 30 to 40 tonnes, so that exerts a downwards force of between 294 to 392 kN. Summing these forces, using the minimum house mass, we end up with: Downwards forces = 142 kN + 294 kN = 436 kN Upwards force = 242 kN So, even if flooded up to the top edge of the slab, the point where the house would start to get flooded, there is zero risk of the house being displaced upwards by the buoyancy of the EPS, all that would happen is that the force acting on the ground beneath would reduce from around 436 kN to around 194 kN.2 points
-
Some of ours (EPS300) took flight in a gale: hence aviation anti-collision lights too2 points
-
Sorry, that was a typo, should have read MOT Type 3 - I've corrected it now, thanks for highlighting it.2 points
-
Perhaps passiv slab house owners should fit marine navigation lights to cover all possibilities.2 points
-
Just for clarity, MOT type 1 includes fines, and isn't free-draining. I think the stuff specified by MBC's engineer is something like "18-35mm, no fines". We used recycled railway ballast. If you choose to do this, make sure you're getting stuff that's been steam-cleaned. Ours was filthy with god knows what, but it was delivered and laid while I was at work so there was nothing I could do about it.2 points
-
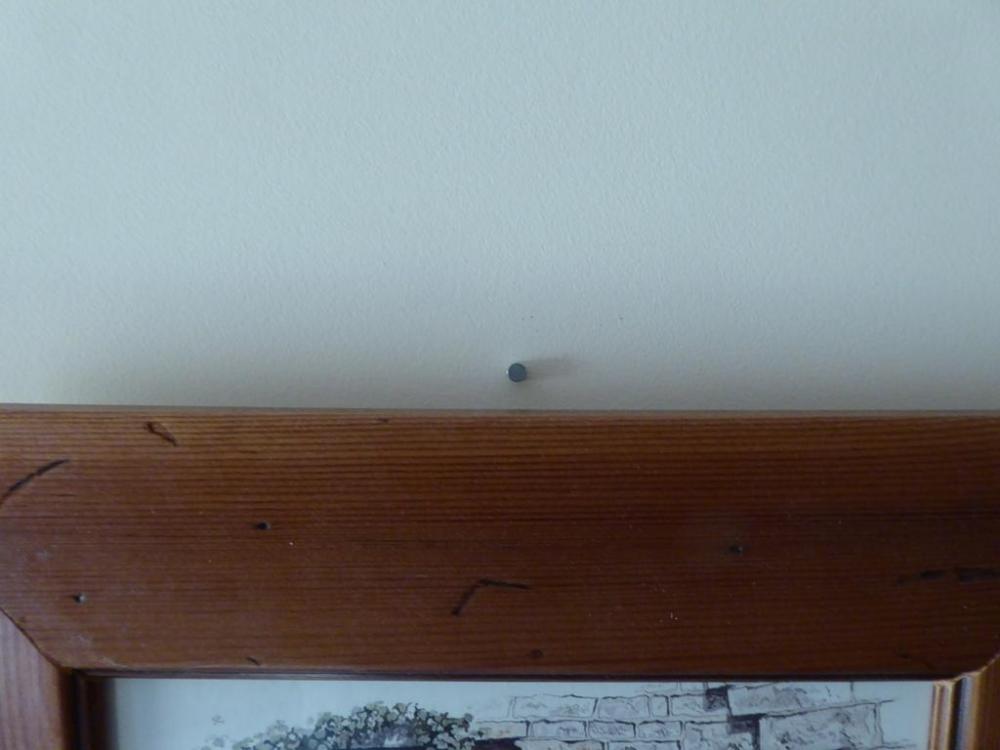
If you want to find the studs after the plasterboard is up, and you haven't marked the floor, then magnets work well. I have some pencils where I fitted neodymium magnets to the end, and these are great for finding plasterboard screws and a lot more accurate than using a stud finder. I also have a dozen or so left over magnets (small ones, around 6mm diameter x 6mm long, IIRC) that I use as markers. They will just stick to the wall wherever there is a plasterboard screw, so I can put several in place to show where all the screws/studs are without marking the paint finish.2 points
-
Thanks for the tips! Haven't even started building but I reckon buildhub has already saved me several £££! Ps @newhome I have also read and re-read your vat thread - so useful.1 point
-
Just if any shower door seals etc. Just a generic 'heads up' to other readers if not applicable to yours1 point
-
Go all out and start afresh Get a silicone removal tool, score the silicone first with a Stanley knife to get things moving, ( don't scratch the tiles ), and then get a silicone remover such as CT1 multisolve / other. A few applications will see the old silicone dissolve and go to mush, and with repeated applications the old shit will all be off and you'll have a blank canvass. Labour of love though im afraid. Start up high so the product works as it descends, and don't let it sit on any rubber seals ( mask off if unavoidable ).1 point
-
We would expect nothing else All depends if there's just gaps to fill back in, and the original stuff is in good repair TBH. Main thing is that it is DRY, as silicone will not take to anything wet. Best to dry it by blasting it with a hair drier for a good 5-10 mins, and then leave to cool right off. Dry the majority with kitchen roll first.1 point
-
self propelled1 point
-
I’ve ordered the Amazon tube and going to look at B&Q nozzles tomorrow.......a girl can never have too many options when it comes to sealant????1 point
-
I looked on YouTube. Looks like quite a thing to hold and aim straight. Don't think it's the thing for arthritic hands TBH unless you have great biceps ?1 point
-
The duff link was to one in a toothpaste tube Been a long day. This is the correct link...….."Joys of modern technology", my hairy welsh arse it is!!1 point
-
i installed the wet system by polypipe which is 12mm pipe in gloved 18mm polystyrene board in a victorian house which worked well..however, there was a neighbour downstairs, upstairs and to one side. In total, there were three heated sides (floor, ceiling, one wall), the flat itself was single glazed and uninsulated front and rear walls. My observations - the pipe heat up the floorboards which heated the flat quickly due to non-screed and direct contact of the pipe to the floorboards, however, the flat cooled down within 2hours once the heating was turned off. Most important observation was floor surface area heated, the flat was 38sq meter open plan and had UFH throughout, if it had been installed in a typical 4m x 4m room, the heat would NOT have been adequate. i currently have a similar system in my current house, this time i have screed on top of the pipes and 100mm of Polysterene between the joists, the open floor space is 65sq of open plan and end of terrace house. The same applies here too, heat is enough but more down to open space heated to make up for high heat loss. if you have small living spaces, i will definitely say, it won't work, you need a well insulated place. if you have good open spaces, it may just be enough, proceed with caution,it will be a expensive experiment if you don't do the due diligence in advance hope that helps1 point
-
Think was my link Nick??1 point
-
Best thing to do is contact southwest water and they will tell you if they own it or not. For my new build I applied to Scottish Water to connect to the public drain. They advised me that they don't currently own the sewer that I wanted to connect to and that I would need to get permission from the company that does own it. For data protection they couldn't tell me who does won it. Turned out that it was still owned by the house builder that had built a large number of house next to my new build. The are currently in the process of transferring ownership to Scottish water, however they won't let me connect until the transfer is complete . I was told this in May last year and the transfer still isn't complete.1 point
-
As I understand it, any drain which has more than one connection is adopted by the drainage authority, so this would be included in that. Request a sewer plan (small fee required). You will need to fill out the form from Southwest Water for a new connection. From what you say, this would be via a new manhole which you would build to their standard spec. As it is on private land you do not need to use a streetworks approved firm to do it. If you plan to build over or near the drain a further approval may be needed.1 point
-
This website seems to show the system a little better (or an earlier version) - http://www.kenon-digi.com/products.php?productId=14 From what I can see each downlight would have it's own network cable back to a PoE enabled network switch, your total power would then be limited by the capabilities of the PoE switch. With corporate gear you can push the full 25 watts per port (i.e. per downlight) - home equipment tends to have the total PoE capacity shared between a few ports so you may only be able to put a few downlights on each network switch. It's certainly an interesting concept, I've seen it done in datacenters before, saves having to run in any lighting circuits and you've got oodles of catX cabling handy. I expect it's pricey tho - a quick google shows list price of £200 approx per downlight!!1 point
-
Looking at @Russdl‘s detail I would do one or two things differently. I would not have OSB sitting underneath the gutter. At the least I would use waterproof ply, but ideally something even better that is entirely unaffected by water. I would probably want a fall towards the outside wall in the sheet beneath the gutter for belt and braces. I would ideally want to run the below tiles membrane straight down into the gutter for simplicity and continuous coverage. I am not sure how I would detail that. Ferdinand1 point
-
In our last house, having a dedicated playroom really helped with the kids rooms being on the smaller side as it meant few toys in their rooms, so I’d definitely keep the play room. We now are (unofficially) moved in to our new Build, My eldest is shortly turning 13 and the things she has is ridiculous, and she can easily spend an hour in the bathroom. It’s a large house you have got planned there and I guess it depends how long your build will take and how long you plan living there but will it work for 4 teenagers? Do you need the attic room as a study or could it be the master bedroom and ensuite allowing for 4 larger bedrooms and two bath/shower rooms on floor 1? You are brave putting the plans up, my plans were like my baby, and when I handed them to the architect to tweak and draw I sulked at the suggestion of his changes ?... turns out he knew his stuff though and all the tweaks really enhance the layout and many were “OMG why didn’t we think of that” , so good luck with the architect, and don’t rush it the building warrant stage as tempting as it is. On a side note...I really like the size of your utility and hall, we thought ours was adequate but it feels a bit compromised and I’m forever moving coats and boots to keep it looking clear.1 point
-
I have done a hidden gutter with a zinc roof. We built the substrate including falls and they did the waterproofing. For your roof, maybe you could do the gutter and, say, 600mm up the slope in GRP, then tile over. The ali copings are as much decorative as anything and a number of firms will supply these made to your spec. I quite like the ones in your example being at the same angle as the pitch. Any chance of you going to Prestbury to have a chat or stick a note through the door? Not sure what you had in mind for downpipes?1 point
-
@laurenco Clarify for us - you are talking across the bottom of the roof, not drainage down the verge? And do you want all the water from the roof to find its way into *this* gutter (which implies some sort of slot all the way along the bottom of the roof above your gutter-cover)? If it is the former, I made a neighbour do something like this along a 20m roof when his gutter was going to overhang my garden - though it was not quite *fully* concealed. My dad designed a detail for them. Essentially you sit the gutter on top of the wall, and flash underneath it and up the back and sufficiently down the face of the wall. And then you need a robust detail that will protect your wall and inside of the house, keep your gutter clear (anti-bird and insect grilles at the ends etc), and let the water get into it in a maximum water-flow event. It needs to be maintainable for when it *does* get blocked :-). You also need the face and appearance of your wall to be robust to the runoff water that lands on the gutter-cover, and overflow if the slot has insufficient capacity or gets blocked. I think my neighbour used lead flashing, but it could be one for glass fibre or EDPM. Will try and get some piccies. Ferdinand1 point
-
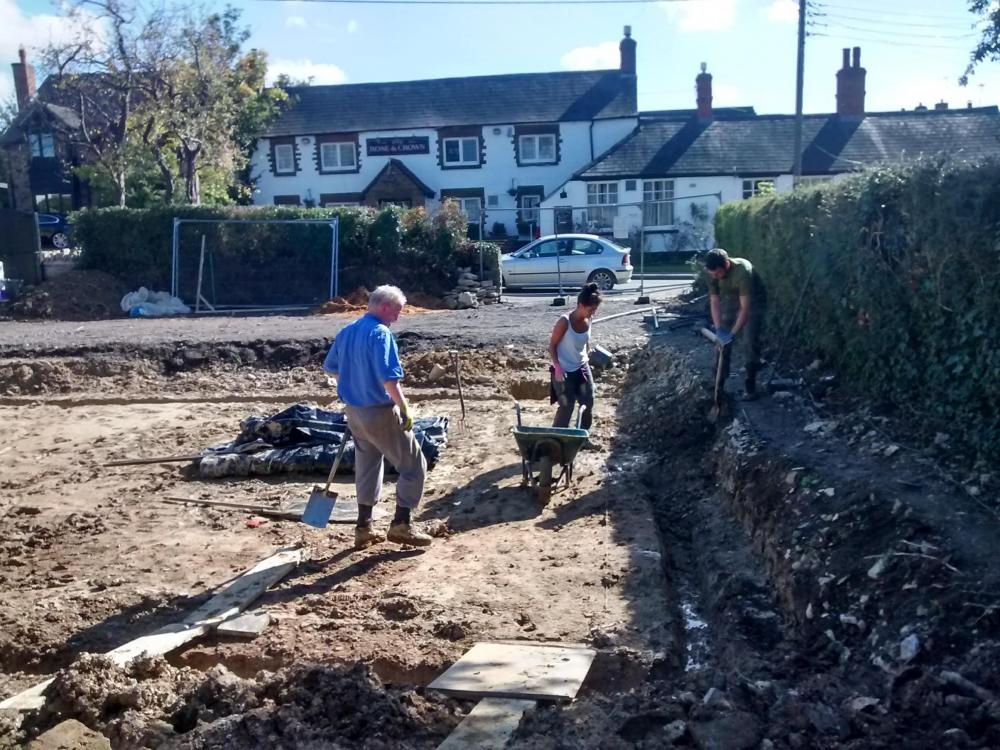
We have the same slab as @JSHarris all done by MBC. We are on clay and before the slab was laid the area was basically a lake as the water table is high. We were advised by the MBC engineer to lay a land drain 1m out around the area of the slab which we did in advance of laying the slab as you can see from the attached picture. This has done the trick as we have no problem at all now.
 1 point
 -
@laurenco I've done that detail on industrial units but not housing. The main issues are having a gutter lining that is seamless (IE similar construction to a flat roof in solvent welded plastic or rubber) and also it should be designed so that the front lip of the gutter is lower than the back by a decent margin so, if it gets blocked, the water overflow is outwards and it can't come back into the building by backing up under the roof finish.1 point
-
We have a water table that varies from road level down to 2.3m below. We had an Isoquick insulated raft foundation installed in 2010 which was the first in the UK. It consisted of 200mm compacted type1 sub base with 50mm granite fines on top. The insulation was 300mm Peripor EPS with 200mm thick upstand and 200mm concrete raft. We had soil tests carried out and it is essential that a structural engineer who has a good knowledge of that type of foundation is employed.1 point
-
Environmental health weren't the slightest bit interested in testing our supply, and it was only when I pushed them, saying that I wanted to have a chit from them, rather than my unofficial report, that they agreed to test a sample. Even then they refused to accept a sample I'd collected. LA testing is a bit of a scam here, as they are required by law to undertake private supply testing for a set fee, which is less than any of the local labs charge. To get around this they refuse to accept samples and insist on coming out to the premises to take samples themselves, so they can add on a sample collection fee that is way higher than the mandated test fee. I was fortunate in that I had access to an exceptionally good, world renowned, lab... There's a long saga surrounding our borehole, but one major problem is that in this neck of the woods there is an almost total absence of available expertise when it comes to private water supply treatment. I ended up getting a great deal of help from a forum in the USA, where private water supplies are far more common. Oxidation of ferrous iron, manganese etc seems understood here at the commercial water treatment scale, but I only found one company that really knew much about it, and they were up in Lancashire, so could advise over the phone about kit and supply it, but I was left having to design the treatment system and learn from experience. My first degree was in chemistry, but that was over 45 years ago now, and I've forgotten more than I ever learned! With the help of some people in the US I did get a very good treatment system put together, but with what I know now I wouldn't opt for the sand and aquamandix filter, due to it's high backwash requirement. If starting from scratch now I'd opt for the same air dryer, ozone generator and injector system that I ended up building, probably a slightly smaller contact vessel, and a backwashing Turbidex filter. The running cost of this would be a fair bit less, due to the much lower backwash requirement of the Turbidex, plus Turbidex filters down to around 5µ so there would be no requirement for any further fine filtration.1 point
-
When you say "in the footings", is this to take the water main through the foundation from outside to inside the building under what will eventually become the internal floor? I ask because the accepted practice is to use ducting for the water pipe as it passes through the foundation wall. The Building Construction Handbook 11th Edition page 937 has a diagram showing what is required with a 75mm drain pipe acting as a conduit for the water pipe through the wall and up to the FFL. In their diagram the footing blockwork is as deep as the regulation 750mm depth for laying a water main hence the water pipe and duct pass through blocks rather concrete. I assume your foundation concrete is thicker and the footing block courses will start above the 750mm regulation depth for the water main? The same page then has a confusing extra note "pipes passing under the foundations should be encases in mass concrete". I think this covers a different situation where the foundations are shallow and the arrival point of the mains pipe is completely below the main poured concrete foundations. Your builder should adhere to further mains water service standards as the water main passes up through the floor structure to FFL particularly insulation. The book shows insulation for the final 600mm of conduit up to FFL and where the water main emerges at FFL within 750mm of an external wall I think it recommends the whole conduit is insulated. Here is what an Anglian Water inspector would be looking for: Pipe has ducting and insulation where it enters the building. Ends of the duct are sealed. Within the property oversite, where there is a suspended floor or the pipe rises to less than 750mm deep within 750mm of an external wall the conduit should be insulated. If the pipe runs through concrete it is housed in continuous ducting to facilitate later removal. See page 11 https://www.anglianwater.co.uk/_assets/media/LED645_AW_DS_Connecting_10_steps_20pp.pdf I am a beginner who is about to tackle this on a diy basis so it would be good if @PeterWcould review this.1 point
-
Ground that has a very high water table or that is prone to flooding would definitely need the input of an engineer before designing the foundations. Take a look at the power of floating polystyrene on a flooded site in this link of a flooded car park in London: https://www.telegraph.co.uk/news/2016/10/09/cars-crushed-against-the-ceiling-in-underground-car-park-as-floo/1 point
-
The bedrooms are all more than 3mx3m so maybe there will be space... although don’t like the idea of jack and Jill en-suite. The shower room on the top floor might help for future years! The eldest is currently only 8!1 point
-
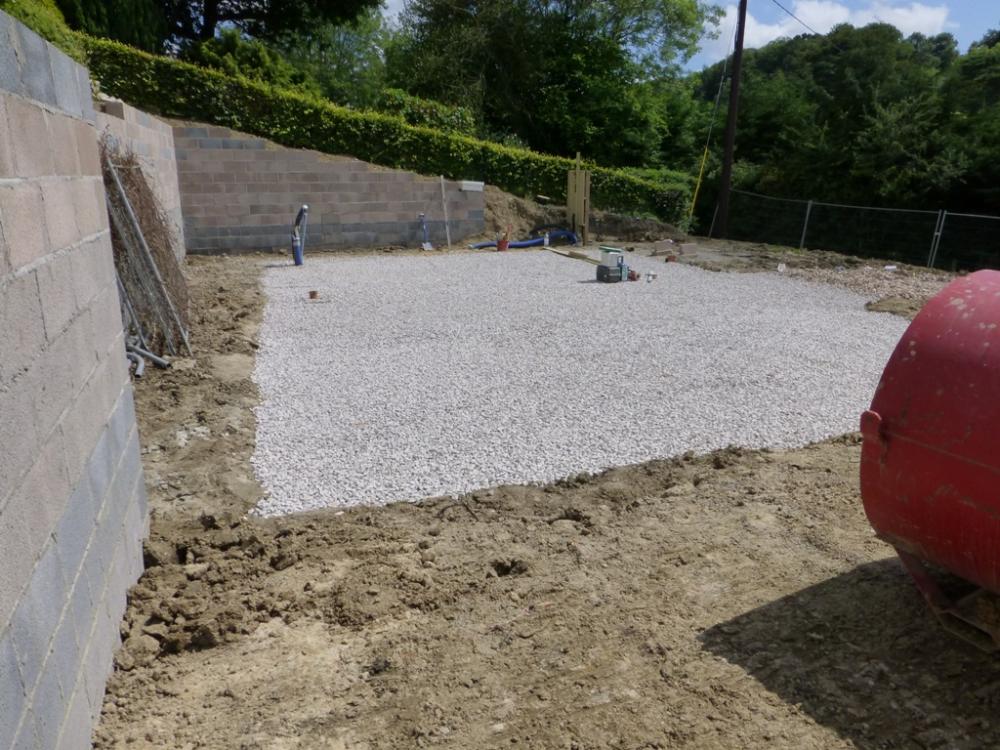
We have a passive slab on dug out ground. Dead easy and quick to install, if done by a team who know what they are doing. Not great for a team who have little experience of laying them. There are photos and a description of ours being laid here: http://www.mayfly.eu/2013/10/part-sixteen-fun-and-games-in-the-mud/ Start to finish the laying of the blinding, insulation, DPM, reinforcement fabric, UFH pipes and pouring and power floating the concrete slab and ring beam took four days. The slab is laid directly on a free-draining 200mm thick layer of MOT Type 3, a bit like clean railway ballast, laid on to geofabric. We have drains around the edges to ensure water flows away. The photo below shows the dug out ground and the layer of compacted Type 1 stone:
 1 point
 -
Strip foundations and insulated suspended timber floor. The main issue for me is the slop of the site and I wanted to raise, not lower, the ground level. At the back, the house floor is 1 metre above ground level (and that is after the ground level was raised using all the spare soil) To do that with a passive slab would have been a lot of material to import, and would have meant building up a raised platform that extended beyond the perimiter of the house and would not have worked so well with the landscaping plans.1 point
-
If the distance between us wasnt so great I would say you had the same one as us! Maybe its a tactic that is common to men with diggers!1 point
-
Normal people do not build their own house!!!!!!!!!1 point
-
@TheMitchells Thank you! It's a bit of a drive from London, but will definitely explore. @ultramods thanks, glad we were thinking along the same lines and are well into the selection process you listed! Highlight of the Christmas family getaway was a visit to a Porcelanosa showroom ? thought-provoking, indeed. Our provisional plans went up for a public forum beating earlier this week and the results were really helpful, working on amendments now! @Square Feet we are demolishing an existing bungalow we're currently living in, so the services are connected to the plot, so hopefully will not be much of a drama to disconnect and re-connect, and we're keeping services entry points almost at the exact spots as current. @recoveringacademic and @Ferdinand - believe me, we are reading it methodically (early stages), but I completely take your point! Nothing is more loathsome than newbies asking primitive questions for a 1000+'s time, can totally relate to the feelings it brings up :)) The only reason why I asked it (whilst reading everything else) was out of fear that there may be some crucial deadline I missed just because I have not yet read up to that page! Anyway, so far this is the friendliest forum I've seen in a long time, and I wholeheartedly intend to obey the rules and not irk the Masters and the Gurus :) bad for karma, they say! Everyone, thank you very much. Now back to reading....?1 point
-
For just a hand wash basin, how about a low volume storage water heater, typically anything from 10L to 20L and with a 3KW element or similar size. This sort of thing just as an example not a recommendation to buy. https://www.ebay.co.uk/itm/10L-2kW-Under-sink-Water-Heater-by-ATC-3-sinks/142934692689?epid=2254439348&hash=item2147925351:g:OxYAAOSwnXpbl8P41 point
-
Anglian Water recommend using 32mm above 40m. See page 8. https://www.anglianwater.co.uk/_assets/media/LED645_AW_DS_Connecting_10_steps_20pp.pdf1 point
-
I'd deffo go for a 22mm 'backbone' and drop to 15mm when you et to the last 2-3 outlets. What hot water device are you fitting? UVC?1 point
-
How long is the external pipe run from the mains to your property wall? There is an industry recognized threshold at which point 32mm is recommend, I think the number is 40m.1 point
-
25mm is a decent sized main for a domestic dwelling. You may be having extra bathrooms, but you'll likely not use them all simultaneously. If you think you will use them / have very high DHW demand then I doubt fitting a 32mm main to the existing mains ( street ) supply will make any notable difference TBH.1 point
-
Would incorporating a breakfast cupboard help tidy up the main worktops? https://www.pinterest.com/pin/359232507770073269/1 point
-
A new house AND Virgin Galactic tickets! You're spoiling them!1 point
-
We will be making sure our shower controls are far away from our shower head, no more wet arm turning it on in the morning.1 point
-
Well I went for block inner and brick outer with 300mm full fill cavity, airtighness should not be a problem because of wet plastering ( no dot and dab here thank you!’) I don’t like render as it so often requires painting regularly, bricks need no maintenance and gave us the cottage look we were after. Also the inner skin was concrete block not thermalite as I have seen too many problems with them.1 point
-
If I've understood Joe right, I think he's looking at something like a hot water tank that's mainly kept at an efficient ASHP flow temp (so typically no more that 40 deg C to prevent defrosting lowering the COP a lot) and then using a modulating instant water heater to provide the boost up to a good hot water temperature at the taps. Such a tank would need an anti-legionella boost every couple of weeks, to around 60 deg C or so. I can vouch for this working well, as it's our standby DHW system in the event the Sunamp PV doesn't get enough charge, or runs out of charge due to heavy hot water demand. The ASHP heats our buffer to around 35 to 40 deg C, and this then preheats the incoming cold main to 30 to 35 deg C. The modulating instant water heater then boosts this up to the 42 deg minimum acceptable temperature for us (I tested this, anything under 42 deg C and the shower's too cool, anything over 42 deg C just wastes energy by heating the water to a higher than needed temperature). One thing to watch is that all these modulating instant water heaters work in the same way; they control the power to the element by pulsing the heating element on and off, with a variable duty cycle at the mains frequency zero crossing point so they don't cause a lot of EMI. They do this to avoid the electrical noise that would be caused by phase control, and they use a low frequency to get a wide range of control and stay within the regs on flicker frequency and amplitude. However, if you have dimmable LED lighting, then you almost certainly will see some flicker when the heater is modulating. We only had one dimmable LED power supply in our house, in the WC, and it's how I know that the heater makes the LEDs flicker! I replaced the LED power supply with a wide voltage range, non-dimmable one and the problem went away. It's hardly surprising that there are small voltage fluctuations with these modulating heaters, ours is switching around 10 kW at a rate of a few Hz, and that's bound to cause a small pulsed voltage drop on the whole installation. The drop is within the limits allowed, but enough that something as sensitive as an LED, with its very fast response time, to be affected by, if it's not eliminated by the power supply.1 point


This leaderboard is set to London/GMT+01:00