
Leaderboard


Popular Content
Showing content with the highest reputation on 09/28/18 in all areas
-
Before we get into the events of the day, I have a little quiz question for readers of the blog. - What is the connection between my build in rural north Dorset and a mystical character from the legend of King Arthur? Answer at the end of today's entry. All will become clear. Today was another busy day on site, with 3 main areas of activity - flat roof, pitched roof and windows. Let's start with the windows, as they are (mostly) looking great. Both of the big lift and slide windows in the living room area are in now and quite a bit of the upstairs glazing is in as well. The flat roof guys changed their work order to get the membrane from the balconies and parapet gullies overlapped on the window thresholds so that the windows could be installed on top of them. This will allow the sarnafil membrane to then be folded up slightly against the window frame and give a shield against any water that tries to force its way in under the window frame. There's a bit of debris on top from the window fitting, but you can see how the membrane extends inside from the balcony. This is the west facing bedroom first thing this morning. And here is the west facing lift and slide window, looking west down towards the woods. Note the view of the woods, which are in a slight valley formed by the River Lydden. It is relevant for a later comment. Unfortunately, all didn't go to plan for the window installers today. The final window in the living room area faces south towards my neighbours' cottages and is a four pane fixed window. As the bracket was being screwed into the frame, this happened: The window installers looked very troubled by this, not surpringly. It's the inner pane of glass that has shattered and you can see that it radiates out from an obvious stress point. Stepping aside from the obvious downside of this, the very small amount of my brain devoted to aesthetics allows me to think that in a strange kind of way, it looks rather fetching. Then the far greater logical part of my brain tells the aesthetic side to get a grip as we have a broken window. So, what happened next, I hear you ask. Well, the window was put in situ and fitted along with the other 3 panels and Norrsken have ordered up a replacement pane and internal bead. They are, however, up against the clock on this one, as it can take several weeks for the replacement to arrive and MBC are now due back on 5th November, by which time all my windows must be fully installed and as they need to be in order for the air test to be carried out. Tick, tick, tick. Breakages aside, I'm delighted with the windows. I know that it's possible to go to the ends of the earth in research and expense to seek ever thinner frames and other features and that my windows are certainly not the most minimalist products out there. However, given the expanse of glass compared to the width of the frames, bearing in mind that plasterboard will reduce the visual appearance of these in due course, I think that the frame:glass ratio is more than pleasing enough for me. Also, the profile is very flat, both inside and out, and combined with the washed wood interior finish, I am content. Tomorrow will be very interesting as the installation team have quite the challenge ahead of them when they fit the floor to upper ceiling window that is in front of the stairwell. It's one heck of a piece of glazing, so I think we shall all be holding our breath then. Moving out of the building and up to the roof areas, both roofing teams have worked their socks off today. It was hot work as today's weather was warm/hot, sunny and lovely. Let's start with the flat roof guys, who have been very busy with their protractors getting all the framework in place to make the capping that sits on top of the parapet, ready to receive the membrane that will wrap over it. you may recall that due to the MBC construction methods, I have a cold roof. This means that it needs to be ventilated, and this can be a little tricky when you need to have a membrane on the flat roof and it needs to go over a parapet. Fortunately, I visited the build of @Weebles a little while back now and they had exactly this set up, so being the diligent researcher I am, I did nothing more after that and just shamelessly stole their idea. And their flat roof people. Why re-invent the wheel? From the firring pieces and OSB that I pictured on yesterday's blog entry, more of the membrane went down over the main part of the stairwell roof: The flat roof guys had to put in the upstand that goes up onto the pitch and they've been measuring and sawing as much as they have putting down membrane today. Here's the framework they made ready for OSB to go on top and form the cap over the parapet: As well as forming the cap over the parapet, this area also needs a drain for all the water that will come down from the pitched roof, and this is a hole drilled through the parapet and a drain liner inserted through, then the inside will be coated and sealed with the membrane. Prior to putting the membrane on, the OSB is rollered with a contact adhesive (red), then the membrane is heated to activate the glue. This is where they are bringing in the membrane from the parapet gully to run under the window frame, working ahead of the window installers. In their current allocation of time, I have the flat roof guys for one more day, so I'm not sure how much more we will get done, perhaps the remaining balcony, which would be good, as the balustrades are going in next week. And so onto the pitched roof. The pitched roof team were badly delayed yesterday as the tiles that were coming from Bradfords in Yeovil were supposed to have been on a morning delivery but didn't arrive until 3pm. They made a good start yesterday but have gone at an amazing pace today. They've done all they can on the east/south faces for now, pending the PV installation. This picture was taken just after 2pm and you can see that this side of the roof is still getting a good amount of sun, and had been since sunrise. At the same time as that pitch being tiled, the guys were also working on the long north face of the roof, leaving gaps for both the velux and the MVHR penetrations. This is early afternoon: And by the end of this afternoon, they had got this far: That's about it on the roofing today, but the scaffolding is also being used as a storage area. As the telehandler was on site yesterday, as much heavy stuff as possibly was lifted close to its final position yesterday, and the solar panels are stacked up there now. My panels are black on black (not quite the title of the AC/DC track) and from LG. As these things go, I think they're a nice looking piece of kit: And so now to the question I posed at the start of today's entry. There are a few mystical characters in the legend of King Arthur, but the one I have in mind is the wizard, Merlin. I hope you're enjoying the blog, guys, and wasn't it a lovely day for buzzing a self build in north Dorset?! Let me explain to, by now, confused buildhubbers. I've mentioned that there seems to be a definite airborne interest in my build, mainly stemming from RNAS Yeovilton and up until this week, it was predominantly the Navy Lynx helicopters. I got an upgrade this week and having nearly peed my pants with a very low buzz from a Hercules yesterday, we had an interesting buzz from a Navy Merlin helicopter this afternoon. I need to give this a bit of context, though. The Merlin is a big bugger with its three engines and gives out a very distinct bass thud that doesn't quite make your liver tremble in the way that a chinook does, but it's not lacking in long wave frequencies. So let me take you back to the view that I asked you to make note of earlier, looking west over the field and down towards Bagber Wood. I couldn't hear Ride of the Valkyrie, but there was undoubtedly a whiff of Apocalypse Now as I heard the distant but increasingly loud thud of a helicopter from the direction of the wood, before it rose up from the dip of the valley, over the wood and well and truly buzzed us, flying low and slow over the house. Nice to see you guys, keep up the good work, but honestly, you'll get a better view from the ground. Victor Zulu signing off until tomorrow.3 points
-
Today, I had my site meeting with the line manager of the local wayleave officer for SSE, to further discuss the situation regarding high voltage wires oversailing my property, all of which I mentioned in a previous post. The meeting went well and AJ's line manager was as different as she could be from AJ and the whole thing was conducted in a civilised manner. The resolution is that OH and I will grant an easement to SSE for the wires to be allowed to pass over our property in perpetuity. In exchange for this, whatever work is necessary to make the wires safe will be carried out by SSE at their cost. The legal work will start almost straight away, and understandably so from SSE's position, as they want to be sure they aren't being messed around and I have no problem with this. I understand that the work may take some time if it does involve seeking planning permission and other administrative matters, but again, this is fine. This has been a very good outcome for what could have been a difficult matter. Happy days.2 points
-
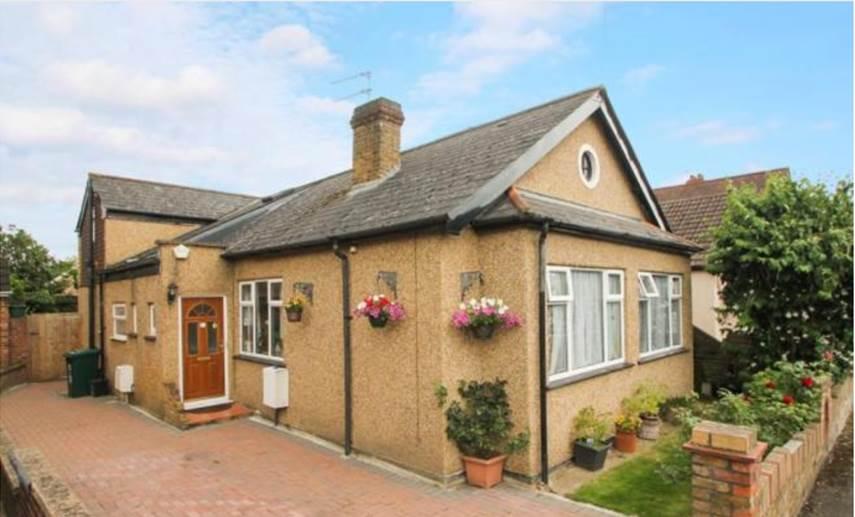
Hi there, We are a professional couple, based in Greater London. Currently reside in a very dated bungalow which we strongly dislike (was not a dream buy in a first place!). Now we are exploring the idea of knocking it down and rebuilding a proper two-storey house from scratch. Very new to all this, so mega-grateful to find this Forum with loads of advice and experience shared. Never done any self-build before, not great at DIY, so just orienteering at the moment trying to assess the scale of what we may be getting ourselves into (and looking for survival tips). Thank you in advance for bearing with us
 2 points
 -
So far this week, things are going okay, but in their usual messy sort of way, and with a few time slippages thrown in that are keeping me on my toes. Let's start with the main show of this week which is the arrival and installation of all my glazing. Woohoo! All arrived intact and, as far as I can see for the moment, undamaged. Everything turned up on a lorry from Poole yesterday morning, so a relatively local delivery as I'm only at the other end of the county rather than the country. My glazing firm, Norrsken are based in Poole and that's where it was all loaded up from before trundling northwards. It seems that it's standard practice for the customer to have to supply a telehandler to get the windows off the lorry and then assist in getting them up to any heights on the building. I think I knew this way back when I agreed everything with the windows but it faded into distant memory but I was able to get organised in time for it. The only comment I would add here is that it's not cheap getting one of these bits of kit out along with a driver, so if you're on a tight budget you may need to factor in this cost and add it to your bill. I had my guy there for 2 days and it cost me a total of £600. As there was so much else going on today, there was plenty of other shifting around for him to do, so I minimized down time as far as possible. For those, like myself, who have no prior experience in the world of construction, a telehandler is basically an extendible forklift. Imagine the forks, as usual, but then on a massive extendable hydraulic arm; apparently these bits of kit cost about £80k, so they aren't your cheap and cheerful forklift type thing that you see running around industrial estates and warehouses up and down the country. The driver also needs to be very skilled at the slow and steady approach and a damn fine judge of distance and clearance. You'll see why shortly. My guy, Andy, was all of these and he did a fine job of getting everything into place, guided by the installation team. After the storms of last weekend, we are having lovely weather again in north Dorset and things have dried out nicely since the deluge. My windows arrived yesterday on a truck with a type of articulated trailer that was much more manoeuvrable than many of the delivery trucks that have been on site to date. In the photo below, you can see the big lift and slide doors for the living room as well as one of the apex pieces for the gable in the bedrooms upstairs. Here's the rest of the load. Nicely packaged up, all secured with bracing timber and heavy duty cling film. Here's Andy, my telehandler driver, swinging into action first thing. This is the telehandler lifting all the slates up to the top scaffolding lift. Earlier, the apex pieces had been lifted to the same level so the window installation team could put them into position from above. It went really quiet when that was happening. The installation team have paid very close attention to everything, included how the windows were left overnight before the main work started today. Instead of just propping the windows up against a wall, as I might have done, everything was stood upright and braced into that position until they are put into their final placements. Now, bear in mind that this for the upstairs. By some way, the largest of my windows are the lift and slide doors for the living room area, each of them coming in at around 300kg. The 3 installation guys, headed up by Val, quite literally man-handled these out of their packaging and then onto a (seemingly) tiny set of wheels, then into the building and ready to go into the recesses that were formed in the slab by MBC when the foundation team were on site. Incredible work, skillfully done, and one heck of a job. Here's the big window on what looks like a roller skate for windows. In the above photo, you can see a tripod set up to the left of the window. This is for a laser that puts a laser level line across the windows to make sure that everything is, well, level. The installation team have now got both of the big lift and slide windows in and they seem to have gone in nicely. They've got a couple of the upstairs windows in, but before doing the rest, the flat roof guys need to run some of their membrane up under the thresholds so that a seal can be formed once done. They will get onto this tomorrow and work ahead of the window guys to prep the thresholds. Ah, my roof. What a tricky affair that is turning out to be. It's all getting done, and will be done, but it truly is roofing by iteration with little nibbles of each thing needing to be done before another team can do their bit. I know that construction people often don't come with the best of reputations for working in a co-operative or helpful fashion but, if that's really the case, then I have the exceptions to that rule working for me. There were 3 teams working on the roof today - the flat roof guys (County Flat Roofing Ltd), the pitch roof guys (Dylan Faber Roofing Ltd) and my solar PV guys (Environment Logic Ltd) and everyone needed a bit of work doing by the others before they could do their thing. They all worked together incredibly well, happy to do collective head scratching and work out exactly what everyone needed to do and in what order to get the job done. It was a masterclass in problem solving and co-operation. So where does the delay to my gratification come into all this? Well, I admit that this is entirely my own fault. I had no idea it would be so tricky to get hold of roof windows without vents. In my ignorance, I assumed that it would just be a case of dropping by to my local roof window supplier, pointing to the ones I wanted and getting them delivered. Not so. It turns out that unvented roof windows are so tricky to get in the size that I need that they simply don't exist as a stock item and so they have to be made to order. Current lead time is 3 - 4 weeks. Rats. Still, never mind. My pitched roofing guys reckoned that the solar panel tray system would be okay to go up anyway as they knew how much clearance they would need for the flashing around the trays and then around the roof windows, but, of course, it has turned out to be more complex than that and the roof windows do need to be in so that the tiling that will support the trays will be in, and so on. I could have given myself a hard time over this but as the morning went on, it turned out that I didn't need to give myself too hard a kicking as the PV guys have been sent the wrong size trays. Quite clearly, my full roof covering just wasn't meant to be today. However, the flat roof guys are still beavering away and they are with me until and including Friday, so they should get the decks and parapet linings finished this week, or most of it. I've been most keen to get the area over the stairwell finished off as it's like a sieve when any rain comes in, so it will be a relief to have that done. I've opted to have the pitched roof tiles secured by tile hooks as this is more secure in areas that are exposed to high winds. I've often seen this method used in France and admired the look of it, so I'm quite happy to have this. The next photo is part of the eaves course and you can just see the end of the tile hooks at the centre bottom of each slate. As well as the pitched roof, Dylan Faber and his guys are going to do the vertical tiling on the upstairs for me. This makes sense given that it's the same material. The only difference is that on the balconies in particular, they will use copper rivets to attach the tiles. This is because whilst the tile hooks are very secure, they are vicious pointy little things that are easy to scratch yourself on, so these give a more forgiving finish should anyone come into contact with them. With the delay to the roof windows and everything else that's going up there, I won't be ready for the air tight prep work and the test itself on the original date. MBC had been scheduled to return on 8th October to do this, but they're now due back in the first week of November, so that will be 5th November. I commented on a previous entry that MBC left site very quickly after their last stint and, in my opinion, they left a little too quickly without the opportunity to check that everything was in order for the follow on trades. There wasn't a great deal that needed doing, but I thought it was poor practice not to make sure that the building was up together for what came after. This was evident with what was a relatively minor issue but caused some difficulty. You can't miss the fact that my house is blue on the outside. This is a breathable membrane that envelopes all the board and is meant to come all the way in over the window reveals as well. It needs to be there for the window installation, too, but the installation manager came out for a site visit early last week and picked up that a few of the windows, including the long stairwell window, were missing the membrane running into the reveal. I contacted MBC to get this resolved as soon as the window guy left and was assured that someone would be out in time to rectify it and indeed they did, but not until after 8am yesterday morning once the windows were already on site and after numerous chasing emails. It's a job that I looked into doing myself, but the minimum quantity of membrane that I could buy was 50m and it seemed overkill for it. In the end, I've no idea how far the MBC guy had to travel to get to me, but I doubt it was local and a potentially stressful situation could have been avoided entirely by taking a little extra time to check things over before going off to the next job. What next? Well, as mentioned, the flat roof guys are continuing this for the rest of this week. Here's the section above the stairwell: It's actually a lot further on than this now but you can see the construction of the flat roof area. A few plumbing/heating things get kicked off tomorrow. We can't start first fix until the air test is done, just be sure that it's not MBC who have put a hole in the structure before it's done, but there's still quite a bit that can be done before then, such as putting underfloor heating manifolds in place and getting foul water runs in the right place. NThere may even be a bit of MVHR ducting action. Calm yourselves, everyone. Off site, I've been chasing up my stone cladding. Hitting my head on the lead time for the roof windows was a salutary lesson and so I'm checking out how long it will take to get my stone cladding delivered in case I need to do it now. Last, but not least, it seems that the build is continuing to provoke interest from military aircraft. I mentioned that there has been a lot of interest from a passing Navy Lynx helicopter during the summer. Well, today they really took the piss and have upped the stakes. We were buzzed by a Hercules transport airplane. I mean really buzzed. The damn thing barely cleared the powerlines and was incredibly low and close to the house, I'm amazed that there were no burst ear drums or centre partings from the thunderous low pass. For goodness sake, if they're that interested they could just drop by. No, on second thoughts, let me re-phrase that as I wouldn't trust the buggers to not come in by parachute or under slung load the way things are going. Haven't they heard of cars and, you know, just asking for a look around? Still to come this week: the rest of the window installation; flat roofing and lining parapets; a visit from the DNO. Stay tuned for the next thrilling episode. With or without Hercules aircraft.1 point
-
I have one of the Kingspan KAR-50RSDC MVHR units which is a re badgged Mitsubish Lossnay unit. I had a request for information on how I controlled it so am posting it here for all to read and share. My unit is now in use and fully functional. Here is what I did: Firstly I don't have the Mitsubishi controller, I just made my own controls based on the wiring diagram on the unit, and a bit of trial and error. Inside the unit there are 2 terminal block for controlling the unit: TM2 has 5 terminals, labelled COM, 1, 2, 3 and 4 This sets the fan speed. If none are connected, the fan does not run. Connecting COM to 4 starts the fan at it's slowest speed. Connect COM to 3 and it runs faster etc until you connect COM to 1 and it runs at full speed. What is not immediately obvious is you can connect more than one of the inputs to COM it runs at the fastest of the selected speeds. I wanted a timed boost function, and as it happens I decided I wanted the upstairs (bathroom) boost to run it at it's fastest speed, but wanted the downstairs (kitchen) boost to run it at a less fast speed. So to give a timed boost, I used 2 of this type of boost switch They have a 230V switched output so can't directly control the MVHR. So instead each one feeds the coil of a single pole changeover relay (2 relays one from each of my boost switches) So I have COM permanently linked to terminal "4" The NO relay contact from the upstairs boost connects from COM to "1" And the NO relay contact from the downstairs boost connects from COM to "2" The other user terminal is TM3 This has 3 terminals, one labelled "HEAT", one labelled "COOL" and one not labelled. I tried both HEAT connected to COM and COOL connected to COM and neither seemed to do anything. Reading a manual for a similar unit, suggested these control the bypass based on a measurement of internal and external temperature, but with no explanation of the logic used. Then I tried the unlabelled contact on TM3 connected to COM on TM2 and that immediately operates the bypass flap mechanism. Remove the link and the bypass mechanism immediately returns to it's normal position. So I have simply connected a normal switch between the unlabelled contact on TM3 and COM on TM2 and that will put the unit into bypass mode when I wish.1 point
-
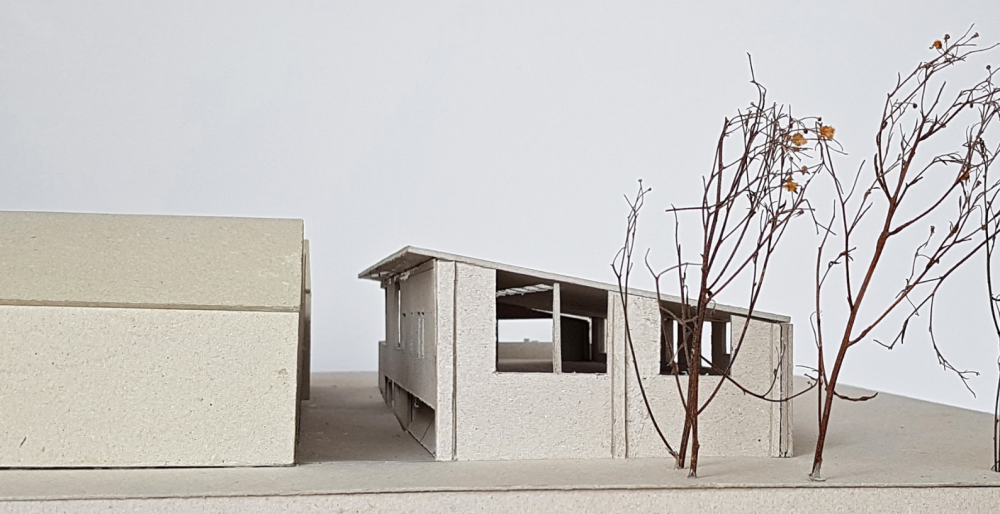
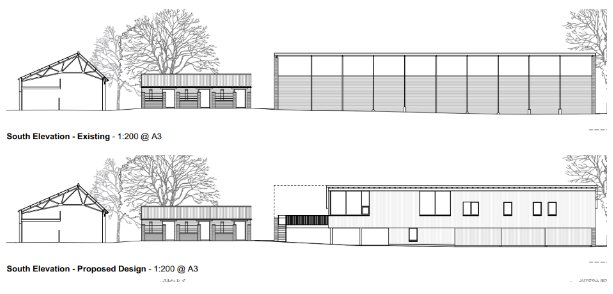
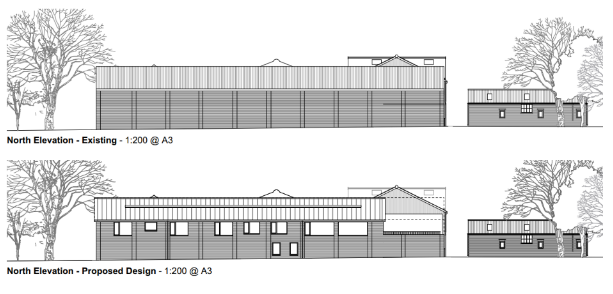
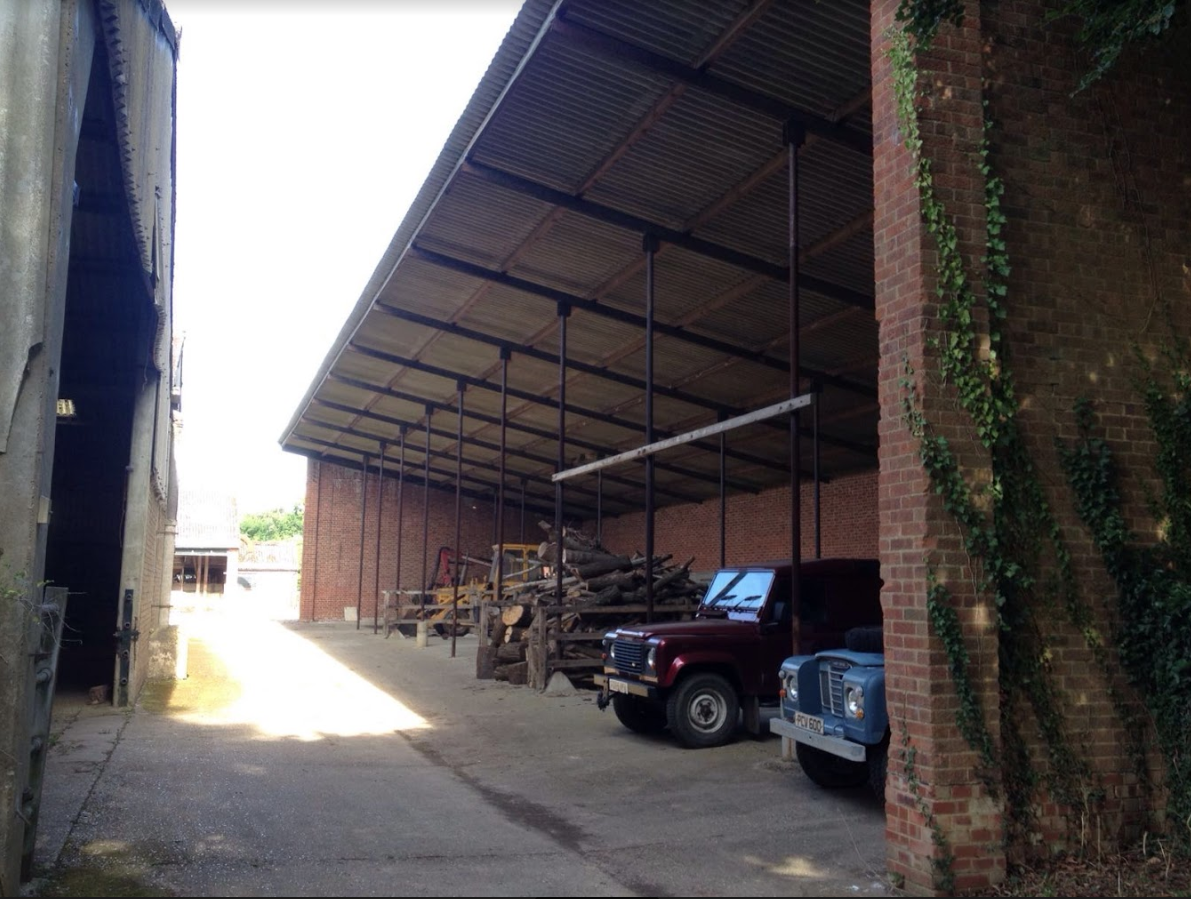
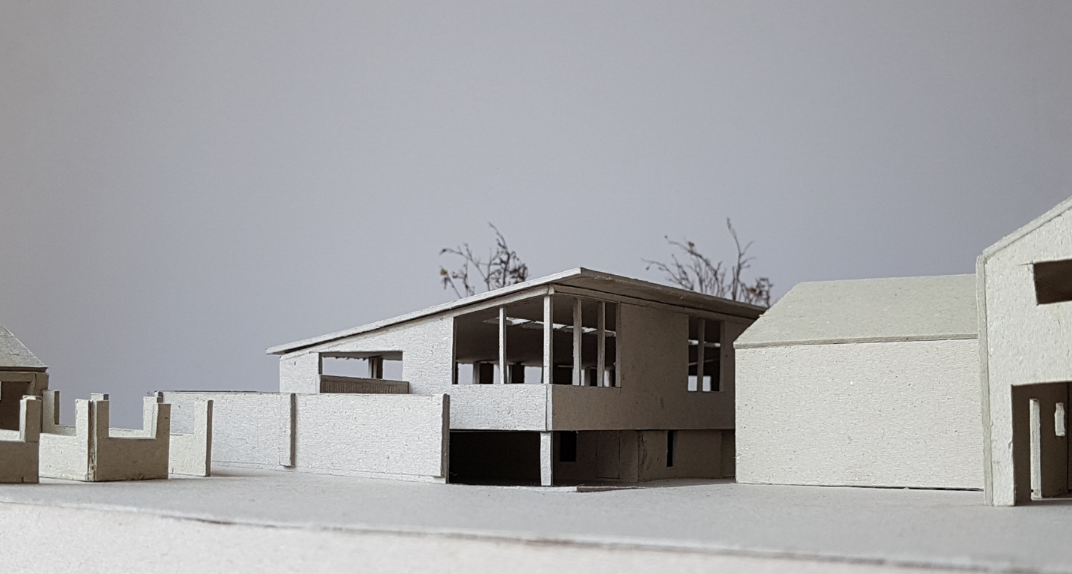
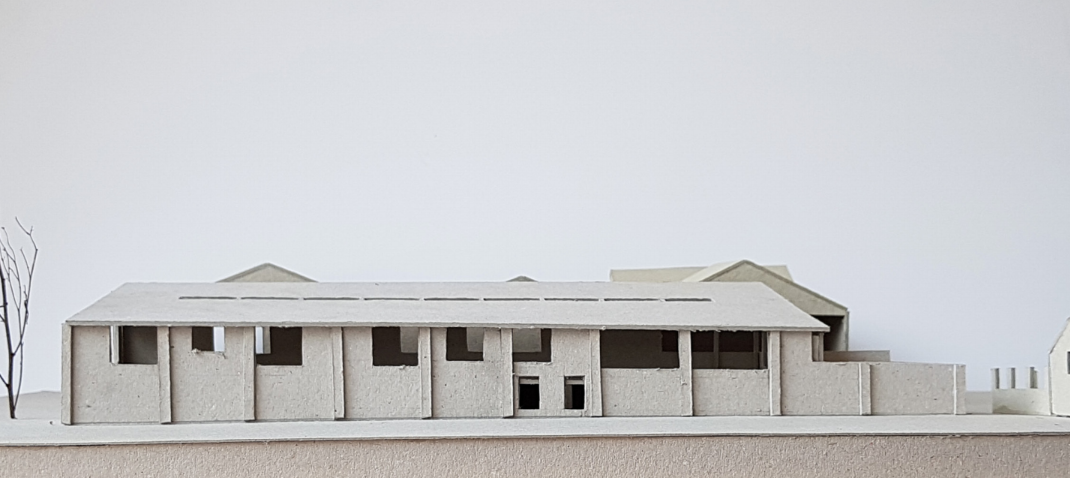
Hello all We recently got planning for a barn conversion in Berkshire, to be our family home. We've been working on the design & permissions for a couple of years, during which time this forum has been invaluable. The barn is on a small arable farm at the edge of a cluster of in-use agricultural buildings. It was originally built as a cowshed in the mid 60s, brick on 3 sides and open at the south face, with a mono-pitch fibre cement roof. See image below. The open south face looks into large concrete & fibre cement barns about 5m away (i.e. not ideal). The north side looks out to trees then fields beyond. We have class Q permitted development to partially convert the barn to a dwelling. A subsequent full planning application to make changes to the eaves height and roof pitch was rejected and we didn't appeal. The idea is to add a first floor to the existing barn and then the majority of the house be on this first floor, with most of the ground floor remaining in agricultural use. This arrangement is to maximise the available space, gain more south light into the house (as the large sheds to the south block everything at ground floor level), and because we like living off the ground. We're also nicking off the top west corner of the existing shed to make a first-floor terrace at the west end of the house. Diagrams below show model photos and a comparison with the existing barn. The aim is for very good insulation and airtightness, but I don't think we will go for full passivhaus due to the poor form factor and that we want a lot of north-facing glazing. Our architect designed & built their own passivhaus a few years ago, so is familiar with it. The long rooflight running east-west (see model3.png) is to allow light into what might otherwise be a dark central corridor, and allow borrowed light into the north facing rooms via internal clerestory windows off the corridor. The rooflight is north-facing (though on a shallow pitch roof) so less of an overheating risk. There was PHPP modelling of an earlier iteration and the overheating was acceptable, but we'll re-visit this to check. We had originally assumed twin-wall timber frame + cellulose for the build method. However, with some changes in requirements, we are re-assessing this. Keen to get people's view on the alternatives that we'll be considering. TBC.


 1 point
 -
Sorry for the long title and wasn't sure which section to put this in. I've been doing a lot of work over the last year to improve this sieve of a house, taking rooms back to block work and filling any mortar gaps - some you could fit your hand through. I then paint blowerproof over all cracks and mortar joints and all repaired sections. So far it's been 3 rooms but those were in the summer. With the cold weather recently the house has rapidly cooled again to around 16-17 but you felt really cold with it. Fast forward to yesterday and we began work on the dining room and big spare bedroom. Big spare bedroom has 2 external walls and so does the dining room. Both have north east facing walls and the bedroom has another east facing one. Dining room is completely plasterboard free now including ceiling as we need to sort out the levels to straighten up the ceiling. The transformation last night and this morning is amazing, it's like a new house. No more chilly draughts now, house retaining its heat much better, hall way dropped by 0.5c rather than 1.5 to 2c. Out bedroom remained the same over night. This is without any heating on whatsoever. Now I know it's not that cold yet, but I can see the wind was blowing a little this morning and it was about 7c outside, normally this would result in it feeling much cooler. I am assuming the plasterboard was allowing the air to move in a different way and air pressure plays a part in how the air push/pulls? Check out examples of the holes we have uncovered: https://photos.app.goo.gl/UCXWTaJN8KRuxQ518 Yes if you zoom in you will see the cavity insulation, there are at least 20 odd visible gaps in the dining room alone that are not quite as bad but not great. Let alone thin cracks. Plasterboard does indeed hide a lot of sins, I am aware of the term plasterboard tent, I think I have something worse. There is an even bigger hole between floors that I picked up on my IR camera last year and can now see from the bedroom, I'd like to get a photo but as said between floors right now and won't be uncovered for a couple of weeks. House is 10 years old by the way, celcon and thermalite lightweight blocks with 7.5-8cm insulated cavity and brick outer. I thought I would show what I am dealing with. Edit: plasterboard was dot and dab with no perimeter adhesive on all sides of boards or adding it in such a way to reduce any possible air flow behind the boards1 point
-
Yes a little Finder relay and plug in base from CPC 240V ac coil and single pole changeover contacts (also available as a 2 pole version) It is a din rail mount, but in this instance it is just screwed to the OSB, though I had to search hard to find a long enough, thin enough wood screw to do that.1 point
-
We once had helicopters land very close to our house site. Not sure what type, but you can imagine what it would be like if this landed with no warning 20 meters from your living room.1 point
-
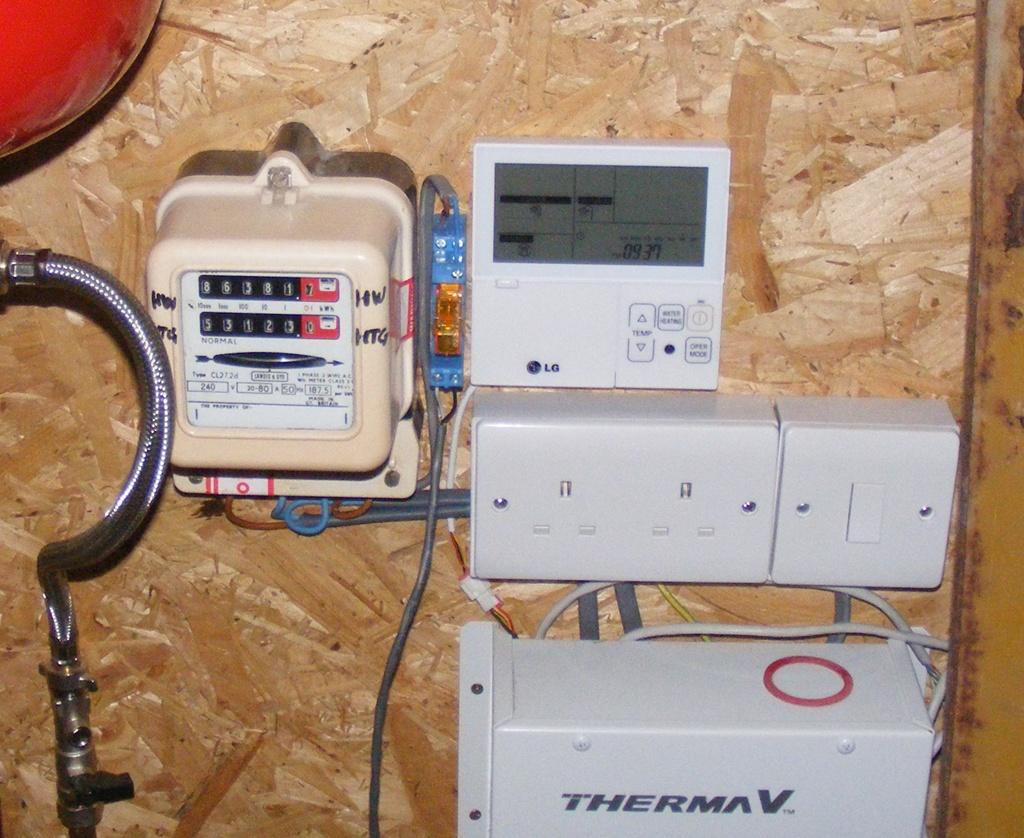
Well my (almost) museum exhibit spinning disc dual rate electricity meter arrived yesterday, and this afternoon I got it connected. I have confirmed it is working and recording space heating consumption on the "normal" dial and DHW consumption on the "off peak" dial I will be taking weekly readings of both now to really see what our energy use is for heating and hot water.
 1 point
 -
I would just be cautious and not actually sign the wayleave agreement until you have a definite timescale and know exactly what alterations they are making.1 point
-
That's a great result. Well done you!1 point
-
Sounds like a good outcome, and more importantly, you haven't been jerked around for weeks (months, years...) to get to it.1 point
-
Just watched it, @Hecateh. What an achievement in such a good cause! 9 days, wow. Thanks for sharing.1 point
-
For bleeding the floor loops you are best using a hose and bleeding each floor loop one at a time, with the valves to the rest of the system shut off.1 point
-
I would guess they intend the "summer / winter" switch to connect to the "heat" and "cool" terminals. But there is no explanation of the control algorithm to open and close the bypass flap, and I dislike not knowing how things work.1 point
-
Noisy and generally difficult to work with. Experience - bil used it for the extendi bit at the back of a terrace. In particular, difficult to cut tidily. I think the technique is to do it in 2 cuts .. the metal separately from the insulation. If using it, I would be ordering the stuff in exactly the right sizzle. Flashing pieces and profiles should be available. Others May have better experience. Ferdinand1 point
-
1 point
-
that's not a spoiler. Telling you that part of the house fell off the lorry would be a spoiler.1 point
-
I have the same sliding door arrangement and my cill does not move. It is rock solid all the way along. I wonder if it was not supported enough underneath when installed. Hope you manage to get it all sorted with those trims.1 point
-
Get the material powder coated to the same colour as the cill. Maybe cut it into 200mm lengths and space at 220mm centres to leave drainage gaps.1 point
-
Nice to see it going well at .. er .. @Hecateh's House. Spot the advertising industry sense of humour...1 point
-
Without doubt one of the best films of the 80’s1 point
-
Not expensive - 10x10 is Standard size 10x101 point
-
Guessing it'll end on a cliffhanger...1 point
-
I kept muttering about cold bridges .. Through the ply finish inside was beautiful. Are they going to complete the look by reversing a Ferrari out the back of the garage?1 point
-
Actually enjoyed tiling tonight which is a first! Bought myself a set of digital, Salter kitchen scales for £15 to exactly measure the adhesive. Much more consistent.1 point
-
Yesterday I ordered my chosen vinyl. I am having a cushionfloor vinyl throughout. They called back to say it was out of stock. So I went for my second choice (which I preferred in some ways but went for a more neutral option originally). Yep that's fine. A call back this morning. Yes they have the stock but there is an issue as an edge is torn, H 'Is there one length that missing half a metre matters?'. M 'Yes and no - the offcut was being used elsewhere. Can you credit that amount but still send it (can hide it under furniture) and give me a discount as well.' H 'Well, yes, we can do that - but I will have to consult with my manager about the level of discount.' 3 hours later - a very hesitant sales guy H 'I'm afraid there is another issue. You have ordered 5 m of the 2m wide material; how much do you really need as though our stock is showing 100 sqm, there is actually only 4 linear m in stock.' FFS, I need 4.6m. Think, think, think - M 'How long before you will have it in stock?' H 'Errr, well, we haven't actually ordered it as our stocks showed we had plenty so probably at least 4 weeks, maybe 6.' For once my brain was relatively in gear. M 'Ok, the 2m wide is for my hallway so there is no major furniture going there, so it's a pain but not an insurmountable problem if this is delayed for a few weeks. I can work round this. - You will discount this for me though won't you?' (I'm learning!) lol. H 'Thank you for being so reasonable, I was dreading making this call - I will push for the best discount for you,' We'll see what happens lol but it's a bit back in the coffers for me.1 point


.jpg.c21f3ac78c9b7efd90cbdcb312744dc5.thumb.jpg.7adcad4c0e384f5ecd7d56b0618df6e5.jpg)


This leaderboard is set to London/GMT+01:00