
Leaderboard


Popular Content
Showing content with the highest reputation on 09/11/18 in all areas
-
We have just finished a self-build and as we went along I made notes of the things I had learnt during the process. What follows are those notes and I hope they will be of some use to people who are just starting out on their projects. I must of course add the caveat that all that follows is only my personal opinion. Although I now have some experience I am no expert and it is of course up to everyone building their own home to seek professional advice about their project. RED'S ADVICE FOR SELF-BUILDERS 9th September 2018 GENERAL 1. Try to work with everyone on your project via email as much as possible so that you have an audit trail of what has been said to people. If you must have a meeting, confirm everything in writing, right from the start. 2. You are about to be on the receiving end of a lot of documents, mostly in electronic form. I kept all ours and it amounted to 1,132 files (in 169 folders) consuming 2.8 Gb of data. Decide early on how and where you are going to store your documentation (electronic and paper) and stick to whatever system you are using. DESIGN 3. Make sure the house is of a specification that is appropriate to the size/type of home you are building. A big expensive house must have a high specification or else you may find its value is disproportionately affected when you come to sell it. 4. Check the local vernacular for design ideas – it can be nice to reflect local building techniques or features and you will get fewer objections from the local community and council. Imposing your personal taste on an area is unlikely to make your life easier. 5. Keep basement walls as simple as possible – they don’t have to exactly reflect the above-ground level walls. Angles and corners increase cost, sometimes unnecessarily. 6. From the design phase onwards, ask that ALL drawings of plans and elevations include a metre scale so that when measuring things you can see how big they are. Sounds obvious but they were not included on ours. 7. Drainage issues can present huge problems in the future if you’re not careful. Look at your plans and see how close your sinks, baths, showers and toilets are going to be away from the soil and vent pipes (probably in the perimeter walls). The longer the distance the more difficult things get and the more likely you are to be plagued by blocked drains in the future. Additionally, be aware that the higher the volume of water, the steeper the gradient of the pipe and the larger its diameter should be. Otherwise you can end up with gurgling sounds, low water exit flow and blockages. This is all in BS5572 and is not that difficult to understand. In short, if you possibly can, keep plugs close to soil and vent pipes and make sure you can access/rod the pipework when it gets blocked! 8. Think twice before selecting fancy plug fittings for sinks. Ask yourself “How is anyone going to be able to fix this when it’s installed and covered in limescale/dirt/etc?" 9. With all fittings/equipment that may need servicing at some point in the future, will you know who the manufacturer was and will you be able to get spares? 10. Decide early on what type of cupboards you are going to have – don’t leave it until later on in the build. Ikea do a great range of cupboard carcases. If you want to go for these cheaper, pre-made type then the rooms can be sized to accommodate the standard sizes these units come in. 11. Be prepared for the fact that contractors involved in the building process rarely have any visibility of or interest in innovation. You may hear them say that that have been in the business for x years and have a wealth of experience but the problem is that what they actually have is a lot of experience doing the same thing over and over again – they tend not to be interested in new products, techniques or materials. Although it’s boring, the more standard your design is the easier your build will be. 12. In your design pay attention to the direction doors open and the positioning of light switches. 13. Ask how your architect/designer/builder wants you to provide information on the locations for items in rooms, e.g. sockets, switches, lights, etc. What symbol scheme should you use? 14. Check that the sanitary ware works together properly. Our toilet flush buttons are (annoyingly) hidden by the seat when it’s up. 15. A good rule for exterior tile and brick colours is ‘dark at the top, lighter at the bottom’. 16. Don’t use small stones on the driveway – it gets picked up on shoes and taken into the house. 17. Wood-effect porcelain floor tiles are very good – very hard-wearing and they look realistic. 18. If you're running water supply pipes some distance from the road, pay a bit extra and have the largest diameter fitted (63mm outside diameter?). Whilst static pressure may not be affected by narrow pipes when the water is not flowing, the pressure may drop substantially once flow starts. Trying to fix poor water pressure is expensive - fitting a large diameter pipe is cheap. Note that the connection to the main at the road will be a 'standard' size and will certainly be smaller than 63mm! PLANNING PERMISSION 19. The planning process is not nearly as hard as it sounds. Consider doing it yourself – don’t pay someone to do it if you feel you can. 20. If there are any trees that need to be cut down for your development, do it before you apply for planning permission but of course ensure that there are no Tree Preservation Orders (TPOs) or other restrictions in place. 21. Check that there are no restrictive covenants covering your property. You can check this to some degree of certainty by ordering the electronics deeds to your property (you can download them from the web for a few pounds). You can get restrictive covenant protection insurance just in case someone surprises you! It is reasonably cheap. All covenants are for the benefit of someone – and it is these people who can make a claim against you if you break the terms of the covenant. 22. Try to work with your local planning department rather than against them. Their aim is to build as many houses as possible (to meet government targets). Believe it or not they are on your side but they have the local residents at their throats trying to stop any building in their area. Give them reasons to allow your development. 23. Make your design a little bigger than you want and negotiate down. 24. During the planning process, all the documents that you submit to the council are likely to be published on their website. This in turn will be indexed by Google and other search engines. If you have submitted electronic copies this will mean that details such as your name and address will be instantly retrievable by anyone in the world. Therefore, if you want to retain some degree of privacy, always try to submit paper, hand-written copies of all documentation. 25. Keep records of everything that appears on the Council website – particularly the letters written by local residents. They will probably get deleted after a few months but having them in your possession can be extremely useful. 26. Planning departments express opinions on planning decisions to be made by councillors based on local and national policy. Highways departments do not have opinions – they have rules which allow them to provide planners with information about the way that a scheme will or will not meet Highways requirements. However, note that planners are allowed to ignore this guidance if they wish. 27. Back up everything you agree in person or on the phone with the planners with an email. PROJECT PRICE 28. Your project is going to cost you a lot more than you thought. There are several reasons for this: - Your contractors will not be motivated to watch your costs as closely as their own and so will find that things are more expensive than they thought they would be; - Contractors are not necessarily perfect at planning – they may be genuinely unaware of costs that emerge during the build and this ends up costing you money; - Prices tend to rise rather than fall; - You can’t remember everything and there will be things that you decide you want that you hadn’t budgeted for. 29. We found that ‘PC Sums’ (see Explanatory Note below), i.e. the non-fixed sums that amount to whatever the builder has to pay, were nearly always over the estimate, between 20-60% (and that’s without any extravagance!). If you decide that you want a more expensive option than a ‘normal’ item which would represent ‘par’ for the project then it is fair that you should pay more. However, on a fixed-price job, make sure you agree that PC sums are not allowed to escalate when you only want the ‘standard’ level of item. My recommendation here is: - Try to get rid of as many PC sums as possible. - Obtain some sort of agreement that the PC sums will remain within control. It is very important that they have some focus on giving you a REALISTIC idea of what your costs are likely to be rather than just minimum figures. Note that it not in their interests: -- to price up to a reasonable amount for PC sums (because it reduces the chance of getting the contract) -- to expend work to reduce over-spends on PC sums. - Set default prices for items of the most basic specification which could be installed for the PC sum if you have run out of money. For example, ask for a price for a specific fireplace that you would be happy with if you were running out of money. - Make a rule with your builder that whenever an item is quoted for against a ‘Prime Cost’ (or PC) sum item, that the PC sum is also given, otherwise you end up being asked “Is x thousand pounds ok to pay for item y?” when you don’t know how much the PC cost was for that item. 30. For an expensive product which is relatively easy to specify, get lots of quotes. This is more difficult with a custom-designed object like a staircase – you are really buying into the company that will design and make it for you and this may be a long process. 31. Ask your builder if they intend to charge an additional sum for some amount they have to pay to the builders’ association or something similar. This can occur if you ask them for a more expensive item, e.g. a better roof, and the cost of installing it is higher than you expect because the builder has to pay a premium to an association based on costs. 32. A significant cost will be the various charges and levies that the council will make against your project. Planning permission will be granted subject to the council receiving this money. 33. Check to make sure that ALL the costs are included in the price. We had to pay thousands of pounds extra for things like fitting a new gas connection, air circulation system and digging up the road for the water main. Make sure there are no (predictable) hidden costs. 34. Ask what the contractors will add on for anything that they buy (often 10%). You might be able to save money by ordering some things yourself. ARCHITECTS 35. Undoubtedly architects can assist a self-builder but we didn’t use one. There were several reasons for this: - We knew pretty much exactly what design of house we wanted - Architects are generally VERY expensive - They often have their own vision of the house which they try to impose on the client. A frequent complaint from clients is that they feel that they have had to persuade their architect to give them what they want! - By having a contractor and a separate architect you run the risk of being caught in the middle of disputes between the two. If there is only one contractor then everything is down to them. In hindsight I am very pleased we didn’t use an architect (we created our own drawings and an architectural technician drew them up for us ready for the structural engineers). SELECTING CONTRACTORS 36. When selecting a builder, ask them to bring all the process documents and templates that you would be expected to be involved in or provided with to a meeting. If they bluster and make excuses about ‘working on an individual basis with each customer’ you know that they don’t have any processes. This is NOT good and it means they will probably repeat all the mistakes they made on the last job on yours. 37. Have your house built on the basis of a contract with your builders for which they are responsible for EVERYTHING. If you allow a situation to arise where a builder can blame someone you hired then you are heading for problems. 38. If you are planning to specify a particular company to perform a special task in the build, make sure right from the outset that they are prepared to meet any associated contractors on site and go through the plan, stating who will do what and when. Make sure that the overall project manager will take responsibility for co-ordinating the various parties. 39. Make sure that concrete form-worker contractors are chosen with care and ensure you know exactly what they are promising in terms of quality before you start. 40. Avoid situations where two or more contractors are responsible to you for the delivery of an item. 41. Above all, when you build a house, the selection of the main contractor will create a relationship where you have to place a lot of trust in them so you must convince yourself that they are worth that trust. I think we were very lucky to have our builders. BEFORE THE BUILD 42. Satisfy yourselves that you understand who is liable if something goes wrong with your house. For example, if an architect specifies some material to cover a wall, what happens if it falls off? The architect may blame the builder for not using the correct adhesive, the builder may then claim that he did or that he wasn’t told. In cases like this, who pays to have it fixed? What happens if a foundation shifts due to ground movement? Whose responsibility is it to fix it and pay for it? 43. Before the build starts state explicitly what trees, etc. that you don’t want damaged. Digger drivers must be briefed on what to avoid. Sensitive areas MUST be taped off at least. If it can possibly be damaged it will be – watch Grand Designs! 44. Agree a length of time that you must be given to make a decision from first hearing about it. You don’t want to walk on site one day and be asked how big the window sills have got to be with an answer to be given within hours. 45. Agree a process for dealing with serious issues. Note that an issue which is serious to you may not seem serious to your builder and vice versa. This could lead to accusations of either over- or under-reacting to a perceived problem. If you agree a process before you start the build this should not be a problem. 46. There are guides for good practice in the building industry. For example, the LABC have an excellent manual and there are British Standards such as BS5572 (Code of Practice for Sanitary Pipework). The problem is that the British Standards documents can be expensive to buy (e.g. over £200) but they are often available for free on the Internet as PDFs. Ask to see the standards to which the tradesmen are working. Seek assurance that a) the tradesmen have a copy of the relevant standards and b) will stick to them. If you have a copy of the standards it isn’t difficult to go around and check simple things. 47. Make sure that your contractors agree that any concrete surfaces or steps will have a slight slope on them so that water will run off them and that they will fix any which don’t, no matter how difficult. 48. Ask your builders (in writing) if they have any interests in/relationships with any suppliers. This is not necessarily a bad thing – it may work to your advantage. Anyway, it’s worth knowing what the relationships are. 49. Agree what happens to materials that leave the site, e.g. waste wood. Will it be sold? 50. Ask yourself where you are going to store the things you buy for your house along the way, e.g. taps, electrical equipment, etc. Consider buying a small, secure container and putting it on site for the duration of the build (you can easily sell it again on eBay) or ask your builder if they can provide you with storage. 51. If your builder hires a contractor such as a painter or architect to work on your build then (unless they provide a transferable guarantee of some kind) they are not answerable to you at all – they are only responsible to the builder. Keep this in mind in terms of your agreement with your builder and any guarantees or indemnity that you may in future rely on. 52. Regarding stage payments, it would be good to agree that if faults are found in a stage that has already been paid for, then an amount from the next stage payment is withheld until the problem is fixed. If you don’t do this, there is no real incentive to fix problems when they arise. 53. Agree in writing with your builder that they will tell you if an item that you are deciding upon has any criticalities – e.g. will the flooring have to be less than a certain thickness, does a fireplace have to be of a certain type, etc.? Also agree that they will not allow you to drift into a situation where you get the blame for something like this. 54. Plan for the fact that concrete screed can take months to dry to the point where wooden flooring can safely be laid on top. 55. Make sure the builders are signed up to pay for any heating and electricity that they use prior to you moving in. Our bills for electricity and gas came to nearly £1,000! If they won’t agree to this, make them agree to cap the spend at a fixed amount. 56. Tell your contractor that you want all of the documentation for every item that is installed into your house. It is best to get it as you go along – when the house is finished all the people working on it will evaporate and the last thing on their priority list will be finding the paperwork that came with your shower mixers. DURING THE BUILD 57. Builders are not always right. Keep checking what they are doing! 58. Watch for quality issues involving techniques that your builders aren’t experts in. This will be anything that is slightly out of the ordinary. With us it was (surprisingly) the concrete basement. They didn’t know what to look for in good concrete or what standard to demand from the concrete suppliers. I was surprised to see unmixed concrete coming out of the lorry so I videoed it. Our supplier denied that there was a problem until they saw the evidence. In the end, several areas of bad concrete had to be hammered out of the walls and redone. Keep an eye out for this sort of thing if you can. Incidentally, the reason the concrete wasn’t mixed very well was probably because the concrete plant was only a couple of miles from our site and the materials hadn’t had enough 'spinning' on the journey to properly mix them. 59. If you have valuable items of your own on site, make sure there is adequate security and that rules for the site are established and adhered to, e.g. keeping gates locked. In my experience builders are not very good at shutting gates. 60. Be prepared to make decisions. I know this sounds obvious but there will be thousands. Ask for a decision schedule and stay ahead of it. Work hardest on the big decisions – floors, bricks, windows, tiles. Don’t get overwhelmed – just start working your way through it and you’ll get there in the end. 61. One often hears builders complain that the client doesn’t know what they want or that they won’t make a decision. However, this isn’t always the whole story and knowing what you want isn’t always enough. If the contractors shrug their shoulders and say that they’ve no experience of some product or technique that you want they may not show much interest in finding out. This can make choosing features/fixtures difficult. 62. Keep looking – or have someone you trust with an engineering background to look – at the important parts of the structure and be satisfied that they ‘look right’. Amongst several serious faults that we noticed we averted an extremely dangerous, possibly fatal structural error when we discovered that a load-bearing element had been mounted on a non-load-bearing support. This was a genuine mistake but it showed that another set of eyes can reveal all sorts of things that the builders may have missed. I was also amazed (and very thankful) for what others spotted that we missed. 63. It is possible (for reasons that are not foreseeable) that a change may be necessary to the design/spec of the building and that new prices will have to be obtained. For example, if electric garage doors were specified but these cannot be fitted for some reason and ordinary garage doors have to be fitted instead. A quote will have to be obtained for the ordinary garage doors and the difference between that cost and the cost of the (more expensive) electric ones should be removed from the amount you will be paying for. You should agree with your builder that prior to obtaining the quote for the new doors, that the actual cost for the original ones is disclosed so that you are sure to get a proper rebate. 64. Be prepared for the fact that the suppliers of building materials have not moved with the times when it comes to quality control. In fact in some cases, technologies that have been with us since before Roman times seem to have advanced little! Take for example bricks – you cannot pick brick colours from a board of brick ‘slip’ samples and then expect to get the same colours delivered. Ask any bricklayer. The only way to guarantee colours is to go down to the brick yard, select the ones you want and take them away with you. The same applies to exterior tiles. The quality control is nowhere near the standard applied to other areas of modern production (e.g. farm produce at supermarkets). The quality of concrete is incredibly variable in both consistency and mix. If you are looking for ‘fair-faced’ concrete surfaces, i.e. ones that are good enough to be visible, it may be a good idea to have a back-up plan in case it goes wrong. Note that the choice of concrete is often limited to those plants that are nearby – your builders may have little choice on which one they can use. 65. If you are working from samples then keep the samples of the things that you used to make choices and make it clear that the colours shown are the ones you expect to see delivered. If the supplier can’t guarantee that then pick another supplier. 66. Take lots of photographs of everything, no matter how boring. When the structure is finished and you need to know what’s behind a wall you’ll be grateful. Particularly useful is where pipes and other services are running behind walls and under floors. 67. Make sure that you decide and say where you need wood behind the plasterboard to support pictures, curtain rails and televisions, cupboards, etc. and then take photographs of where it is before the plasterboard is put on. 68. Keep a VERY close eye on what you are paying out. It’s a very good idea to create a spreadsheet which documents all the costs and then when they have been paid. AND FINALLY SOME OTHER NOTES… 69. In my experience professional bodies such as the Chartered Institute of Engineers are only there to protect their members, not the public. In my experience they will always maintain that their members are right and you are wrong – the member is the one paying them – not you. Always have in the back of your mind that you cannot rely on any professional body to protect you from their members. 70. Don’t expect the Local Government Ombudsman to uphold any complaint you make against the local authority. In my experience they rarely take any complaint seriously. Take a look at their website and try to find a dispute that has ended up in the resident’s favour. Even those labelled as ‘upheld’ often don’t force the local authority to do anything to rectify the matter. 71. If you are using a home automation system which controls the lights, make sure you put an ordinary light switch in the cupboard/room where system is. If it goes wrong you’ll need some light to fix it! Also, think carefully before using mechanical retractive light switches. For a simple on/off they should be fine but for special uses (e.g. double tapping for switching a light scene off) they are not very easy to use. Consider the touch-sensitive (capacitative) type - they are far easier to use. 72. Don't allow things which will need replacement or servicing to be boxed in with decorative panels, etc. Make sure it is easily accessible. 73. If you're building a basement in impermeable ground (e.g. clay) remember that basements can easily 'float out', i.e. rainwater can flow down the sides of the concrete, collect under it and then cause the basement to float. Yes, it sounds incredible and yes, basements are very heavy but so are battleships and the Archimedes' principle holds true for both of them. Make certain that a) that your builders have spoken to the engineer about this and fully understand and will mitigate the risks, b) that there is adequate drainage from the bottom of the basement during the build to prevent water collecting around the concrete 'ship' and c) obtain written confirmation from your engineer, backed up by his professional insurance, to confirm that the weight of the house's structure above will be sufficient to keep the house firmly in the ground when the project is finished. 74. I started with this but I’ll say it again – get all decisions in writing. If you make a decision verbally with anyone, back it up with an email. Explanatory Note: A PC Sum (Prime Cost Sum) is an allowance made by an architect or a builder in the price for a specialist contractor or specialist supplier. In most cases a PC Sum is allowed for electrics, plumbing, heating, kitchens, windows, etc. It is allowed on a lump sum provisional basis and the client is responsible for the actual end cost of the item plus a small percentage for the main contractor. It is in the contractor’s interest in the tender process to keep this figure as low as possible as it makes his overall figure lower even if it is well known that the provisional cost is insufficient.11 points
-
Firstly, for all you lot waiting with baited breath for my next blog update, my apologies! Since the house was opened up for guests I've needed a bit of time to switch off from what was a very full time project for the last few years. When we first opened to guests the house was missing its decking. I had gone through various ideas for the design of this, and in the end decided that less was more, and made it a fairly minimal affair, just somewhere to allow access to the big sliding door and give space to sit and enjoy a cuppa or glass of whatever, whilst looking out over the views to the loch and the sunsets. Due to the big change in height, I decided to make the seating integral and do dual duty as part of the step down as well. This has worked pretty well, I think, with the advantage of dropping the height of the decking and preventing the handrail from obscuring the view from inside the house. There's still some tidying up to do- paths around the house, and some cladding trim to finish off the decking itself- but it's a big improvement on how the place looked a few weeks ago.3 points
-
In Part 22, I detailed my decision making process in relation to my choice of a pre-plumb Mitsubishi Ecodan 8.5kW ASHP based DHW and heating system. I now have a full set of data covering 12 months so can provide figures in respect of how the system, and our house has performed. My baseline requirement was to maintain 21.5C in the house 24/7 throughout the heating season (October to April), and a supply of DHW water that would allow multiple showers to be drawn off without a drop in the temperature of water delivered at the tap. The Mitsubishi FTC5 master controller / thermostat is set to 21C, and is located in the hall next to the vestibule. DHW is set to and stored at 50C. Over the 12 months March 2017 – March 2018, heating COP ranged between a February low of 3.3 to an October high of 4.6 over the course of the heating season, with an overall SPF of 3.7 DHW COP ranged between a February low of 2 to a summer high of 2.5, with an overall SPF of 2.3 Based on a kWh electricity unit price (inc standing charge) of 12.3p, I paid 3.32p per kWh of delivered heat, and 5.34p per kWh of DHW (inc losses). It should be noted that DHW cylinder losses do slightly reduce my heating demand, albeit at a higher cost than if delivered via UFH. For a reminder of our layout: In winter, with a set temperature of 21C, the house sits at a comfortable even temperature, the main living section of the house tends to sit at 21.5C, the 2nd and 3rd bedrooms at 21C and the master bedroom at 20.5C. I suspect that the slightly lower temperature in our bedroom is due to the fact I set the MVHR vent at a higher supply rate than the other bedrooms. This would tally with my experience of doing the same in our last house. The two biggest factors that impact on our heating demand are wind speed and solar gain. In modelling our heating requirement, I took both into account, along with incidental and household gains. The weather data set was based on a combination of met office and local home weather station information. Our average wind speeds are significantly higher than elsewhere in the country, and combined with the effect of storm force wind speeds (which we get a fair bit of) we do have a higher heat demand when compared to the same house being located in a sheltered inland area. The impact of wind speed, and the differential in pressure it causes is illustrated here: http://www.wanz.co.nz/ConversionChart A doubling of wind speed sees the pressure increase by a factor of four. Average winter wind speeds of 15-20mph (which equates to the standard air pressure test) are common if not the norm here. Average storm wind speeds of 40-50mph gusting to 70-80mph are also common. The impact of the pressure differential that such wind speeds cause was illustrated to me during the build whilst I was decorating. Having masked off the windows with polythene it was noticeable that when wind speed exceeded 40mph, the polythene would inflate on the windward side of the house, and be sucked onto the glass on the leeward side. Whilst we’re not aware of any drafts and the house isn’t any way uncomfortable, looking at the daily heating requirement when wind speeds are high, you can see an increase in the amount of energy used. Part of that will be air leakage (as evidenced by the effect of pressure differential on the windows) part is the unbalancing of the MVHR (gusting wind from a particular direction can cause the fans to struggle), and part is the lack of solar gain on such stormy days. In terms of solar gain, the vast majority of any gain manifests in the public areas. In winter this provides a useful uplift in internal temperatures. Depending on how clear it is, and how long the sun is out, the uplift sometimes compares to having a WBS stove on and really is quite pleasant. More generally, with mixed winter weather, the gain is less noticeable in terms of a temperature spike, but does have the benefit of reducing our heating energy use. In summer, the gain can be significant and does require a cooling strategy. Without any active cooling, the house has at times risen to 25C in the public areas and 24C in the bedrooms. Alongside the MVHR summer bypass (set to activate when extract air is 22C or more) we cool the house down to a more comfortable 22C using cross ventilation, opening windows / taking account of the prevailing breeze. We also have a velux window upstairs, which when opened in combination with a downstairs window, creates a chimney effect that is very effective in exhausting hot air. The biggest downside in using cross ventilation is that it doesn’t work when the ambient temperature is high (not a very common), nor when there isn’t a breeze (again, not very common). You also have to factor in the unexpected as we had to recently as our neighbour undertook ground works, which created vast clouds of dust in the dry weather. Opening windows simply wasn’t possible on those days. Overall the predicted impact of solar gain is as I modelled it using data from the following two sites: https://www.susdesign.com/ http://re.jrc.ec.europa.eu/pvgis/apps4/pvest.php PVGIS provided daily average data, and from susdesign I was able to work out a peak solar gain multiplier to determine what the maximum likely amount of solar gain would be on a clear, cloudless day. Modelling solar gain for both heating and cooling requirement was a very worthwhile exercise as I was able to determine what our worst case requirements were for both, and what strategies would work. I’m fortunate in that the prevailing weather conditions here mean cross ventilation is a viable and workable strategy to deal with overheating. I am however in no doubt that had we built our house in a sheltered location in a warmer part of the country, that we would have a very real overheating problem and would have to use a very different strategy, most likely combining solar films on windows and active cooling. I do have the option of actively cooling my house using our ASHP, via the UFH and if I wanted by retrofitting a duct cooler into the MVHR system, although haven’t felt the need to do so yet. One plus point of the Mitsubishi Ecodan ASHP is that activating cooling is simple (changing a dip switch setting to enable the master controller). All in all, I’m very happy with the way the house is performing in terms of retaining heat and providing a comfortable environment in both winter and summer. The performance and running costs to date are certainly more than satisfactory. Of particular value to us is having sufficient heating capacity to deal with spikes in heating demand (resulting from especially stormy weather) as and when needed, without having to resort to auxiliary heaters or peak rate top up, and the simplicity of use of the master control system. Whilst I could if I so wished set flow temperatures and heating curves, the onboard auto / adaptive program requires one user input – internal set temperature, and the controller works out the lowest temperature way of delivering it. Whilst I had a very good idea of what our heating curve should look like, using the auto / adaptive mode saved a lot of trial and error, and having monitored flow temperatures, have not seen them exceed 32C. For those not comfortable with developing their own programming or control systems, this is a very big plus. Having looked at a variety of options, I concluded that an ASHP would be the most cost effective solution (even after taking into account the cost of replacing the outdoor unit after 10 years) to meeting our requirements, and 12 months on, I have absolutely no doubt that I selected the right system for our requirements. Whilst I have no hesitation in recommending the ASHP system I have, it is important to recognise that low energy or passive type builds really do need to be modelled and individual requirements identified to determine what type of heating, cooling and DHW provision is required.2 points
-
Being a mere dreamer of building our own property I had previously been a regular visitor to the eBuild forum and was disappointed by it's closure, so whilst doing a recent t'interweb search for Larsen trusses, I was really pleased to find this forum and offer my sincere thanks to all involved in achieving the resurrection. My previous eBuild name was Eyefor and I had asked many questions and gathered very welcome advice on planning procedures, Architects, build methods etc - all of which were asked on the basis of "soon, we would find a plot" but having looked for over 10 years in our area we were near to giving up and buying a ready built. Our son and his partner then showed an interest in a fairly local farmhouse that had adjacent (but definitely separate) barns having both agricultural and industrial (B1) uses classification that gave us concerns for the long term future of his property, should he buy it. Long story short... They bought the farmhouse in September 2017 and in October 2017 we completed on the 5 barns (total 11,000+ Sq ft) plus 2.9 acres of paddocks without planning permissions but to us, it was a no-lose basis because, although they might make us a nice dwelling, our primary reason for buying them was to protect our son and his partners interest. Earlier this year, using (superb) planning specialists we submitted applications under permitted development Class Q for change of use to a dwelling on a 2000 sq ft agricultural barn and prior approval for a dwelling under class PA for the 4800 sq ft main barn. Both were approved in July. Lots to think about and lots to do in the forthcoming months (and years) but I will be regularly visiting the forum in search of ideas (and help!).2 points
-
CT1 ? Well Nick says it will stick anything? I also will get my coat.2 points
-
Well guys Just got my quote for windows etc for my new build and would like your comments. Basically 14 windows and two 2.4 Mtr French doors and one oak (insulated) front door and frame ,approx 23 sq metres, triple glazing giving a u value on 1.0, all built from Occoya and spray painted . £24,360 already agreed a delivery time of three months, has done work for my builder before and highly rated by him. We hear of so many projects getting delayed or just cocked up by widow problems that I get a good feel for this company. Discuss please.1 point
-
Curlew Cottage- named for the birds that live in the field and shoreline in front of the house.1 point
-
@Crofter Nice updated profile picture!1 point
-
Or play one of the default tunes but yes it does make a noise when the battery is charged but the single beep option often goes unnoticed if your 'at it'.1 point
-
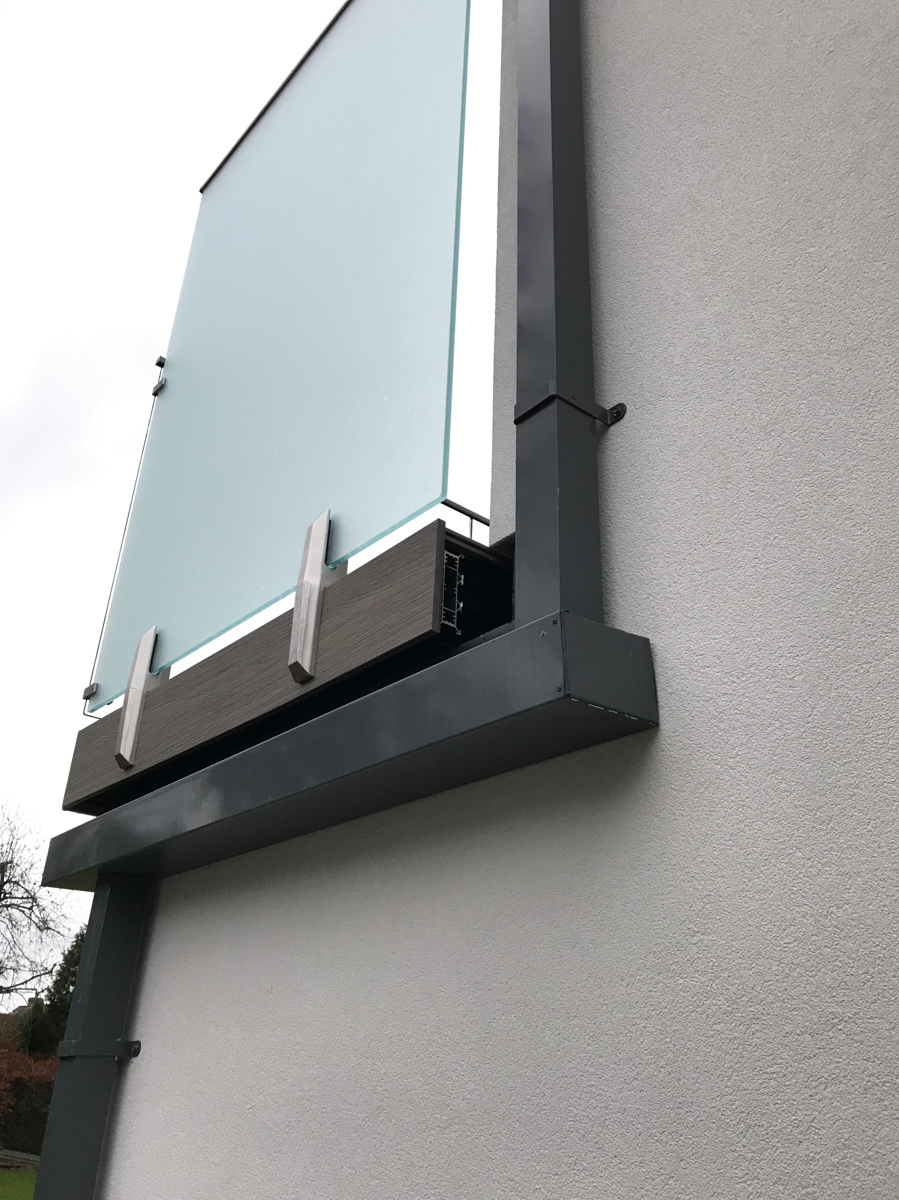
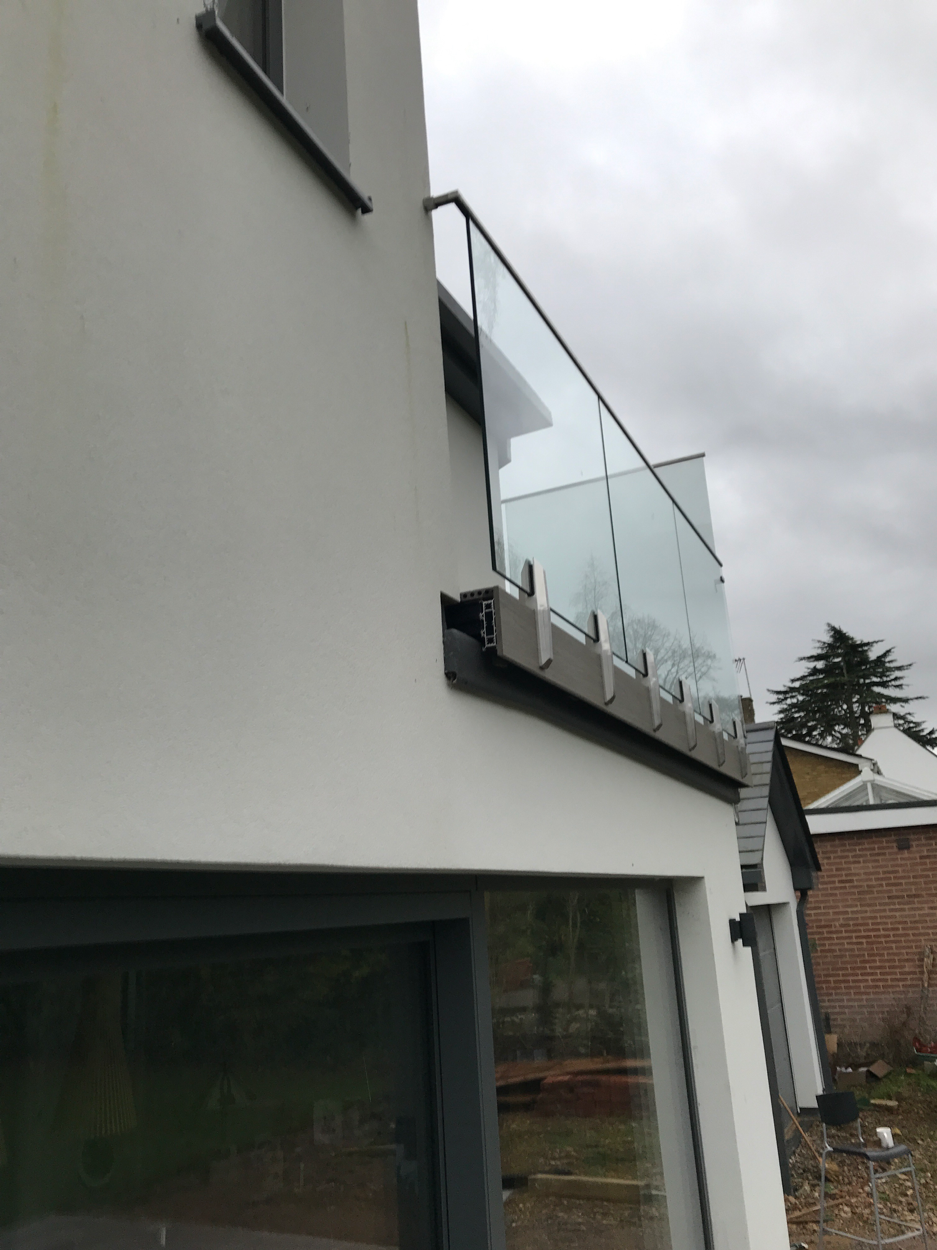
....is how my brother in law accurately described the state of the build now when I Whatsapped him the picture below, taken yesterday afternoon. As you can see, MBC have been at their blitzkrieg style building speed again and this morning I arrived to find my roof all covered in membrane and battens, too, and MBC noticeable by their absence. Actually, it's the silence that you notice as much as anything. There were about 7 in the team over the weekend and when all the nailguns are going it does sound either like gunfire skirmishes or lots of firecrackers going off. Either way, they were true to form and really shifted. This is the view from down the lane and you can see the membrane and battens all in place. Personally, I think that this is an interesting photo because it shows how, despite being a large building, the view of it from the lane is much less prominent than one might expect, due to the angles of the gables and pitched roof. The part that looks like it's covered in tin foil is the garage. Here's a more distant view from down the lane, taken before the membrane went on. Of course, in order to get the roof on, all the posi-joists needed to be put in place and this was being done over the weekend. My neighbours work in construction and have been fascinated by the process of the MBC build, which is all very new to them. It's great having neighbours who view the construction with such enthusiasm because instead of complaining about noise and disturbance about the teams and working late/working weekends, etc. (remember Peter powerfloating the slab till 12.45 am?), they gush about how hard working they are and give me full update reports on what's happened in my absence. Lucky me! And thus, according to my local spy network, there were 9 team members working on Saturday and there were 7 on Sunday. No wonder I came back to an empty site today. I was away from the site on Friday, dropping hubby off at Luton airport at 6.30am and then on to have a brief bit of R&R with a girlfriend in Birmingham before heading back south. On Friday, my temporary staircase was delivered from Howdens and MBC added a couple of extra treads to the bottom to bring it up to the necessary height. For £120 + delivery (and VAT, if applicable), it's a very useful bit of timber to have. Most of the stud walls are up now; there are only 2 that need to be put up when MBC come back, both off the hallway and have been left out for the time being for logistics. This photo is looking from our bedroom into the en suite and through to the main guest bedroom. We had a lucky save on the stud walls, not in financial terms but layouts. The architect had specified that each of the bedrooms should have a partial stud wall just inside the door and centrally located, almost making a corridor as you walk into the room. We were really unconvinced by the idea at the time, but went along with it as it can be hard to accurately imagine these things before the building goes up. When I came to the site on Thursday, however, it was clear that they would have been awful for a couple of reasons. Firstly, having gone to a lot of effort and expense to have bigger rooms, these immediately sliced off 25% to 30% of the room and made you feel like you were being pushed up against the window which, by the time a large bed is in the room, is exactly what would happen. The second reason is that because of the really high vault in the main bedrooms, 4.7m, having a run of about 3 along the floor from the partial stud wall the the window meant the proportions were really off and looked terrible. Still, nothing ventured, nothing gained, and these weren't put in and are now a nice load of scrap or surplus timber lying around. The matter of the stud walls does, however, emphasise the value of being on site most days as had I been absent, they would have been put up according to the plan and I'd have regretted it bitterly. There have been many instances like this where what seems like a small, or even trivial, decision or alteration at the time which is quick and easy to deal with because I'm there, could have developed into a big deal or expensive issue at a later time. Coming back to those vaulted ceilings, the ridge height is such that when the scaffolders came back to put the second lift on and make some adjustments earlier in the week, we needed to get a tower in for the guys to reach the top internally. If I can give one bit of advice to anyone starting out, scaffolding is EXPENSIVE!! I know that very little comes cheap when paying others to build a house, but don't underestimate the cost of scaffolding. By the time I'm done, mine will be just over £5k. It isn't the simplest of buildings to scaffold with the balconies and vaults, but even so, it's a significant cost. Once all the internal stuff was getting done, the roof was getting boarded. This is the main, west facing bedroom with half of its roof boarded. And then the same once it was all covered. Finally for this post, the balconies have been made ready for boarding and flat roofing. I have to go back to the architect in the morning to check on the fall of these and the direction of the run-off as it doesn't make sense to me right now. I need to refresh my memory as to what was discussed and answer a couple of queries PDQ as my flat roofing is now imminent. But that's another subject for another post.1 point
-
Does your waterproofing system lap over the parapets? In which case f you're doing a U channel that the glass will slot into you'll have to penetrate the top of the parapet plus need a very solid substrate to bolt the channel on to. Looking at the buildup above, your parapet looks to be CLS either edge and I presume will have OSB on top - meaning your glass channel will need to either be on outside or inside edge and one course of CLS may not be enough to hold the channel and glass securely (imagine someone leaning on the top edge if the glass, making the balcony want to pivot at the bottom. Easy to beef this up now but not when you have a finished wall / roof

 1 point
 -
I suppose it’s too late to say use stainless and get it TIG welded and buffed.1 point
-
Yer learning fast, lass!1 point
-
It may be too late to comment on this? Mine looked similar when I started work. I lowered the internal floor. The building didn't have foundations and was built on a slope, so the excavation exposed the underside of the external walls on about 1/3rd of the building. So I had to underpin this area. Underpinning sounds scary, but in reality its just digging holes and filling with concrete - but carefully! With such a build you will find it is very labour intensive. you end up knocking lots of areas out to rebuild. Costs can escalate easily as until you get the structure sorted and roof/windows complete, it is almost impossible to estimate what is actually needed. you seem to do 3 weeks taking bits down to every 1 week building back up, so it can be demoralising too. It is pretty much impossible to get a fixed price for any of the work to the structure. I project managed mine and was the designer, labourer ,estimator, buyer, Qs. I brought in skilled groundworker, masons, bricklayers, carpenter, plumber, electrician. It would have been easier to demolish and rebuild, but maybe not much cheaper. Good Luck1 point
-
There are some useful replies, so we'll leave it up, but this thread was started to allow posting of a spam response (which was deleted before it was posted due to an eagle-eyed mod).1 point
-
An analysis from @JSHarris from my thread Thread here1 point
-
Slightly off topic but some are still concerned at heat pumps and point to "faulty" design. I saw one such on a job this morning. I noted a house I have worked at previously had just had a new Air source heat pump fitted. I also noted that the heating medium appeared to be conventional sized wall hung radiators which will need to run hot. This seems to be one such poorly designed system where I feel near certain the results are going to disappoint and this will be yet another person saying how bad heat pumps are.1 point
-
I raised that issue recently in a thread of my own, and the conclusion was it was near impossible for legionella to be present in the cold water mains supply, and with an unvented hot water tank there was no way for it to enter other than in the supply water, so heating it hotter was pointless.1 point
-
That might have been me. My DHW set point is 47 degrees at the moment. At that, I can just hold my hand under a running hot tap, so hot enought for what I recon is the hottest task, dishwashing, as long as you don't add any cold water to it. I see no point it heating it any hotter with the HP. At this temperature it is more than hot enough for showers or a bath, and still leave plenty of capacity for later on when solar PV is fitted for heating the water further by excess PV generation.1 point
-
Hi and welcome. I think that post deserves to be made a sticky post somewhere for east reference.1 point
-
Nobody changes the pump on a fridge. Similarly, I'm not sure whether people change the pump on an ASHP because of the restrictions on the refrigerants. Still, the fan should be an easy change. I expect to own two fridges in my life. The one I bought in my early twenties which I chucked when I sold my old house in my mid fifties (because it was very grotty and a bit noisy) and the one I'll buy when I move into my completed house which I expect will outlive me. I don't see why ASHPs shouldn't be a similar deal.1 point
-
1 point
-
As @ProDave says - you can use ordinary inhibitor based antifreeze which isn’t that expensive and the volume is about 15-20% to get the cover down to -10c. It’s only really an issue if the ASHP isn’t in use and the outdoor pipes freeze - it takes water a fair while to drop to freezing point if they are insulated with 15mm of nitrile rubber insulation (35c to -2c is 9 hours from memory) so this is only really needed if the heat pump is not on for a long cold period or the power fails. I plan to use a mix of decent insulation, an amount of inhibitor and also a timed frost programme on the heat pump to run the pump every couple of hours if the outside temperature is below zero. All those should resolve any issues.1 point
-
[Thread split into new one re heating design]1 point
-
.1 point
-
I think it fair to say that the planning authority has so little resource due to austerity cutbacks that they weill have little or no appetite or capacity to be bothered by such things. Unless there is a proper nuisance or H&S situation, or a local councillor takes a dislike to you. Maybe if it was in a particular sensive conservation area etc. I moved in ages before the competion cert as I delayed the final certificate so I could get as much done prior to submitting my VAT claim.1 point
-
If it's the DC18RC charger then the green light on steadily means it's charged. Green light flashing means the charger's on but there's no battery in it. I don't think the fan goes off until a bit after the charge completes but it's been a while since I watched one closely. Normal charge from flat is about 20 minutes I think. Initial charge of a new battery should be shorter than that as they'll be shipped at least partly charged.1 point
-
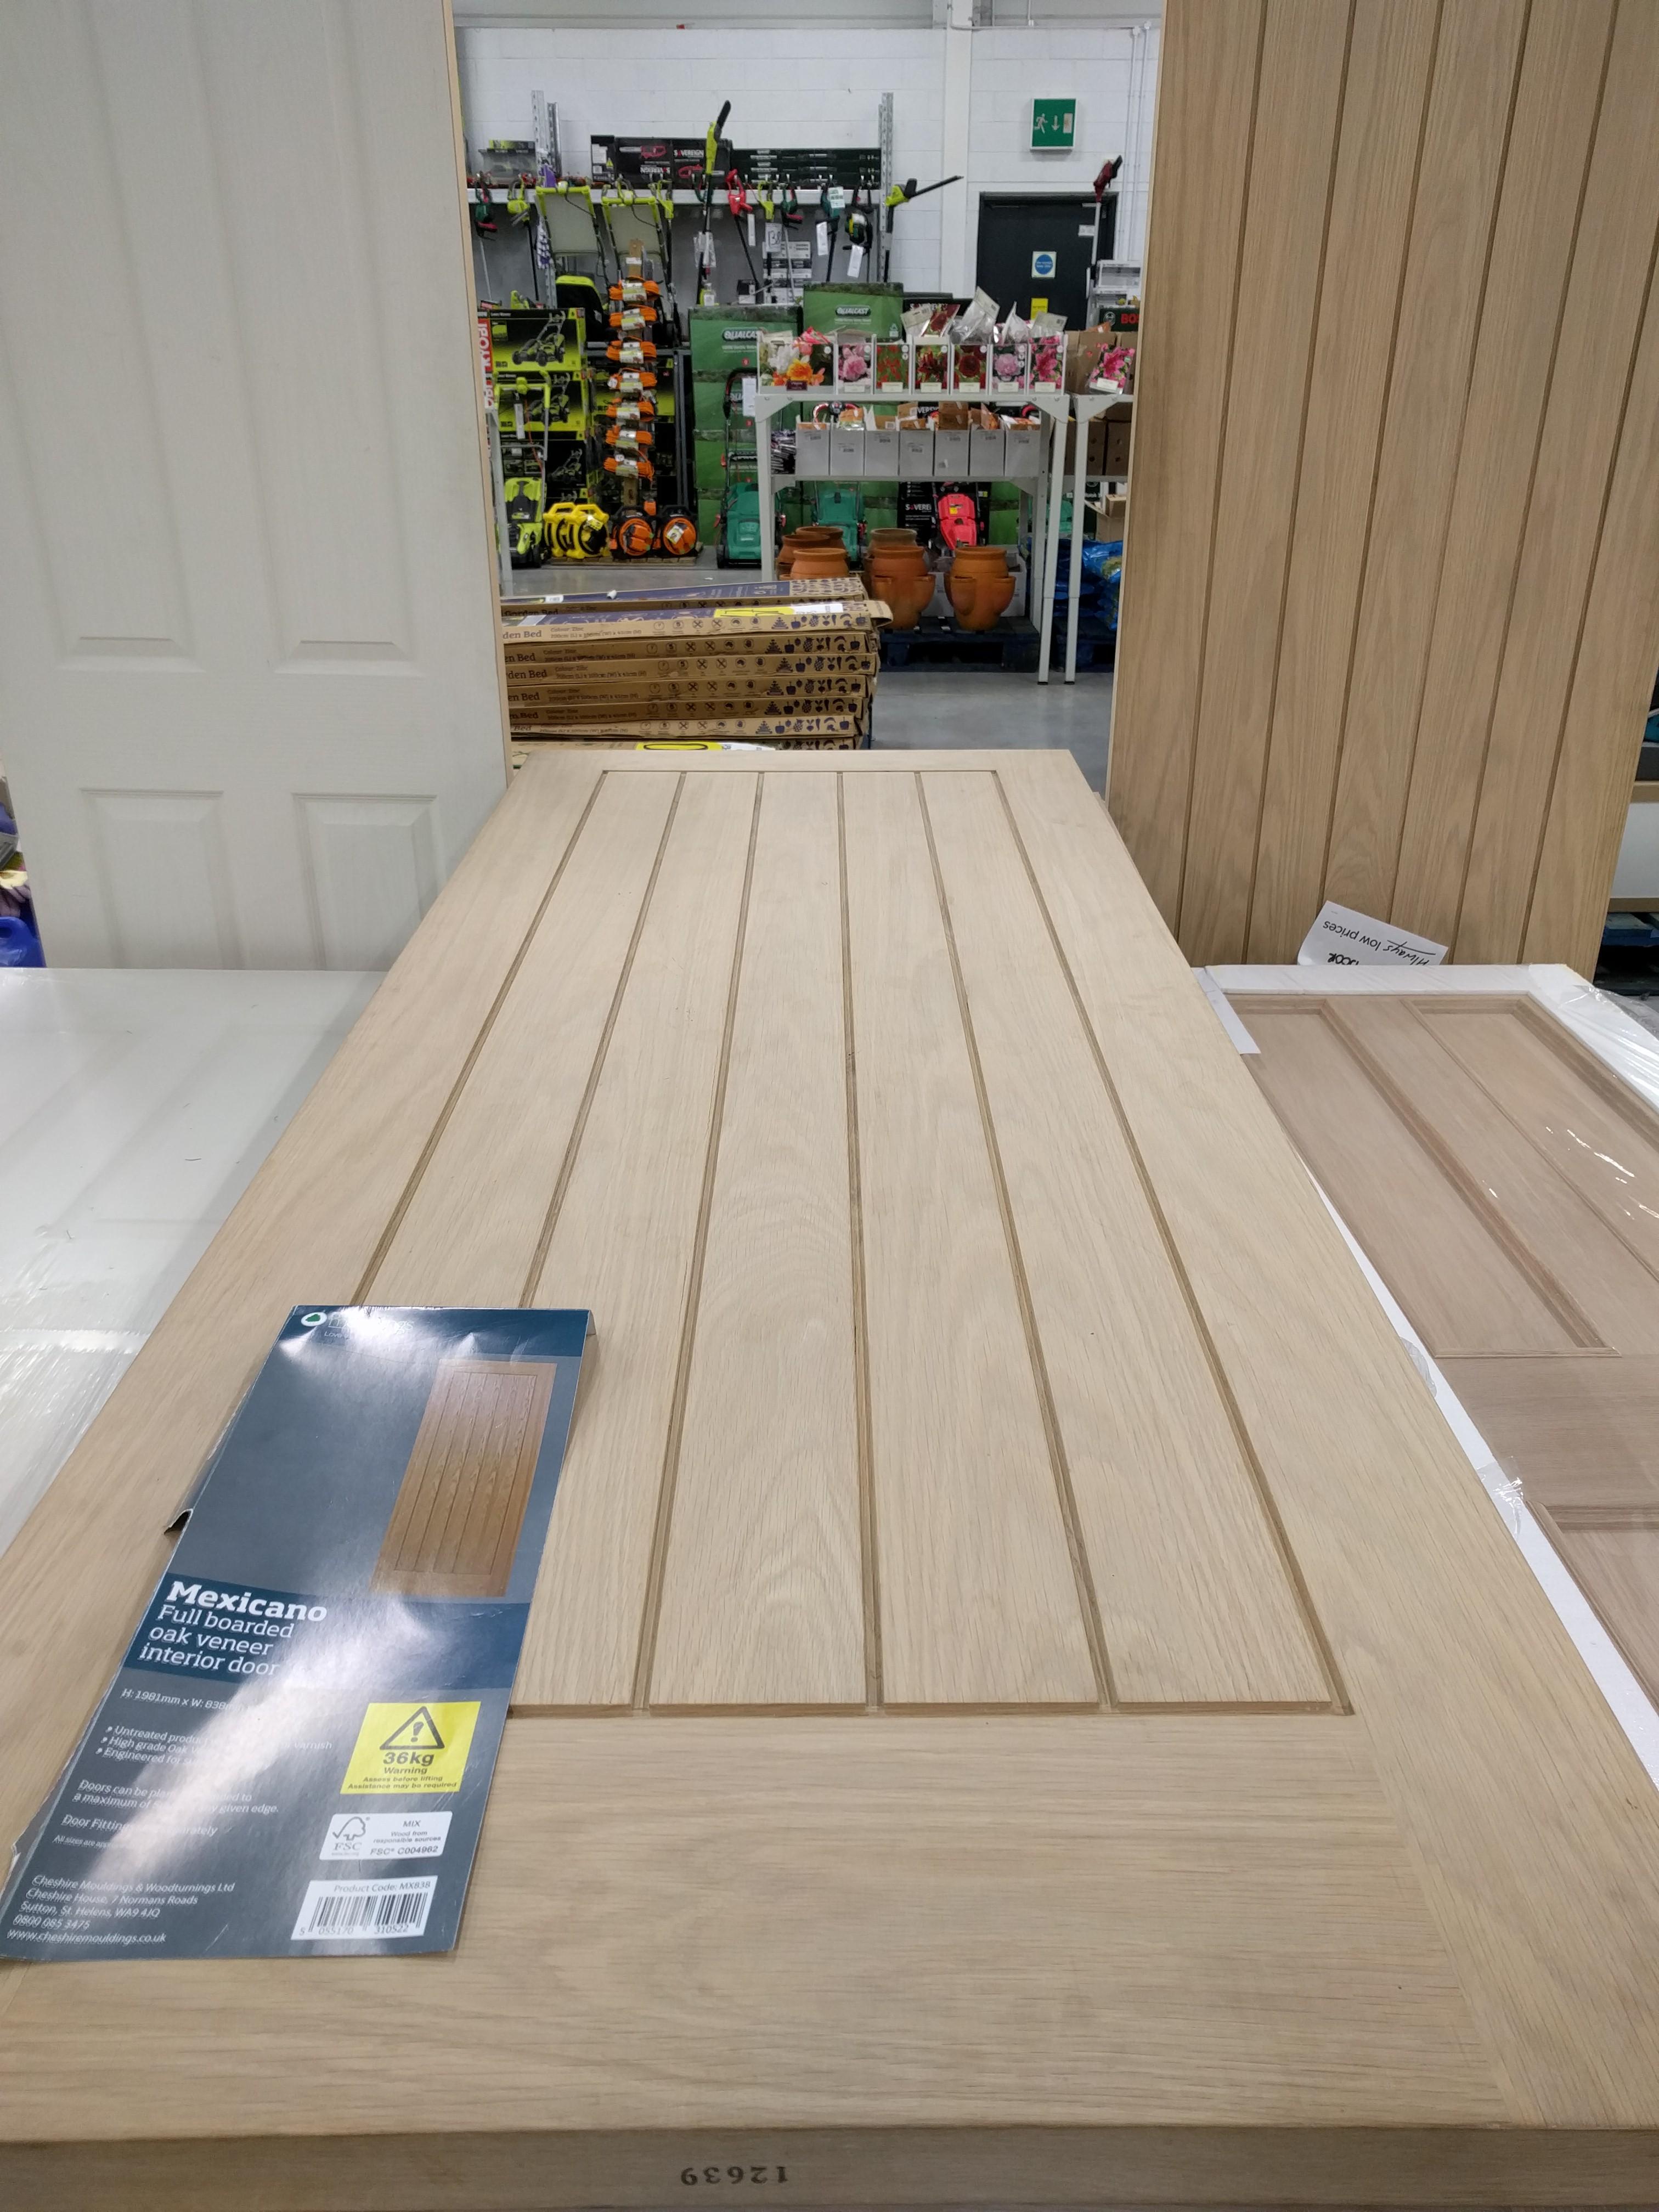
Hi, I was talking to someone last night about going to tender for my new build. I'll be appointing a main contractor. When I meet the Architect next month to discuss the tender specification I'm trying to get my head around how I get from a line item in the specification to the exact product I want. Take doors for example: I know exactly the type of oak veneer door I would like to get, plus handles, lock etc and good quality hinges. Now I could get the ironmongery myself or just price these from a supplier and quote a budget of say 150-200 per door to cover things. Then on the day after the contracts are signed point the builder at the supplier and off they go. If I start buying some items myself it means the builder will have to bump up his margins on other items to make up for that loss. Against this I need to be sure if I leave them up to the builder, he gets exactly what I'm after. Do I let them supply the door and I'll supply ironmongery or get a catalogue from a local building supplier and find everything I need there? I'm just after a specific end result. As long as I've my budget set right which is half that battle, who is the best person to procure? If I find a better deal online would they buy it there? Second - how much do I take on vs leave to the builder? Do I get for a quote to finish everything but then negotiate I'll do X & Y afterwards but that affects the builders margins? It also places me on the critical path if I'm slow getting the kitchen installed, MVHR, flooring etc? I don't want to take on too much stress or hold up the builder costing them money in the process. Thanks!
 1 point
 -
Its not quite black and white unfortunately. The HSE guidance is:- The practical and proportionate application of health and safety law to landlords of domestic rental properties is that whilst there is a duty to assess the risk from exposure to Legionella to ensure the safety of their tenants, this does not require an in-depth, detailed assessment. The risks from hot and cold water systems in most residential settings are generally considered to be low owing to regular water usage and turnover. A typical ‘low risk’ example may be found in a small building (eg housing unit) with small domestic-type water systems, where daily water usage is inevitable and sufficient to turn over the entire system; where cold water is directly from a wholesome mains supply (no stored water tanks); where hot water is fed from instantaneous heaters or low volume water heaters (supplying outlets at 50 °C); and where the only outlets are toilets and wash hand basins. Interestingly it does refer to a 50 Celsius minimum at outlets. I don't do anything for my rental properties.0 points


.jpg.c21f3ac78c9b7efd90cbdcb312744dc5.thumb.jpg.7adcad4c0e384f5ecd7d56b0618df6e5.jpg)


This leaderboard is set to London/GMT+01:00