
Leaderboard


Popular Content
Showing content with the highest reputation on 07/21/18 in all areas
-
Home brew screed rails rule OK! Vid:2 points
-
Should we have said this first? My defence is that I did not come in until nearly page 4. What about you lot? But think how less interesting @newhome's weekend would have been.
 2 points
 -
I'd go with that. I had a plastic bag full of blown bonded beads that I filled when the guys were putting in our CWI. I split the bag into two more or less equal lumps, let the glue dry for a few days, weighed each lump, then immersed one of the lumps in a bucket of water, weighed down by a brick, for a few days. When I took it out and checked the weight it was near enough exactly the same as when it went in. On the basis of one, impromptu and uncontrolled, experiment, I'd conclude that blown bonded beads don't absorb water at all to any significant degree.2 points
-
I look so young anyway that I am still on the same bottle !2 points
-
I am seeing that dodgy investment arithmetic again. If you went out on Monday and invested £4000 in United Bank's fixed rate NISA/ISA, after 5 years you would have £4350 tax free. If you went out and bought a battery storage system, after 5 years you would have £0 plus any savings. Worth bearing in mind that the last 3 weeks I have used less than 100 kWh. As most of that is during the night, so the cost is about a 3 quid a week.2 points
-
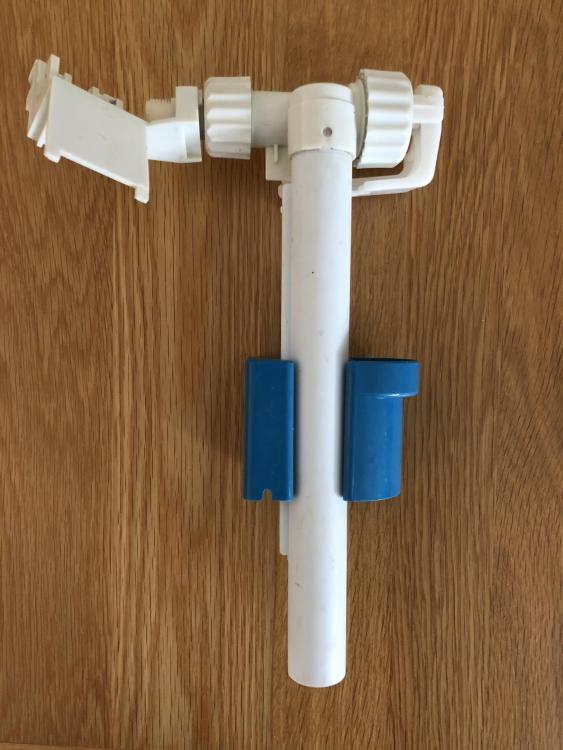
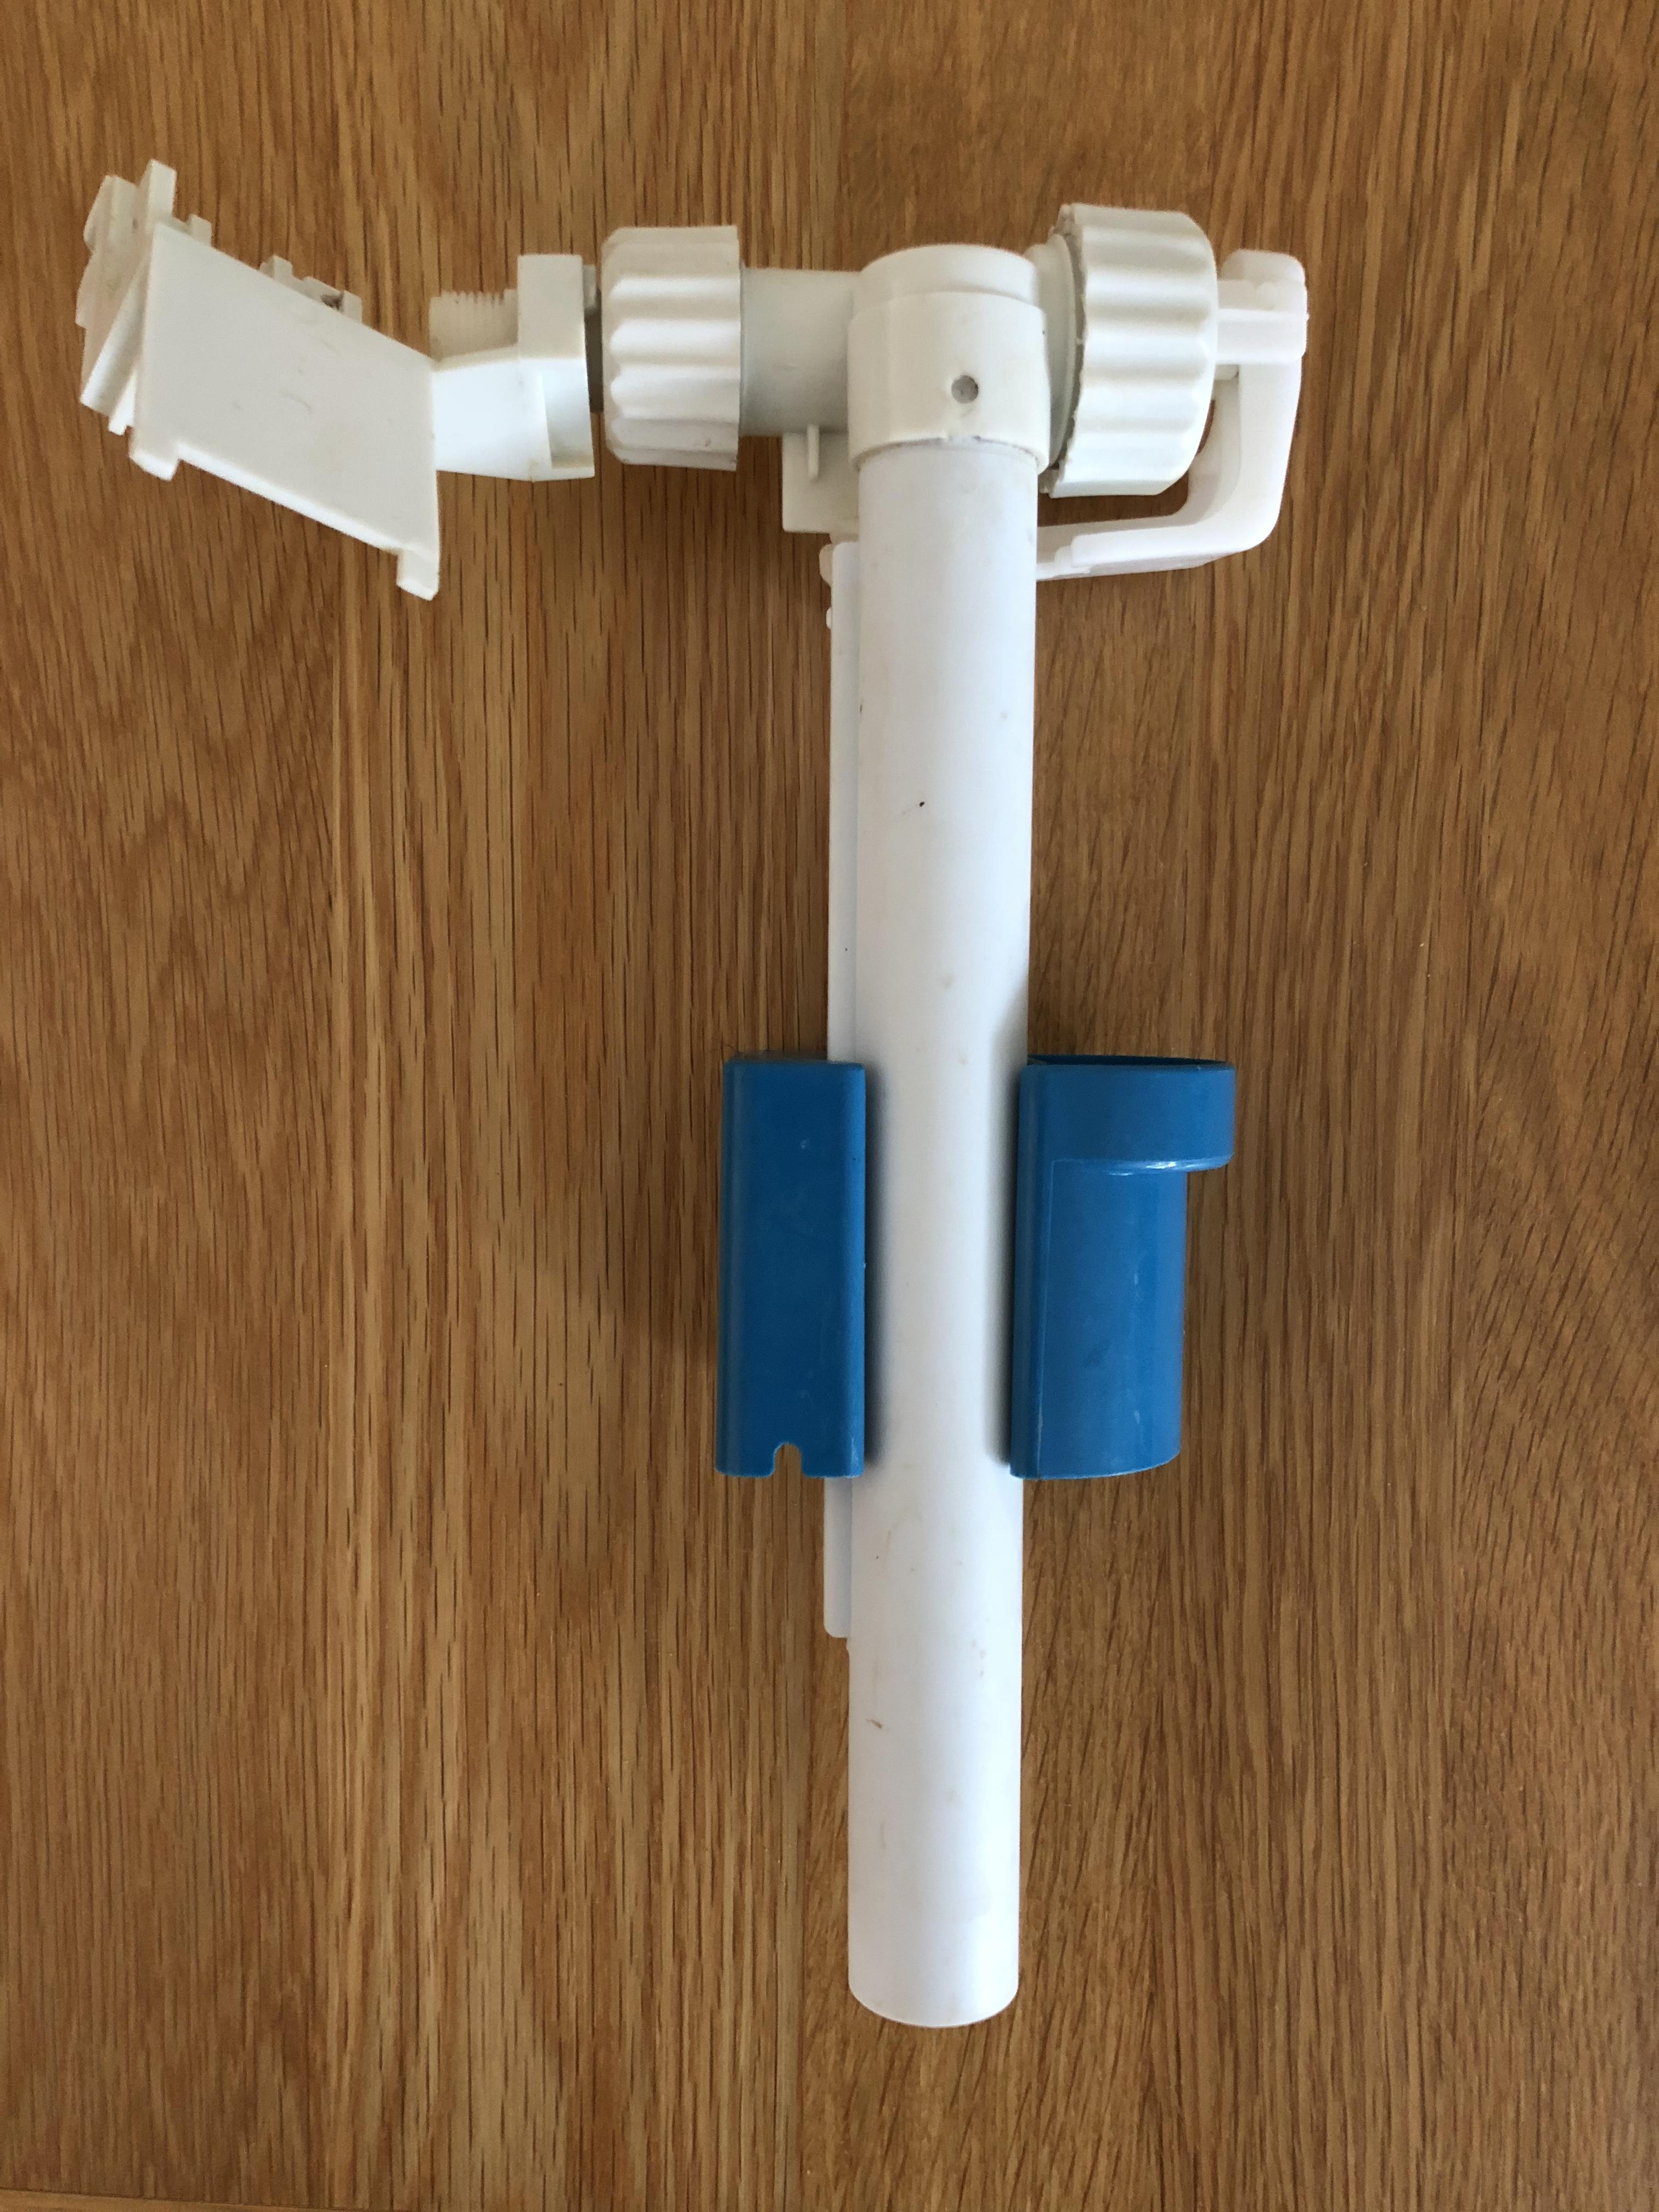
I'm near-100% certain that the fill valve you need is the Siamp 95L, shouldn't matter if it's the all-plastic one or the one with the brass insert. I'm also pretty certain that the AG1378 flush valve is the right one, but I'm not at all convinced that the AG1378 inlet valve is the right one at all - I've been caught out with the float catching on something internally by fitting a similar, but not quite the same, fill valve before now (I think twice, as I'm sure there are two new ones that don't fit anything we have up in the loft)1 point
-
I do that too...1 point
-
You know it struck me, as it may have others, that had they mustered the sense to put the pieces in the other way around it would have looked better at least. Given this one is inevitably drawn to the conclusion that these work people were not the brightest.1 point
-
Thanks all. I still can't get the damn flush thing out but I could nuke it if I had a new one I guess . Miraculously I managed to find the email they sent when we ordered the cisterns and they say AG1378 so I'm thinking it's probably this one? @PeterW? http://www.toiletspares.co.uk/ag1378-flush-valve.html I have a sneaking suspicion that the flush valve leaks a little too as the water starts to trickle out into the bowl before it has even refilled. So a trickle possibly caused by the seal not being 100% on the flush, followed by a gush as the fill valve doesn't stop the water and it starts to gush out. That's my non educated guess anyway. Is the fill valve that @JSHarris posted the one I need? Or this one (but the end is metal instead of plastic)? https://www.amazon.co.uk/Monaco-Universal-Cistern-30956510-Thread/dp/B00Y3PE5FY/ref=sr_1_1?s=diy&ie=UTF8&qid=1532184641&sr=1-1&keywords=siamp+95l The one they list in ToiletSpares is this one but it says 'new type' and doesn't look quite the same: http://www.toiletspares.co.uk/ag1378-inlet-valve.html @lizzie I've drawn a blank trying to get any damn plumber out here so have been forced into desperate measures hence trying it myself. There are other jobs here that I definitely can't do however so have to keep trying to get someone to come, and not a cock plumber which is the worry ... And @Ferdinand it wouldn't have been so much 'fun' had I been told just to replace the bits to start with, and I now have some knowledge of how the damn things work that I didn't have before yesterday so it's all good. I have another educational piece still to come trying to reassemble it all and getting the flush working properly so that may need more voddy I imagine Will try the one upstairs first.1 point
-
@newhome I think you need a plumber LOL Not sure exactly where you are (I know its tricky borders) but this site may be useful for local recommendations - might be one you have not tried......https://askyourneighbour.com/start.php1 point
-
I have to say that's been my standard approach ever since cisterns switched to using plastic fill valves. Back in the days of brass ball cocks I'd have happily just replaced a washer, knowing that nothing else was likely to go wrong for years, but these sliding float plastic fill valves seem so damned flimsy that I'd not trust another part to fail not long after repairing one. As an aside, if you want an absolutely bomb proof, super reliable, tank or cistern float valve, and aren't particularly constrained for space (although these things are tiny) then I can recommend these: Abertax valve which are available from BES They are brilliant, as they operate magnetically and have no external float to catch on anything. The only downside is that the fill level cannot be adjusted, it's fixed by the installation height of the valve. Ideal for hard to get at F&E tanks, though. Internally they work just like a servo assisted solenoid valve, with the magnet in the float operating the servo diaphragm through the plastic wall of the housing,.1 point
-
It is worth a price on the check of the entire mechanism. If one thing has worn out, so might another piece. The last leakyloo problem I had, we just replaced the entire mechanism for very little money.1 point
-
It seems clear that there just isn't any sort of coherent quality process within the domestic construction sector. During the week I spent at Nissan, it became clear that right down to their Tier 3 suppliers Nissan imposed their own quality process, and made every supplier responsible for adhering to it. The result was that every part that arrived on the line was not only manufactured and checked to Nissan's own standards, but the contracts with the suppliers made them liable for any costs Nissan incurred as a consequence of any quality failing. Hence the line stop costs being charged to the supplier whose component had been shown to cause the problem that stopped the line. The discipline applied to quality had to be seen to be believed, right down to every single person in every team actively monitoring and visually reporting on boards adjacent to their workstation every single issue, no matter how minor. AFAICS, there is just no real accountability for quality in the domestic construction industry. It's just accepted that there will be snags, that stuff won't be built as designed, and that there will be a lot of remedial work at the end of every build. The concept of "build it once, build it right" just doesn't apply to house construction as far as I can see, plus there seems little willingness to apply any form of total quality approach. I don't think this has anything at all to do with consumers, as over the past few years, with the growing influence of social media, we have seen more and more cases raised to the level of the mainstream media where big developers have built really bad houses, with dozens, if not hundreds, of failings. Despite this they don't seem to be getting any better - it seems that the industry as a whole just isn't positively reacting to the problem. The contrast with commercial construction seems marked. As a part of my last job I programme managed a £96M new lab and office construction project, to house 900 scientists and support staff and provide 42 new laboratories. The quality regime of the main contractor (Sir Robert McAlpine) was very like that I'd seen at Nissan. Quality was "built-in" at every stage, from design through to ensuring that absolutely everything that arrived on site was exactly to spec. If the same approach was applied to building houses then I'm certain that the majority of the problems we regularly hear about just would never arise. FWIW, SRM were working to a "cost plus incentive fee" contract, with a 50/50 split on any cost savings made during the build between the customer and the main contractor, so they had a strong incentive to reduce costs wherever they could. They saved over £4m, IIRC, by the end of the contract, and that's after some quality upgrades were made during construction, like opting to use Corian for all the toilet work surfaces, switching to Dyson Airblade driers and upgrading the wooden flooring in the common areas. We even upgraded all the hundreds of office chairs to Herman Miller ones at around £800 each, out of the contract savings.1 point
-
All done (dry) bar the shouting! Now this tile could be a pita: The edge is sitting on just the eps upstand! There'll be the door frame goes on here. Some of that red brick needs to go to let the frame in: So the tile fits on I'm just worried it's not supported: The other side shows how the door frame will sit: Not sure how far I'm going into the doorway or whether that's it?1 point
-
There are millions of Siamp ones in use - unless you’re up for buying Geberit and doing some sort of Frankenstein’s inlet on it, as the main nut where the pipe is I would expect is pretty non standard ...1 point
-
They all vary a bit, and one problem with built in cisterns is that there often isn't much room inside to fit the fill valve without the float touching something and perhaps jamming. You can repair the valve you have, as the chances are the diaphragm has a small hole or split in it, but a new diaphragm is around £3 and you really need to take the fill valve out to gain access to it, anyway. By the time you've done that it's easier to just fit a new valve. One of the plumbing experts here will know whether there's a more reliable side entry fill valve that will fit in the same space as that Siamp one, perhaps. If not I'd just replace it with the same one - they usually seem to last for around 5 years before failing, from what I can gather.1 point
-
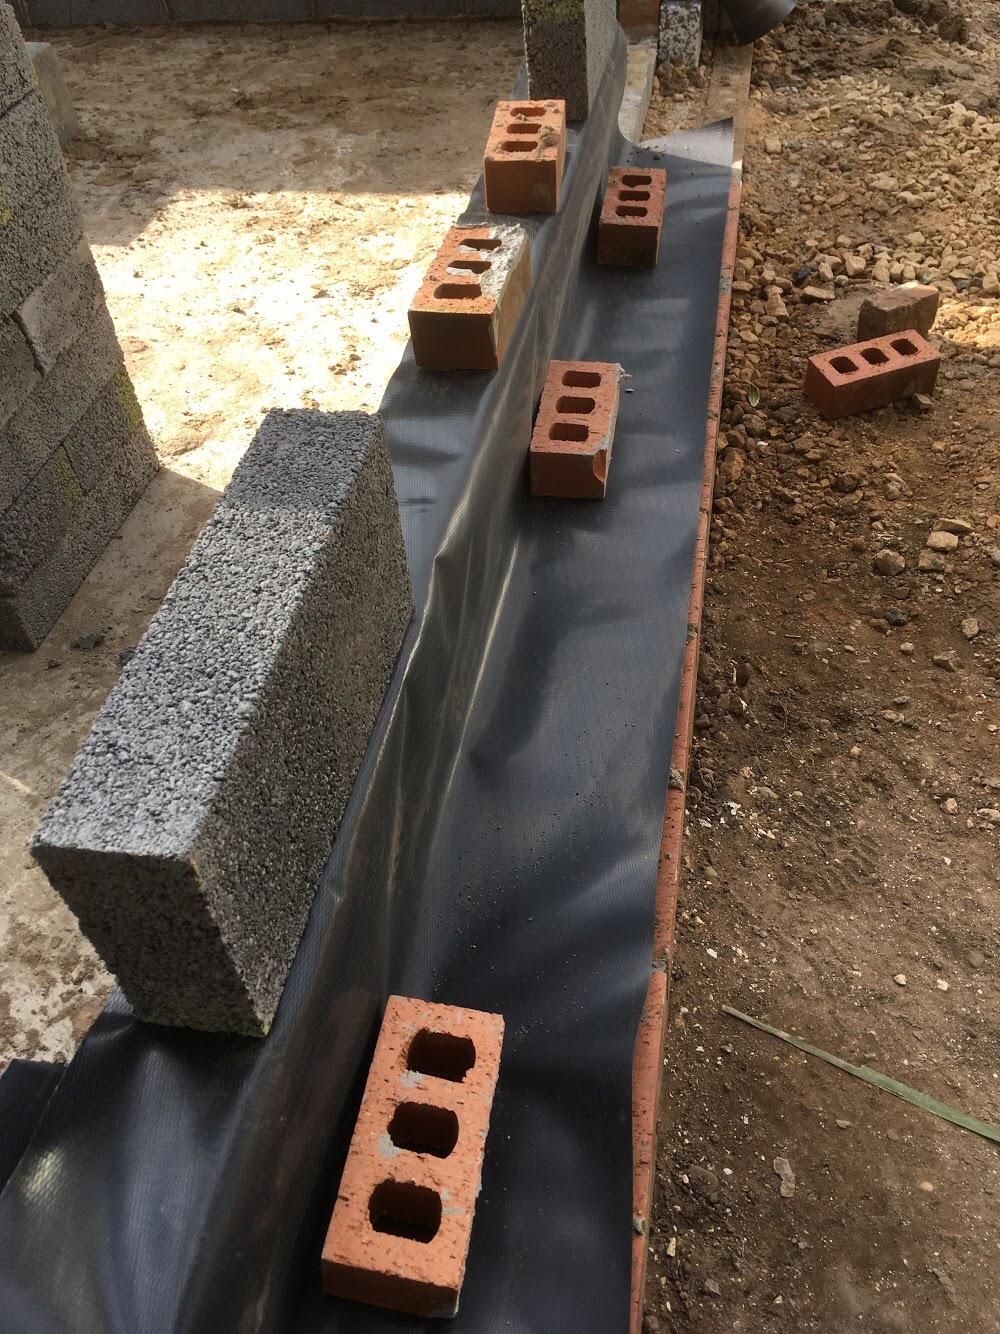
We're on exactly the same type of soil ( topsoil or fill , re-named made ground). And solved that particular issue by using a radon barrier.1 point
-
Pretty sure it's this one (swap the bracket over from your existing one) : https://www.toiletspareparts.com/collections/siamp-toilet-spares/products/siamp-95l-side-entry-inlet-float-valve-1-2-15mm-plastic-30950607 Hopefully one of the experts will confirm or otherwise if this is the part before you splash some cash (although it's only £12).1 point
-
I did just this fill however : - below ground is 100mm EPS with a 25-45mm 6:1 sand cement fill in the remaining cavity. - there is a second DPM cavity tray up the inside of the first block lapped down and across to the outer DPM - all cavities were cleaned (and hoovered....) before the closers installed and beads blown in.
 1 point
 -
I'm far from alone - @SteamyTea does just as many experiments to prove or disprove things. If I can't find any hard evidence to prove something I find questionable, the chances are I'll do a quick experiment to better understand it. I still have to dig out the two bits of PIR foam that have been sat outside with lumps of mortar on for months and see if the mortar has had any effect at all on the foil coating. Might dig them out next week and see how they look.1 point
-
Because of something that happened over 70 years ago? In that context ... suitable gas protection measures ... means ? I have a strong suspicion that all you need to do is have a report written by a competent person to the effect that the likelihood of gas being present is close to zero. At this stage all that means is a Desk Study. Not too expensive.1 point
-
What has got them worried about gas??? Was it mentioned on the building regs submission. Will most of the fill not be stripped away on the section where the house will be?? Any site investigations I done for gas you could usually smell of there was something there as soon as you broke ground. Once you got to the water table then you could see it as well in some cases. Around here is a radon area so that type of membrane is in most cases standard practice. I don't think it cost that much more than good quality polythene anyway.1 point
-
On the basis that very few people have a clue, or interest, in how things work and how they are made, I have considerable difficulty with that statement. They also, by and large, have a very limited choice of houses, which makes selecting a well built house even more of a challenge. Of course, all the developers will crow about how Eco-friendly and low energy their houses are so, even if house purchaser have an interest in the subject, they will be misled by the promotional material. Simply not reasonable to blame the house buying public1 point
-
The beads won't be sitting at the very bottom though. By the time both walls are built the droppings of motar will have filled up an inch or two. As they are EPs type beads it won't matter anyway if they are submerged in water. If you're cavity is constantly filling with rain then something major has gone tits up.1 point
-
Success! Couldn’t find a spanner but managed to improvise with some grippers. What now please?
 1 point
 -
11/16" in old money!1 point
-
I think I said it was to release funds to finance a second home, never mentioned self build. They may be more cautious these days I guess since the banking crisis as it was a while ago. I remortgaged in 2009 with C&G. I wanted 80% LTV and they would only give me 75%. That was based on the reason for the loan not affordability. I had no mortgage on the property so had 100% equity. In the event I could have got away with not remortgaging as the house sold before my savings ran out but it was close and I didn’t want to be in the position where I couldn’t afford to continue as I had run out of funds. If you can’t find a lender who will do this for you maybe go via a broker but don’t apply and then get rejected as it will then affect your credit score.1 point
-
Lever it up and it will unclip from that and that is a 17mm nut...1 point
-
Best bet is to sort out and photograph your late husbands tools, post them here in another thread, and we will look at them, name them for you and you can then label them so you know what they are. I suspect you already have all the tools you could possibly need, and all you really need is a way of identifying them. If you want to be really professional, then see if you can stick up a board in the garage to put all the tools on, with names written by the peg or hook for each. I have a bit of cheap MDF on my old garage wall, with loads of nails driven in to hold tools. I pencilled around every tool when it was on the board, then took all the tools off and painted inside the outlines of every tool with some left over paint and a small brush. Took about an hour to do, but now I can glance at that big board and see if any tool is missing. I didn't bother with labels, but you might find it easier to label the "shadow" of every tool on the board, so you can find it easily. It's a tremendous help just being able to look at a board to find any tool. There's also a great deal of satisfaction in fixing things yourself, especially the first time you do it. I find it's not really about the money saved, it's about the personal achievement,1 point
-
If the AECB wants to be effective why do they undermine their cause with puerile rabble rousing leftie language? The problem is not profit. Domestic gas boilers are built for profit and so are cars. Both have delivered steady advances in energy efficiency under the dark cloud of capitalist incentive. There is a problem with British house building but it is not capitalism.1 point
-
Jesus. Time for a chat or a 12 pack of LE foam.1 point
-
A few more images showing the completed UFH network for upstairs, the servicing battens downstairs and also some additional "supports" to accommodate the fitted kitchen units. I have really been impressed with the UFH fitter - he has even supplied photos of vulnerable positions so there should be no excuse for puncturing a pipe after the screed and boarding has gone down. You will see the areas left "unpiped" in the en-suite and bathroom areas. The manifold is stored in the landing cupboard.1 point
-
You could always try unscrewing the white collar to the left of the silver nut/ clippy bit and see if the floatvalve will lift out then.1 point
-
We will claim it is onsite workers accommodation for a few months but eventually it will become our primary residence so I am prepared for a Band-A council tax bill at some point.1 point
-
11/16" & 13/16" equate to a 17 & 21mm spanner. See then if you have an 18/19 or 20mm spanner or small adjustable.1 point
-
We are looking at £350 transport costs for a 30 mile delivery, one of the benefits of building in a poor area of the country where statics are a primary residence for many.1 point
-
Game on. The setting out for the piles is happening on Friday afternoon, 20th July. The piling contractor will also be getting everything to the site that day so that they can start bright and early on Monday morning. The piling is likely to take most of that week; I will be around at various times, but certainly Monday and Thursday, with a couple of hours here and there. If anyone would like to come along, PM me and we can arrange suitable times.1 point
-
A few photos of the stone work that has now started on site, whilst others continue to prepare the upstairs for the first fix. I have also included an image of the "biscuit screed" laid upstairs over the UFH pipes. Close observers and those who have read previous entries, will notice that the windows have been corrected with fire battens fixed. Anyway, the stone is called a local blend and is made up of Perthshire stone, Cumbria stone and Borders Buff. The Quoins have a hint of lilac to them, to have blend in with the colour palette of the stones. The Red things seen in the photos are glass fibre Fire Socks - They fill the cavity at the corners and other strategic locations. Either these can be used or indeed 45mm x 45mm battens.1 point
-
Lady plumbers...hands in tight spaces... On a serious note I've taken the liberty of firing off a couple of these images to toiletspares.co.uk Does to me look like an early Siamp fill valve. I've waded through every image on the site and Siamp looks the nearest. They may come back of course and say the only way to be sure is to whip it out for a proper look...
 1 point
 -
In my area builders merchants sell a few different grades of plywood. All is claimed to be wbp but some is dire quality and how they can claim it's waterproof I've no idea - it seems to have more in common with a well known brand of breakfast cereal. Shop around and go see what it's like.1 point
-
My wife loves your stonework, around 1/3 of our new build will be stone, so a few questions, who supplied the stone and the corner quoits, how thick I’d the stone ? What you doing above the windows? Does your mason travel?1 point
-
I like soaps, but I missed the episodes of this one. ?1 point
-
Fill valve is fecked then. Can be replaced fairly easy - silver valve turned off and the plastic bit before the threaded hose clips into the white retainer. All comes out and the hose detaches. Should have a manufacturer on the valve as they need the slim plastic section to clip in.1 point
-
Ok the float is too far up - turn it anti clockwise so the float moves downward. Flush it and see if the water level stops below the top of the white tube.1 point
-
Marine ply most would shout, but just wbp for me.1 point
-
By the skin of my teeth, but that seems to be the way of construction!1 point
-
Don't have the Lidl Woodgate cider ffs or you'll cut your tiles wrong...1 point
-
Hi @ProDave This is exactly why I am doing a "blog" detailing my experiences and routes for various aspects of the self build. We will never be embarking on such a project again which is a great shame when you consider the "learning" one gains from such a venture. Yes, I can sit back and reflect on where I could have made a saving and or used a different approach but as long as we get over the finish line without breaking the bank, I shall consider it a successful mission. I just hope others reading this record will be able to consider options they may not have considered, as explained by either myself or contributors such as yourself.1 point
-
You should be looking at 150mm min pir type insulation. Been a long time since I used Jeremys heat loss calculator but you should put in 120mm and 150mm in the floor section and see what the difference is and take it from there.1 point
-
My honest advice is go to a caravan dealer and look at the stock they have for sale. We are fortunate there are 2 such dealers close by up here. This will let you look at a lot of 'vans from the old £1000 barely habitable wrecks to some quite nice younger vans. and make a choice what suits you. The one we bought, we chose because it had an unusual layout with the living and kitchen area in the middle and a bedroom at each end. Not only did that seem a better layout for our site to live in during the build, it also has more potential for later use as work / storage space. (we are keeping outs as a garden outbuilding so it is not going anywhere) The advantage of buying from a dealer is usually transport is included. If you buy privately you will have to arrange and pay for transport, and not all the dealers up here will transport 'vans they have not sold. Ours was only single glazed. Yes double glazing would have been better, but you are never going to get particularly good DG units in a static, expect a very thin gap between the panes. Don't rely on bottled gas heating. In the first month of living in ours, the inbuilt gas fire had emptied a 47Kg cylinder at a refill cost here of £80. We stopped using it then and before the winter fitted a wood burning stove, that hardly went out between November and the end of March. Top tips. Support it well, ours sits on 12 piles of concrete blocks. Panel in the gap between the bottom of the 'van and the ground. Insulate under the floor. Strap it down to some stakes so it stays put in a gale. Lag all the pipes. Check the lagging from time to time, we had one freeze up due to mice stripping a 12" section of pipe insulation. These things are poorly insulated. However having said that we had no problems with condensation, unlike the very old one we had last time, so the more recent ones are not quite as bad so perhaps buying a more recent one is a better idea than an old wreck.1 point


This leaderboard is set to London/GMT+01:00