
Leaderboard


Popular Content
Showing content with the highest reputation on 08/07/17 in all areas
-
Well, some interesting developments: 1. We bought a caravan! Even though it's only about 8 miles from where we are temporarily renting (though that "temporary" has ended up into it's 3rd year since we sold our old house!) , it's a pain working on the house then having to hide/ lock everything away each time, before going home, then spend half an hour getting it all out again next day, so we gave notice on our temporary tenancy and are moving onto the site at the end of the month. That should make it far easier to do work on the site. 2. The stone has arrived. It's backed off stone from an old convent school, and we've also got a few interesting bits of stone found on the site which we intend to have inserted into the stone walls, like ones I cut up for the dry stone waller which have fossils in (nothing startling, just marine corals and the like) and one small piece which for various reasons we believe is likely saxon. I also managed to get free of charge 2 genuine old stone gateposts of which I know the provenance - goodness knows how old they are. One of them looks like Stonehenge is probably missing it . But I really like the idea that we know the provenance of all of these things, even the roof slates are recycled (they have not arrived yet but are imminent). We are really pleased with the stone, and fortunately amongst it are enough quoins, which is an unexpected bonus, 3. Openreach came out and were helpful. We discussed options and in the end we are going for armoured cable which we are laying as it can be laid simply on the surface, so is going along behind a hedge where it will disappear into the ground of it's own accord. All perfectly acceptable to Openreach due to the low voltages, and actually something they do quite commonly in rural areas where digging would be an issue. The nearest pole is too far away. Only downside is that despite the entire village getting fibre in only about a year ago, they'd want an arm and a leg to get it to us - however, the guy tells me we'll be the only people on the exchange on ADSL so will probably end up with quite a respectable speed anyway for less money, so I'm not too bothered if this turns out to be correct. I know that as houses in the village were moved onto fibre and off the ADSL, those still waiting were noticing speed increases. 4. Electricity board say they'll be progressing things in the next couple of weeks, so I've cracked on with getting their cabinet installed - it's going onto a retaining wall rather than on the house itself (they are perfectly happy about that) so we have a second cabinet alongside for our junctions off for our sub mains to the garage/workshop and the house, as well as putting an external RCD socket on the outside to give us a temporary supply (handy for the caravan!). The retaining wall is built in blockwork, but is getting covered in real stone, so that's definitely not it's final appearance. 5. With deciding to move onto the site, I need to get the utility room and downstairs bathroom (though the caravan has loo and shower of course) sorted ASAP so we can have a washing machine and so on, so instead of doing the insulation, UFH pipes and screeding on the ground floor all at once, I'm going to have to do those two small rooms first (staged finance prevents me doing it all at once just yet), so am looking now at screeding them myself, though will get a firm in to do the main parts of the building later of course. So last night I put the base of the partition wall in to make it more manageable for me to do in 2 smaller lots. As ever, our dog is fascinated by the laser level (that's not it shining in her eyes I should point out!).2 points
-
I haven't.........I also have speakers in the bathroom ceilings and they have not suffered from the occasional hostile environment but I do have MVHR. As I said in an earlier post I installed the speakers in 2010.1 point
-
Be positively negative - I think the modern generations would call it passive aggressive. You know: "Great company to deal with as they gave me a full refund when I pointed out that sadly the hole saw was not quite able to cut the depth it said it would on the website and was not an own brand product as they also said." Service review +ve product review -ve.1 point
-
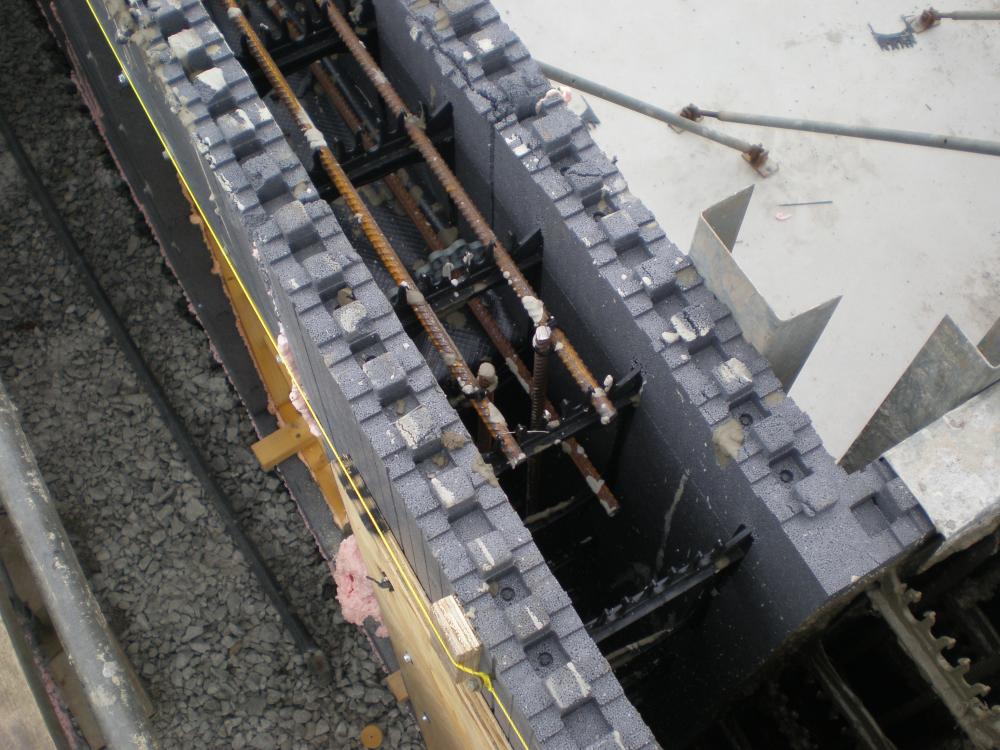
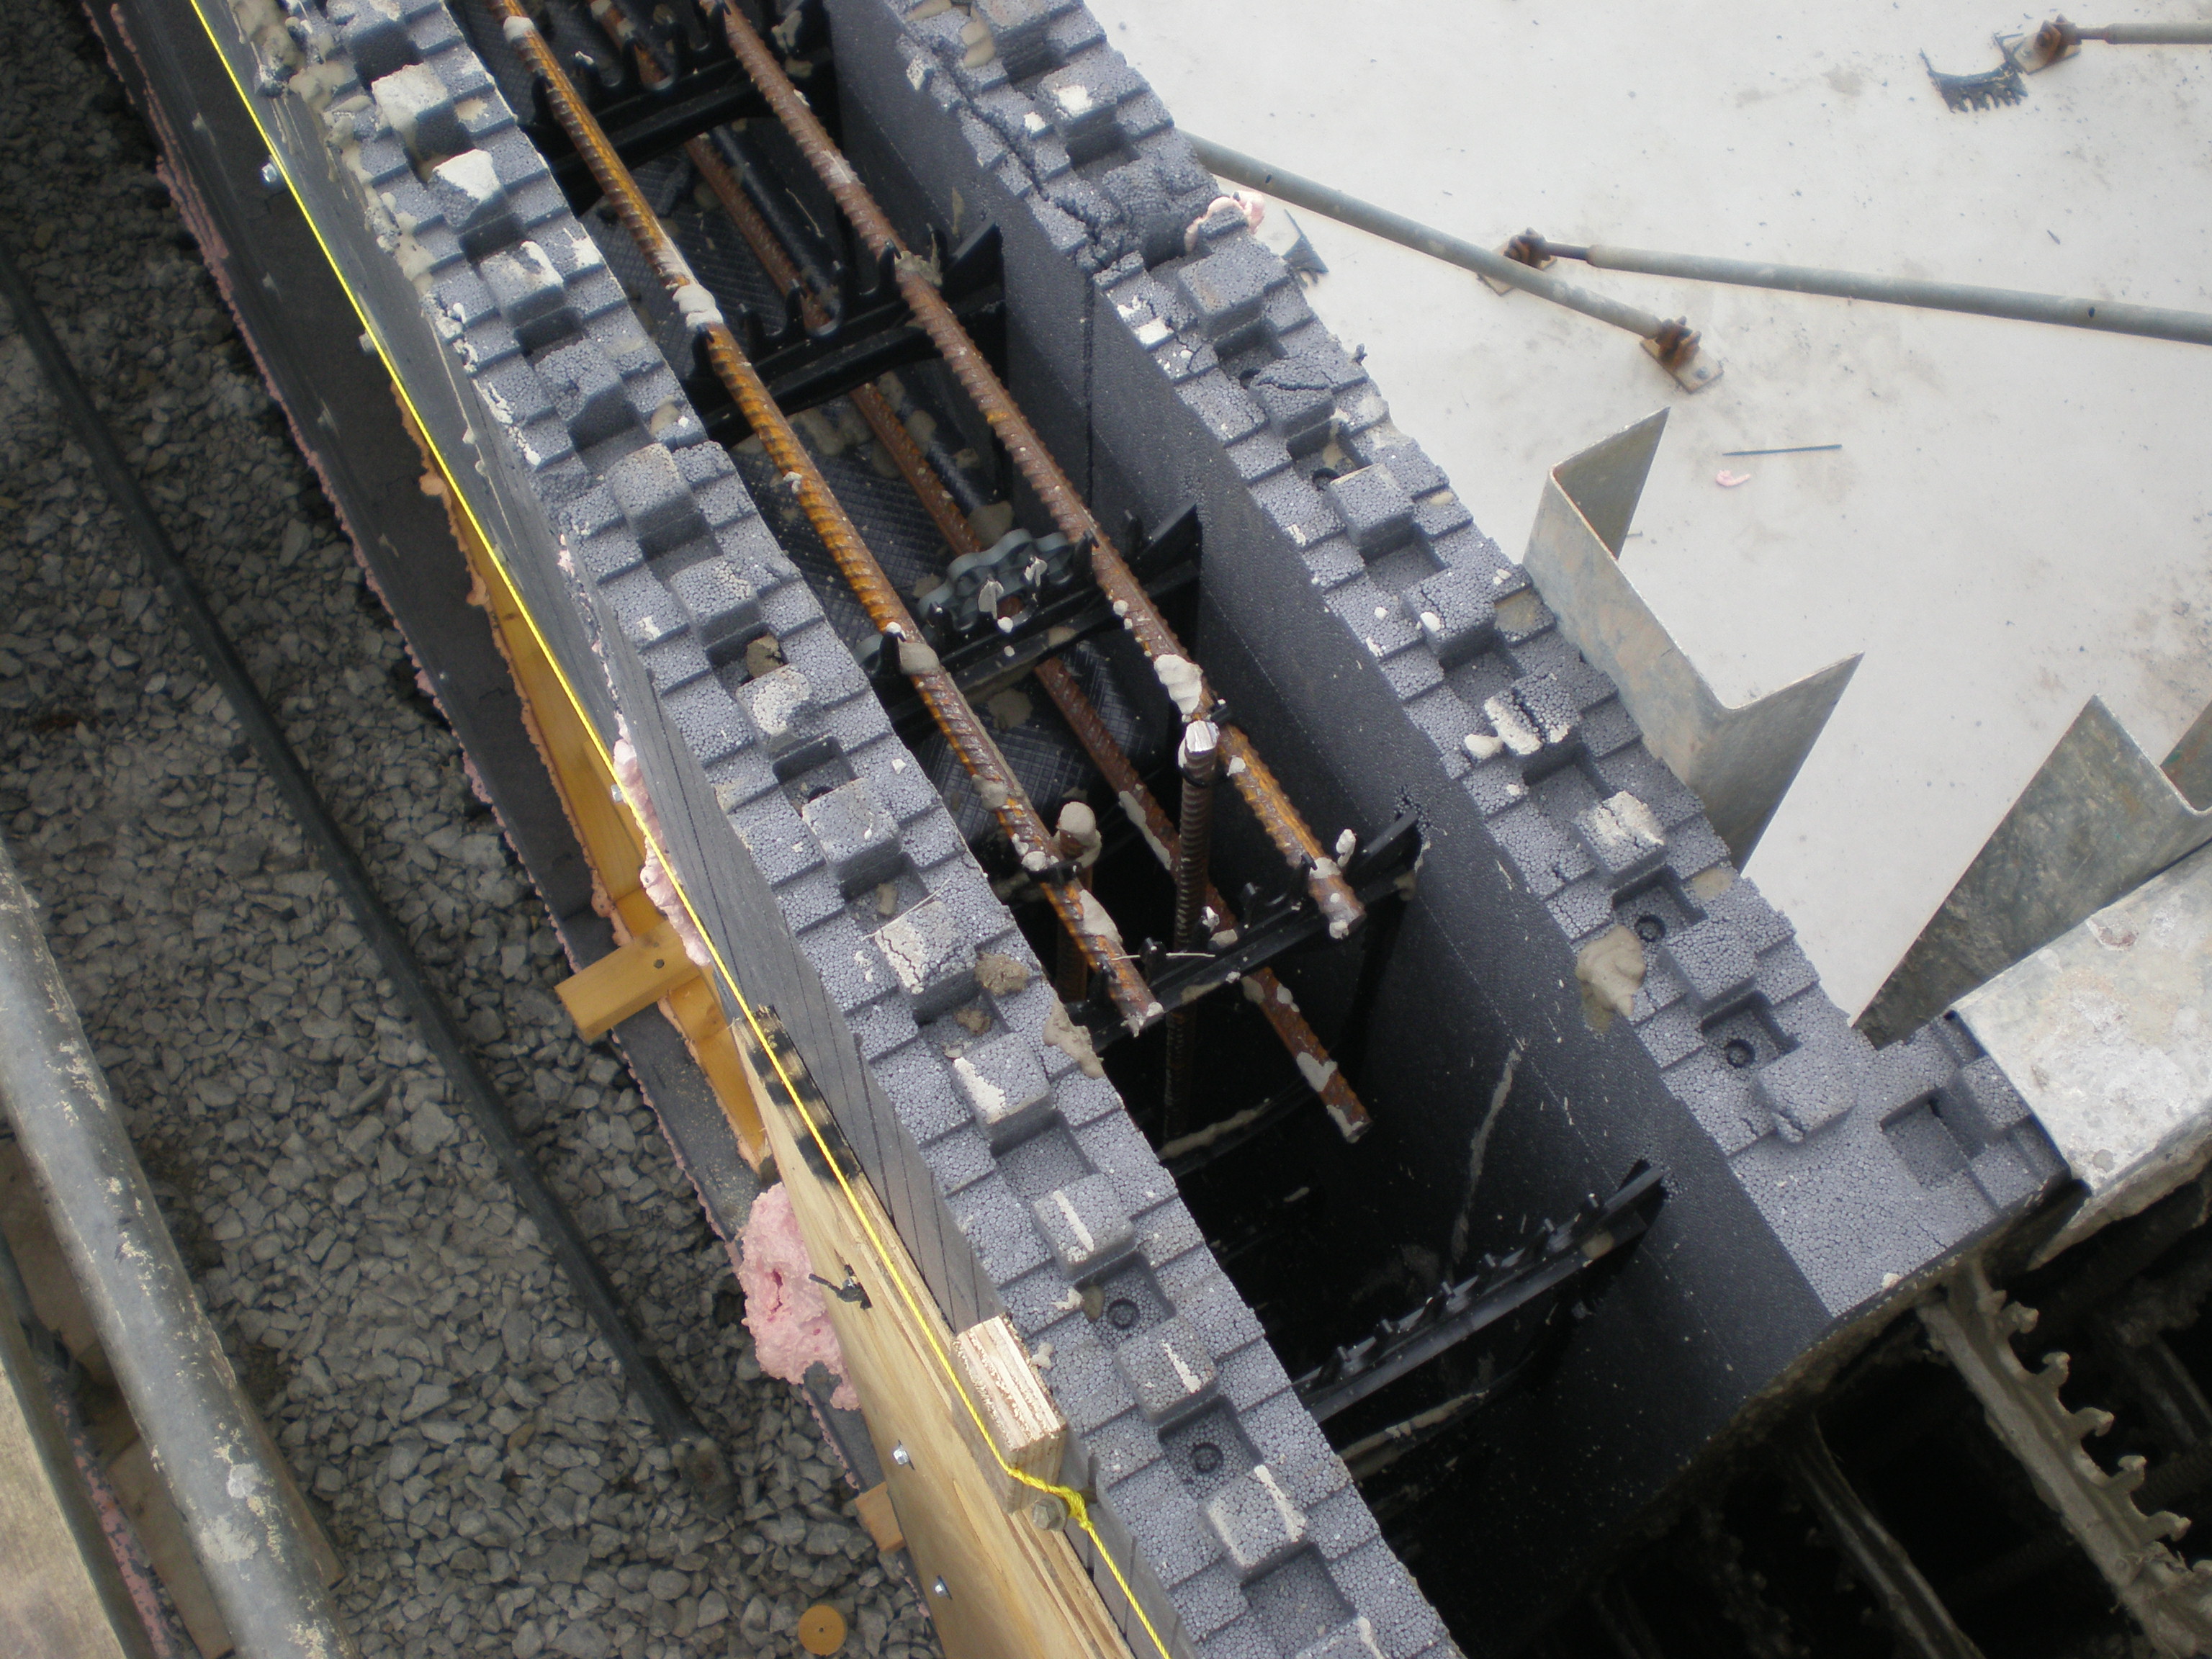
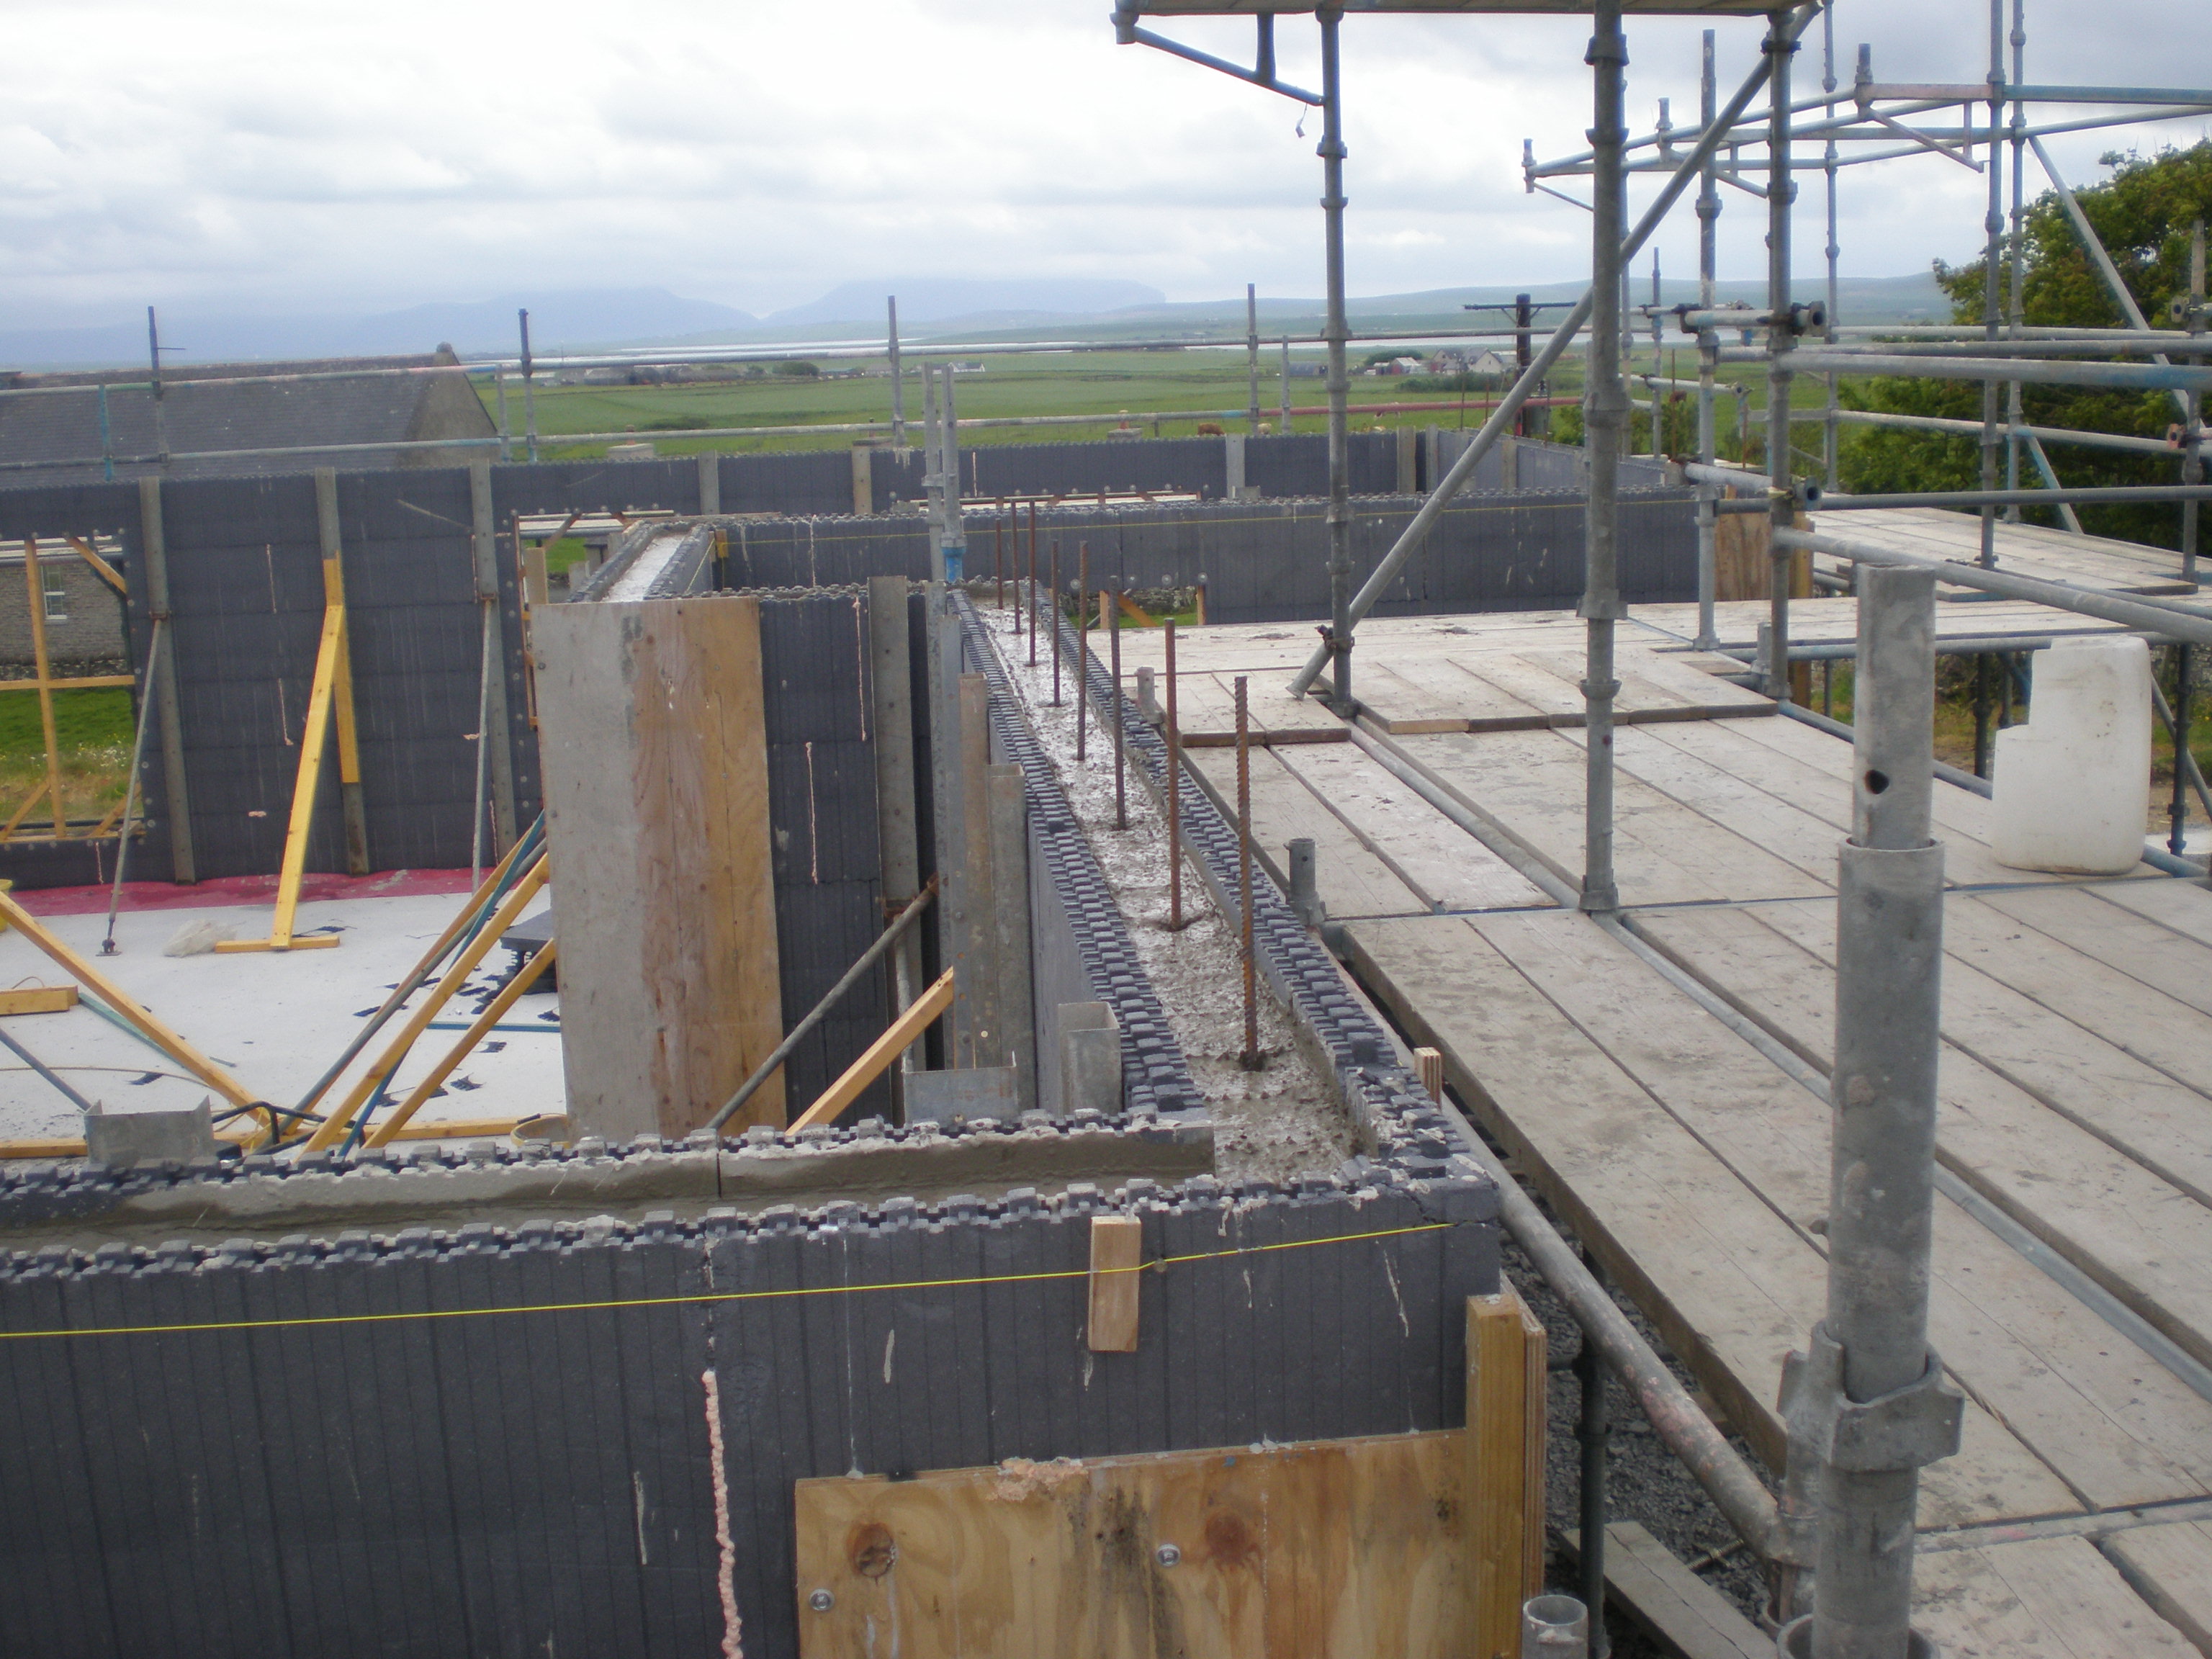
It's annoying me too, and for the sake of a few minutes work could have been a lot better. I suppose this is a good example of the differences between different ICF systems, each system having pluses and minuses. How a lintel is reinforced in our ICF block: This is how our walls were left prior to the gable blocks being built and poured. Is the absence of any rebar simply down to a lack of builder experience with the system being used and a simple (wrong) assumption that because it was only one course, it wouldn't matter?
 1 point
 -
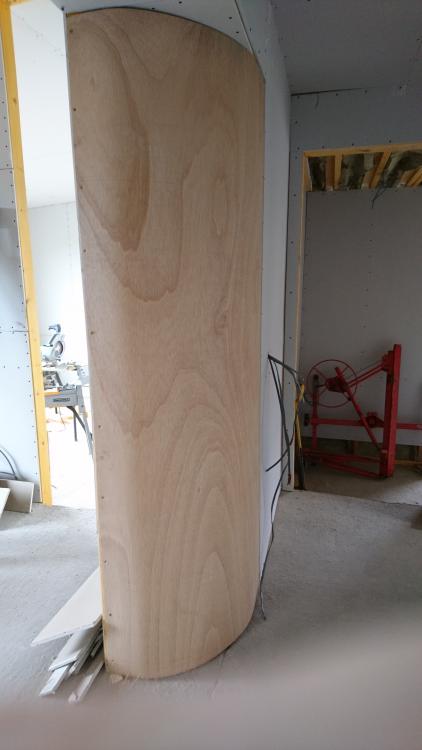
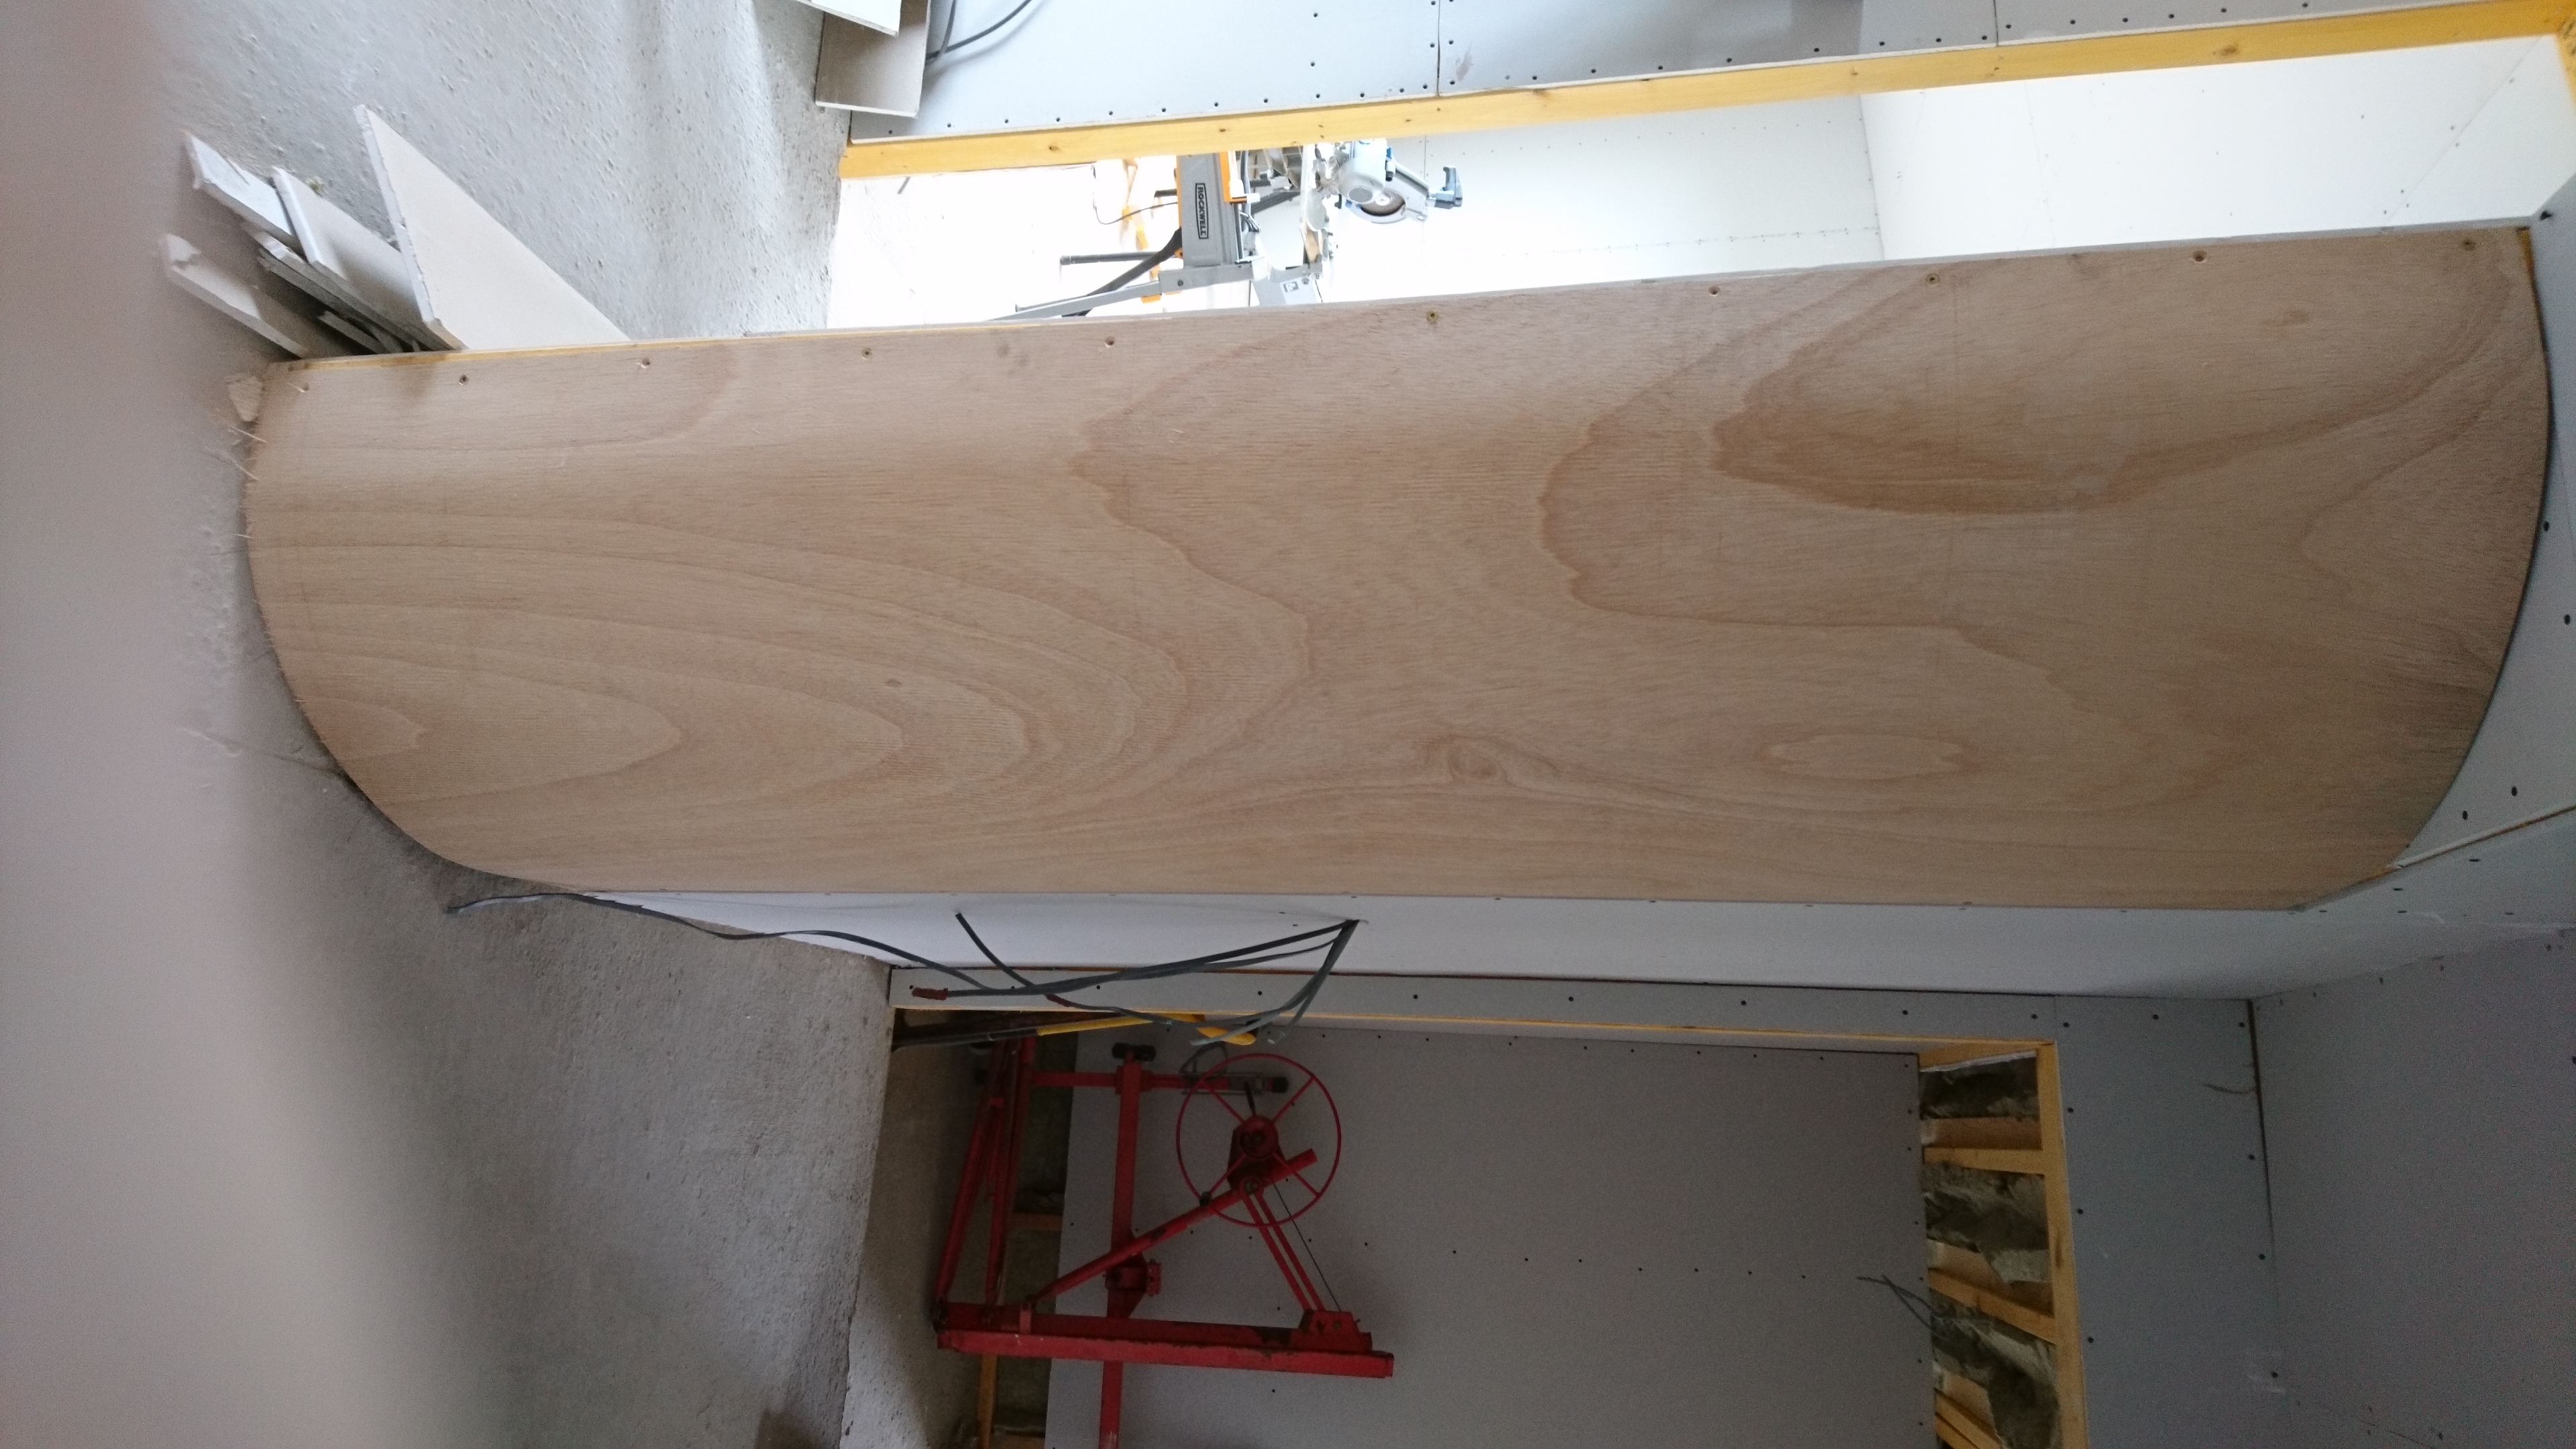
Hi folks, For our curved wall sections, many people here and that have visited have commented on the lovely grain pattern on the ply I used for the curved wall. I don't want to varnish but willing to do a lacquered paint finish if the grain will show through - any recommendations on a lacquer? Not really sure what I doing be buying or best way to apply? I saw a staircase at a show where it was lacquered blur with the grain showing and it was lovely.
 1 point
 -
Osmo polyx/hard wax oil. Osmo do small 5ml samples for about £1 so cheap to test several colours or clear.. http://www.wood-finishes-direct.com/product/osmo-polyx-oil1 point
-
At last, someone who is clear about the need for concise problem statements. What a relief. I'm going for 2 and 3, as well as a bit of the addendum. And I'm going for @Onoff's puffer and @PeterW's Hilti '...solution....' (Christ how I HATE the abuse of that innocent little word). I'm going to trial the use of resin because I'm going to need to fix the first floor POSIs, and they need to be 'resined' in. And for that I need clean holes. ================================ Monday morning: HERAS unlocked, 0700. PC's arriving today. Cos He Told Me 0900, a quick polite text to the PC: 'You coming today? 'I'm going to be with you erm, ahhhh, mid-week, Ian' 'And you knew that you were going to be delayed yet again by Wednesday of last week didn't you?' 'Er, well, yes' If you can't take a joke, don't self-build1 point
-
You could ring Brett Martin in Mallusk http://www.brettmartin.com/en-gb/plumbing-and-drainage/products/rainwater-systems/anthracite-grey.aspx or Down PVC (great to deal with) http://www.downpvc.co.uk/rainwater.html or online try https://www.directplastics.com/guttering-downpipes/anthracite-grey-gutter1 point
-
Ok if this is a replacement for a cast in there is only one adhesive I would trust and that's a Hilti HY200 - it's what it is designed to do. https://www.hilti.co.uk/anchor-systems/injectable-adhesive-anchors/r4803 Hilti tech services are superb - give them a call and explain what you need and they will advise what is the best adhesive as you may be able to get away with a lower spec if the loading is shear rather than axial. Downside is this stuff isn't cheap and needs a Hilti injector gun to install but it won't go anywhere for a long time ..! It's what they use to fix crash barriers onto Motorway bridges ....1 point
-
Any cylinder holding stored, heated water that is sealed and pressurised, needs G3. A combination aka open pipe TS does not. Im a Telford man, and I prefer the fact that they make theirs out of all stainless steel. As far as bespoke goes, Telford manufacture to each order using their basic dumb cylinders as the base for each order. The cylinders are off the shelf but you can specify where the tappings go, within practicable reason, at no extra cost. Turnaround time is still less than a week from placing the order iirc. I see zero benefit from the tank in tank ( TIT for short ? ) option, with its reduced capacity for the same size cylinder. Id only go for the two tank UVC + buffer option if there was an ashp involved. With a 37kw oil boiler I'd be really worried about such a small second vessel as the oil boiler performs best when allowed to do a long burn at full wallop, rather than cycling in short bursts, and would reheat a 100L buffer very quickly indeed. I'd go for a single cylinder stat to stretch out the hysteresis of the on / off cycle to further promote this.1 point
-
Have used Fischer and R-Kem before and both work fine. Just make sure you thoroughly clean the holes out, that includes dust and scraping sides clean.1 point
-
OSMO opaque colours works well although the sheen level is a little higher than you might want for internals. Available in a range of colours or any colour to order. I.e. http://www.wood-finishes-direct.com/product/osmo-country-colour?gclid=EAIaIQobChMI-7Poyb3E1QIVbb7tCh2XYgeXEAQYASABEgKbbPD_BwE It does need to be applied carefully though it doesn't like being applied thickly and will look glossy if over applied and you'll loose the wood grain you're wanting to achieve. Practice on a scrap piece first.1 point
-
Shellac? Traditional way to bring out the grain, but also a decent barrier to water vapour, This is not quite my area, though.1 point
-
If you do it, turn the blending valve right up so you can't get water stagnating in the Willis. Let the Willis thermostat set the flow temperature.1 point
-
I knew asking on here first was a good idea ? For Sale: Old Gloworm Boiler - not yet converted to LPG ?1 point
-
How about 25mm deep x 38mm wide mini trunking. You could butt your 25mm thick insulation up either side. You'd have plenty of space, air surrounding the cables for some cooling etc. What are the inside & outside faces of the 25mm insulation touching?1 point
-
and / or A self-employed planner who really knows her oats. The gender choice is deliberate. Women are far more capable at focusing on detail; nitty gritty detail. And thats exactly what you need now. You need someone who can answer this question simply , honestly, quickly, first. Why? Because your design taste will be changed by the process of planning for building it. Exactly the same way that drinking cheap red wine , with persistence, evolves into the odd glass of serious claret. Research the planner market. Do that by reading widely. Read the Design Access statements` they have written. Does the statement show a well-argued narrative? Or is it sloppy / slapdash? Waste time with many local estate agents. Encourage indiscretion on their part; and remember those who refused. Network like mad. Then interview one or two. Trust those who want a small amount of cash up front for a quick, straight opinion. And then employ the one who impresses you most. But solve the water supply issue first. There is a long cautionary tale about that to be found on @JSHarris blog.1 point
-
+1 to what @Ferdinand has said, particularly about conveyancing. When buying a plot, the legal considerations are different. You need to be assured that the boundaries are in exactly the right place, that the planning permission as granted can be implemented, that the site can be provided with services at a reasonable cost, that there are no underlying issues such as soil contamination, services crossing under the land, covenants that are restrictive in terms of development, planning conditions that are reasonable and can be met (and are acceptable to you), access that is free from constraints, such as a ransom strip, plus a few more. Few of these aspects would be routinely checked by a normal house conveyancing person (and most conveyancing isn't actually undertaken by a solicitor). I found that our solicitor had missed several key points on our purchase, but I was pre-warned, as we had tried to buy a plot of land elsewhere a few months earlier, and that had a lot of problems that highlighted the deficiencies in a normal conveyancing approach.1 point
-
Returning to this. I think you *may* be cruising for a bruising if you are using someone who is treating it like a bog-standard house conveyance - with all due respect to people who make their living doing routine transactions. Or is it a demolish-and-rebuild or a known-reliable plot? On the other hand if you have emotionally already bought it then you may have gone past the point of no return in your head, even though you can withdraw your offer. We missed assigning reports on our much larger project getting PP and selling a field to a developer, and it cost us £1000+ when the Housing Developer we were selling to made it a condition of sale. The project could take it, but it is a lesson learned. If you are not in a position to identify for your risks, by definition you cannot identify the costs in time and money to manage them, or the size of the risk package you are choosing to take on blind. You may be OK, but there are any number of things that may be expensive to fix that you *could* negotiate on had you noticed them before you push the button, and here we can by definition only do personal opinions, albeit sometimes about specifics. The expensive uncertain stuff is the stuff underground, and that which is not identified on the standard bits of paper or may only appear in searches after you have started spending money on solicitors so already have some downside to withdrawing. If you do not have a suitably experienced solicitor/conveyancer and it is not , then I would suggest that you consider rapidly building up some hinterland yourself (books etc), or hiring a local professional to do a sanity check / elephant-trap hunt for you. For that route, you probably want the old and qualified experienced person from the backroom of the local independent estate agent - 10 years local experience ideally. You would get a 15 minute scoping conversation free first ... and they may be able to say "there be dragons" or "plots down there are usually OK" on the spot from having dealt with one eg 17 years ago. When does PP run out? One key questions is .. why are they selling it? If it is obviously just to make money then that is comforting, as is the fact that it has full PP. Ferdinand1 point
-
Lol after 5 years of fighting the neighbours over planning and the enforcement officer out just last week ( waste of time of course ) there is good reason to p*ss the neighbours off !1 point
-
Another week of hard work by the builders and the foundations are complete. Type 1 up-fill (only 100mm or so required) was spread then compacted down with a vibrating roller. A final layer of quarry dust was added to finish the blinding. In keeping with previous comments about a clean and tidy site, you can also see the digger spreading type 1 around the foundations. Internal drains and ducts are added, DPC / Radon barrier laid and 150mm PU insulation fitted. Whilst doing all this, the concrete wagon stopped by and the strip founds for our garage were put in. The plumber subsequently put in the UFH pipework, over 1 KM of it! A track system was stuck down (black lines you can see) onto the face of the insulation and pipework clipped in. Individual clips direct into the insulation were used where required. The following day, an hour of light drizzle forecast, the main concrete slab was poured. Two wagons and just under 14 m3 of concrete with glass fibre mixed through. Again, a concrete skip and crane were used to move the concrete from wagon to foundation. You'll notice the twin (scaffolding pole) rails running the length of the foundation. They had simply been set as guide rails for the vibrating leveler to run on and were removed once the main vibration runs had been completed. The next shot shows the slab ready for power floating later in the day. Unfortunately, it kept on raining which meant a 0430 start the following day for my builder. He did a cracking job power floating the slab, which is now beautifully smooth and level. The final stage before building the walls can start, is painting a radon barrier ( the green paint you can see ) on the concrete core of the ICF block. Apart from a bit of unwanted news - 3 week delay for our windows due to a summer factory close down - things are moving in the right direction. The walls should go up this week so we are going to see big changes over the next few days.1 point
-
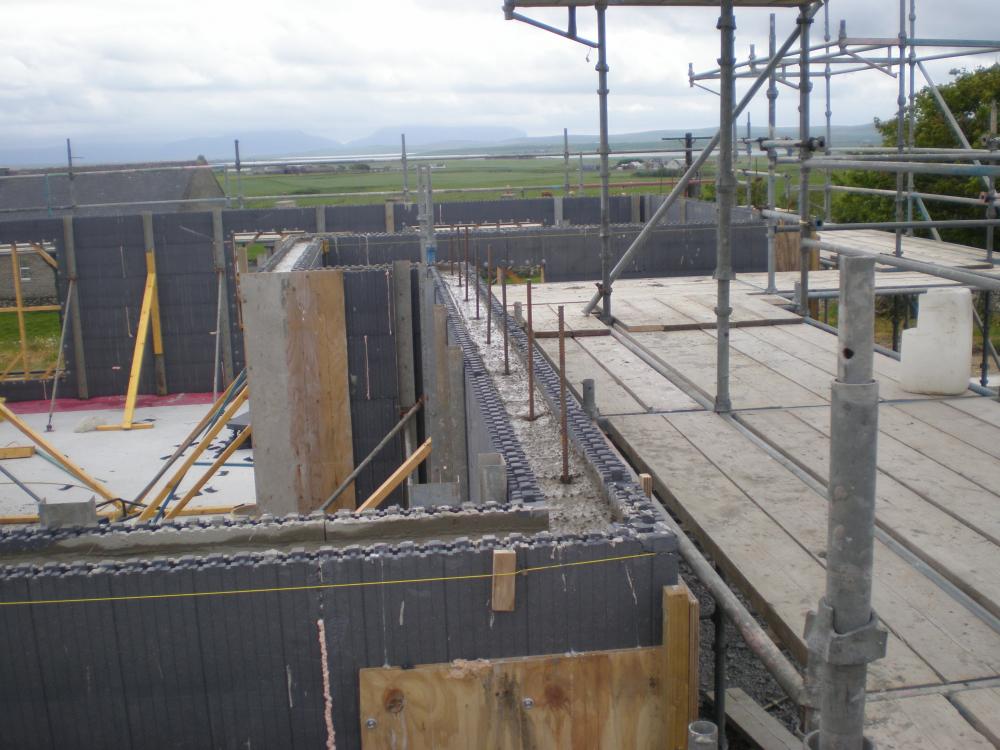
A busy week on site has seen us transition from foundations to solid structure. First order of the day, getting prepared - ICF blocks, braces, window formers and other equipment moved onto the slab. Building the walls up - basically a giant lego kit! Blockwork finished and scaffolding going up. Although the ICF blocks interlock with each other, the walls themselves (6 blocks high) are subject to a lot of movement. To counter this and secure them for the concrete pour, adjustable braces are fixed to the slab, and to tracks bolted into the plastic ties that form the core of the ICF block. Timber sheets are bolted over internal and external corners for additional strengthening, Timber window formers are fixed into place inside and out to prevent movement during the pour. Rebar is used to reinforce around openings; and finally, any gaps or damage to the ICF blockwork is sealed with expanding foam; Erecting the ICF took two days, with all the preparations taking another two. Concrete was finally poured on day five, using exactly the same method as per the foundations. A hoistable skip attached to a crane, was filled with steel fibre reinforced concrete. The builders worked their way around the walls in three circuits, filling to a depth of 2 1/2 blocks on the first two passes, and finishing the depth of the last block on the final pass. Again the same hopper was used to run along the top of the block wall and direct the concrete from the skip outlet down into the wall. A vibrating poker was used to help settle the concrete. A lot of work went into getting the concrete to flow around the window openings. To ensure full fill beneath the windows, the builders cored holes in the window formers and manually topped up the concrete in areas where required, again using the vibrating poker to ensure the concrete filled any gaps and settled. Having filled the ICF core, the final things to be done were floating the surface of the concrete in readiness for the wall plate, inserting lengths of rebar into the gables in readiness for the final sections of ICF being built when the roof goes on, and checking all the walls were true. Two separate rounds of checking the walls and adjusting the bracing were made, to ensure any movement in the curing process was countered. In this picture you can see the curing process in action - water from the concrete being forced out of the joints in the blockwork; Around 22 m3 of concrete went into the walls. The builder had ordered an additional 1 m3 but it wasn't wasted, being deposited in the garage foundation (it's a useful tip - have somewhere prepared where you can deposit / use any spare concrete) All being well, the roof goes up this week.1 point


This leaderboard is set to London/GMT+01:00