
Leaderboard


Popular Content
Showing content with the highest reputation on 12/13/16 in all areas
-
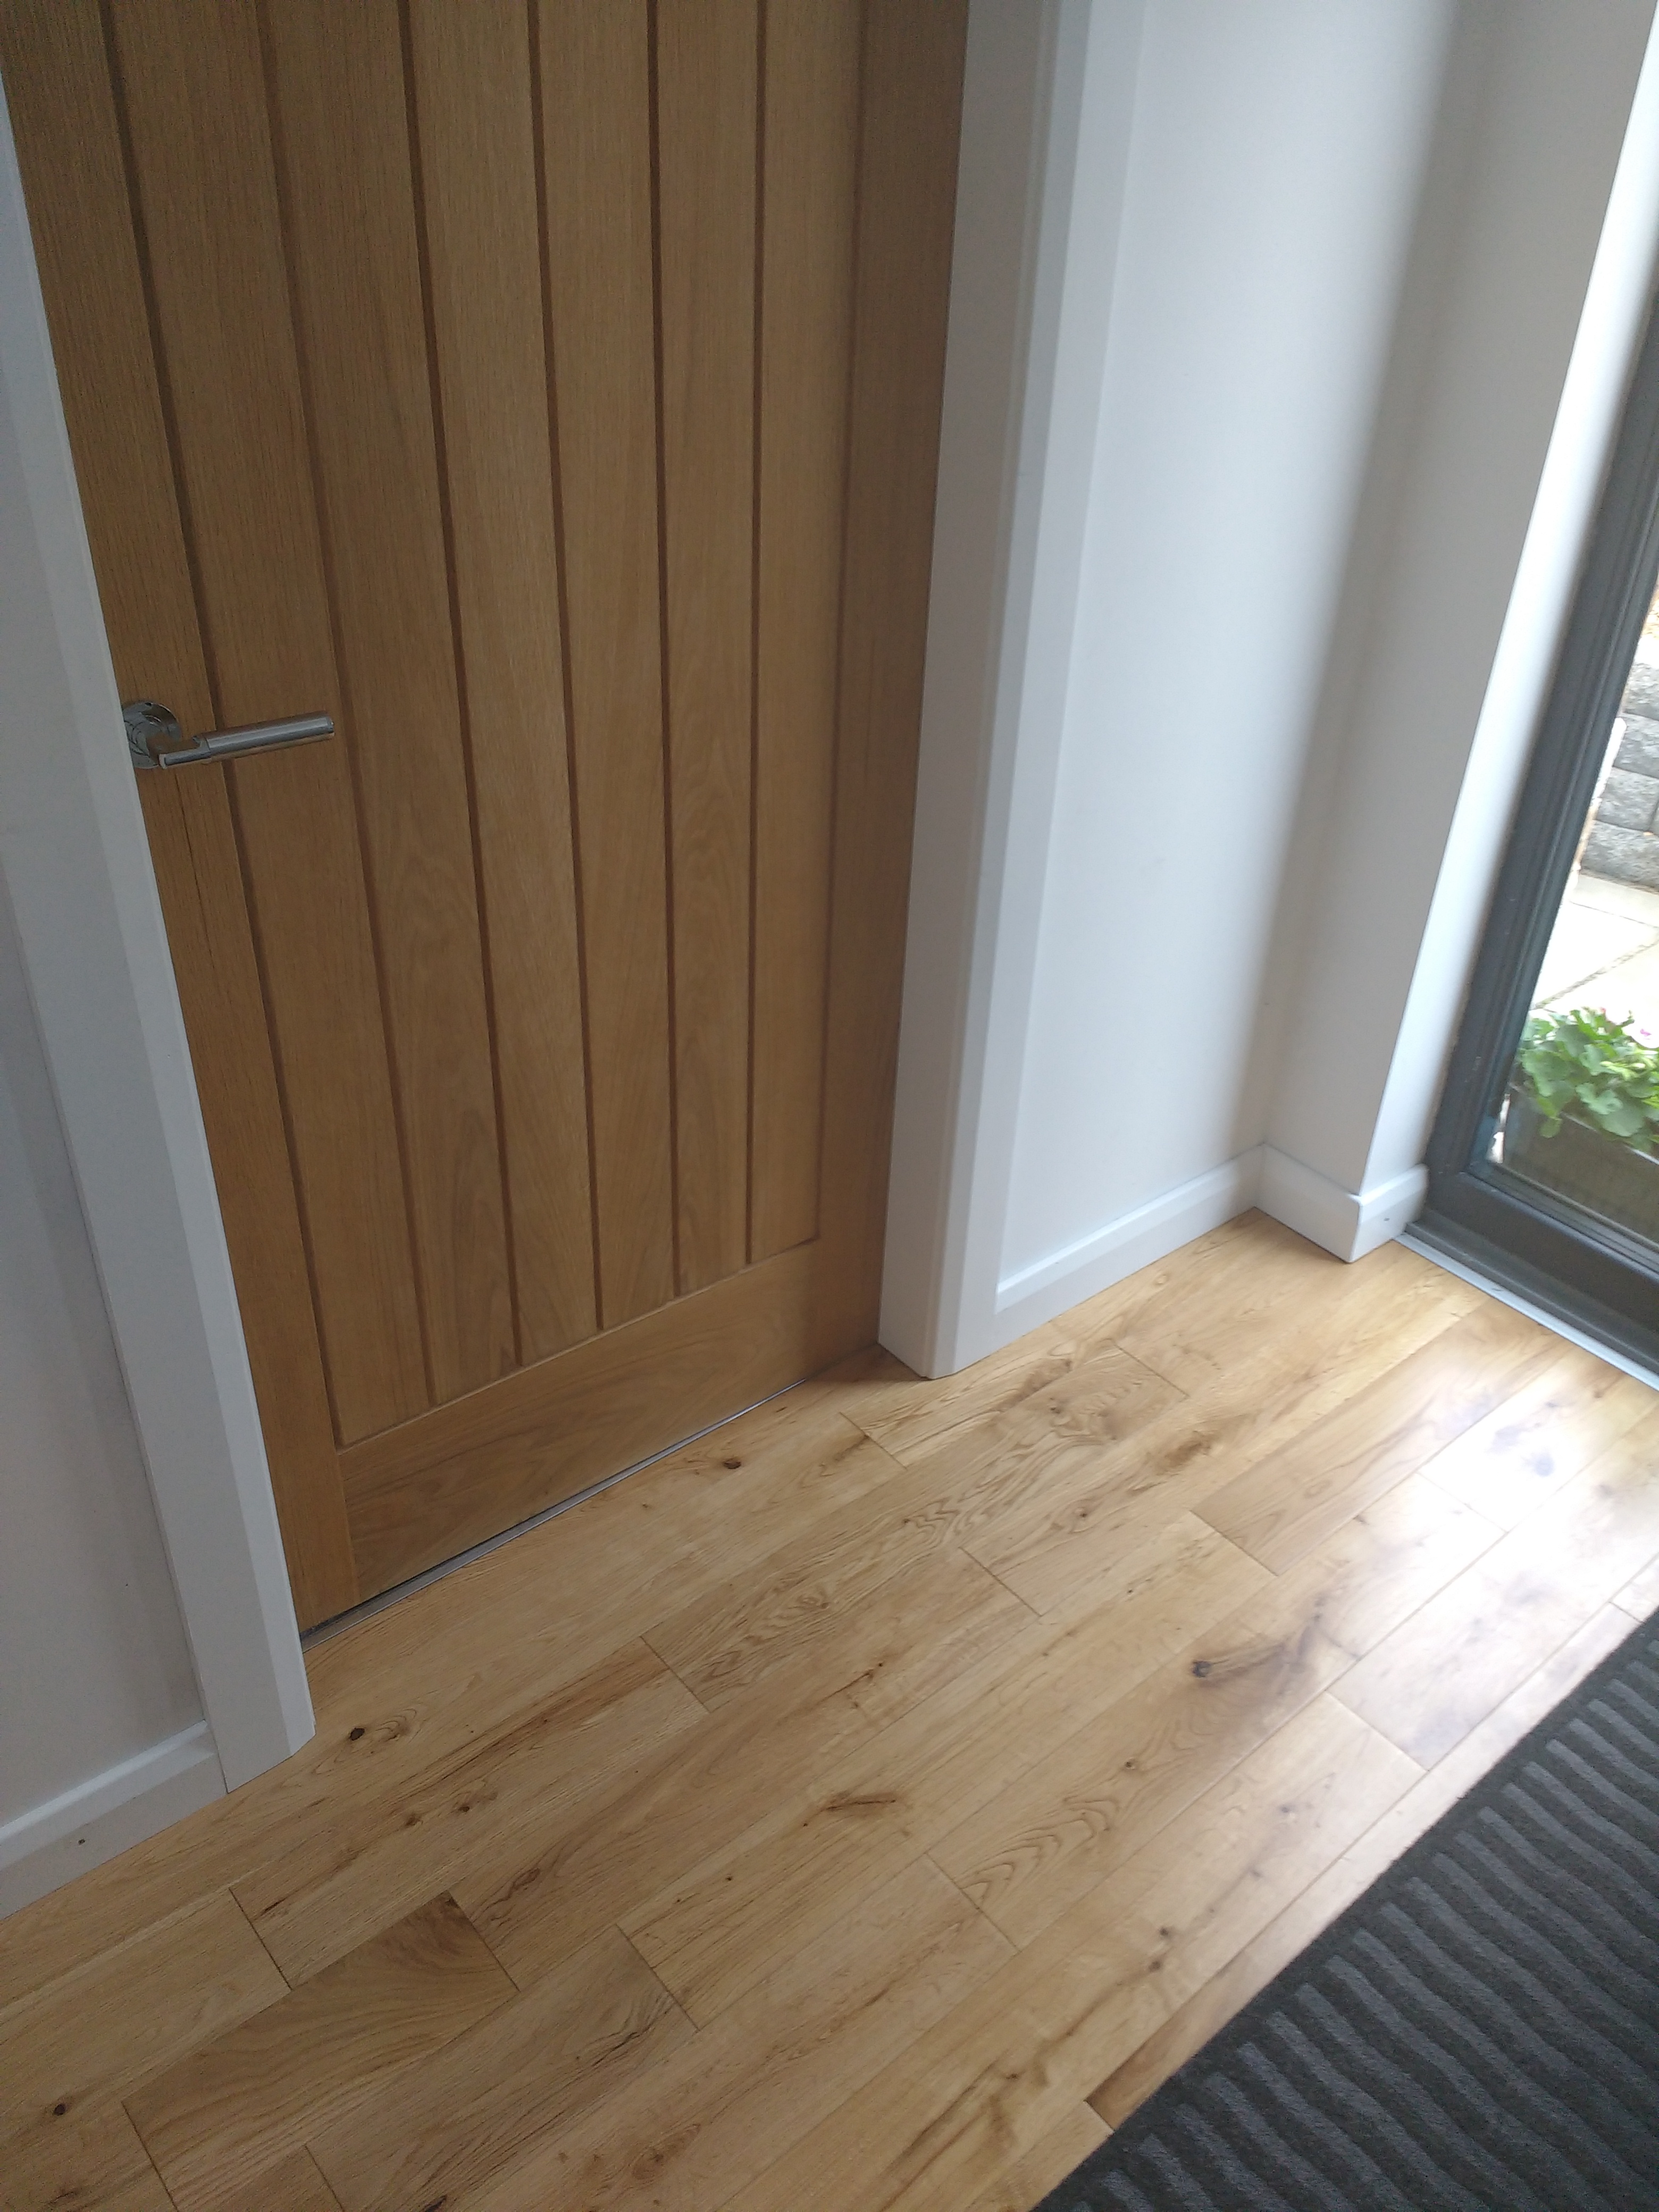
(This post is a précis of a post and thread discussions that took place on the eBuild forum October last year and subsequent discussions with my builder.) Many of the self-builders active on the forum will have used or be familiar with the Passive Foundation system marketed by MBC Timberframe. The essence of this is that the foundation is a raft slab that incorporates a ring-beam that sits inside an EPS former. This former both acts as shuttering for the concrete pour and as insulation between the slab and the underlying hardcore base. The slab is therefore wholly contained within the thermal insulation envelope of the house, typically giving an overall U value for the slab of around 0.1 W/mK. So far so good. A variant of this is where the house has an external brick, blockwork or stone skin. In this case one approach is to pour a second outer ring-beam to carry the outer skin, and the MBC structural engineer (SE) Our skin is a rough-cut Cotswold-style limestone with an s.g. of around 2.5 (or 2.4 allowing for mortar); the walls are ~5m high, and the courses on average 125mm deep giving a linear loading of around 1.5 tonne/m rising to 1.8 on the 3 gables. The underlying ground is a very stiff impermeable (Oadby Member) clay, but We have some medium size tree quite near the foundations. Here is a simplified diagram of this. The SE specified bridging H20 rebars at 150mm centres to couple the inner and outer ring beams structurally, so that the load of the skin is carried across onto the main ring-beam and transmitted down through the ESP300 underneath the beams. If we assume that the load of the stone and house was carried only by the EPS300 sections of the slab, this gives an overall GBP of some 12 kPa and the 266 H20 rebars ensure that there will be minimal differential movement between the outer stone skin and the timber frame supporting everything else. This is comfortably within the allowable bearing pressure of 120 kPa recommended in the Geo-survey report. So this is a good structural design, but it unfortunately embeds a major thermal design flaw. If you consider the thermal cross section of the total rebar, it is pretty much the same (from a thermal perspective) as replacing the rebar and the EPS between the two beams by solid concrete. To be honest I along with everyone else missed this thermal design flaw when I was given a copy of the slab design to review. The penny only dropped for me when I saw the rebars in place, and the concrete was just about to be poured. The inner slab and ring-beam is within the insulation envelope of the house, but the outer ring-beam is at ground level and directly carries the stone skin. In the base design this would be fully exposed to the elements and could often drop to ~0°C or below in winter. The 266 × 2cm diameter mild steel rebars have a total cross-section of 0.084m, and this couples a slab at roughly 21°C with a ring-beam at roughly 0°C across a 20cm gap. This is a pretty perfect thermal bridge as steel has a thermal conductivity of roughly 40 W/mK -- this means that we will lose heat at roughly 21×40×0.084/0.2 W = 350W or 8.5 kWh / day in colder winter months through these bars. This is over 3 times the design figure of 2.6 kWh for the entire slab. Here is a small extract from the slab engineer's design. I've coloured the different components and removed a lot of the structural detail which isn't relevant to this discussion, so we can focus on the issue here. We were too late to change the design fundamentally, but if left uncorrected, this flaw would result in the slab being the single largest source of heat loss (more than the walls, the roof, or the windows and doors for example). So after discussion with MBC, Hilliard their SE, and members on the eBuild forum, what we decided to do was: We retained the outer EPS formwork that wrapped the outer ring-beam. This still left a thermal bridge between the top of the outer ring-beam and the stone skin it was carrying. Hilliard confirmed that a course of Perinsul Foamglas would be capable of supporting the design load of the skin and largely close the thermal bridge. However, we would then have an exposed ESP front and FoamGlass course edge which is cosmetically crap and vulnerable to rodent damage. So after discussing options with our builder we decided to cover the entire exposed EPS / FoamGlass surface with some courses in engineering brick. And when the skin was complete we would then put a perimeter path 60cm wide and 10cm (min) deep around the house on the crushed stone bed. Here is a simplified schematic that I drew up for my builder of the approach that we finally agreed on. What he did was to use two external courses of engineering bricks as an plynth in front of and on top of the FoamGlass, followed by two header courses to step back the wall line. This engineering brick wrapper is primarily cosmetic and a weather protection as the load is actually carried down vertically through the FoamGlass onto the ring-bean, I've also included a photo of the plinth at one of the rear French windows where you can see how it looks in practice. There is still going to be a little bridging on the diagonal between the ring-beam and the outer engineering brick layer, but my rough estimate is that this will be more like 50W rather than the 350W discussed above. An extra 1.5kWh/day, I can live with.2 points
-
I went MDF route and used 75mm for both the skirting and architrave. Of hand I think a 5.5m length was £6. Easy to cut and easy to fill and as you say no knots to worry about. Below is the only picture I have on my phone.
 2 points
 -
Hi All, We were granted planning approval in July for a 4 bed barn style home. We needed to gather information for free as this is the first time my husband and I have built a whole house. After months of bedtime reading of buildhub I've bitten the bullet and registered so that I can enlist help from you all with your obvious vast knowledge of planning and self building. Our first hurdle was the archaeological condition (still not completely sorted), Norfolk is littered with archaeology and we are lucky enough to have some on our plot of which we were not previously aware. The 21 conditions on our planning permission could take a while. The steering on the dumper we bought packed up, there is an oil leak on the digger and we haven't even started. I think we will need a lot of help any information would be gratefully received. I hope I can help others along the way although I don't know much and I look forward reading many more hints and tips from the buildhub community over the coming months and years. Let's hope it's not too many years until completion.1 point
-
Today we got an email from the council saying that they, and the valuation officer, had accepted that we not longer need to pay council tax on the property we are building in Seasalter as there is no longer a habitable dwelling on the site. The roof has been long gone and I am just salvaging the main timbers, those that are not rotted, for general purposes around the site. The small win is that although they only checked on the site in October, after we requested the council tax to stop, they have back dated the non payment to the date of the demolition order (August), some here might remember that asking for a demolition order triggered an automatic commencement of the build. So we are due for a small windfall in council tax repayment which I am looking forward to putting towards on one of these if anybody has experience of the beast please let me know good / bad!1 point
-
Life must be tough for a perfectionist! Bet most wouldnt notice. Good to see you back on line.1 point
-
Its here: http://www.ikea.com/gb/en/customer-service/planning-tools/kitchen-planner/1 point
-
1 point
-
i think you are over thinking this. We routinely dry our washing on the "pulley" Contrary to popular belief this does not add a noticeable amount of moisture into the house, there is no condensation or mould anywhere. And I cant say it has any effect on the temperature of the small utility room that it is in. So just do it and don't worry. If you use a non condensing vented tumble dryer, you, like me, will cry at 3KW of heat going out of the house through a big hole in the wall. If you use a condensing dryer, it will use much the same amount of energy but most of that stays in the room so adds to the heating of the house. You might detect I am not a fan of tumble dryers. the sole purpose of ours is to make the towels and socks "fluffy" and experimentation has found for that you don't need to dry them in the TD, just partly dry them, then hang them on the pulley to finish off.1 point
-
well I managed to get it down to just under 9, you should have seen it before i edited it down from 35ish mins1 point
-
We used a very small 45 deg chamfer on all our skirting, architraves and windows boards. I got samples from a few companies and quality was variable, so ended up with pre-primed HDF (smoother finish than MDF). Good discount and free delivery for the single large order I placed over the phone. http://mdfskirtingworld.co.uk/epages/www_mdfskirtingworld_co_uk.sf/en_GB/?ObjectPath=/Shops/www_mdfskirtingworld_co_uk/Products/edg409/SubProducts/edg409-0001 Skirting 120mm tall by 18mm thick Architraves 70mm x 18mm Window boards 25mm thick Would not hesitate to do the same again.1 point
-
My internet was going slow and stopped, started then stopped again before resuming. In that short time all i heard was 'cut 9 inch'.. Did I take that too far?1 point
-
So, who's this Eva woman at 0:35? Eh, Edward? No wonder Faye looks less than happy1 point
-
Yes work through all the conditions starting with any that prevent you starting work. There is a fee for getting conditions discharged but it is per request not per condition so you can save money by applying for several conditions to be discharged at the same time. That said I wouldn't wait too long to apply. For example it's possible for someone like the conservation officer to tell you verbally he is happy with a proposal, then before you get it discharged he quits and the new man takes a different view. So if you get verbal agreement on a difficult condition get your application to discharge in as soon as possible.1 point
-
E: "Faye says it's not gonna fit through the gap". F: "It's pretty tight!" Is this the script for another "home movie"?1 point
-
Was it only 8 minutes? Felt like much, much longer. #fussarse1 point
-
Thanks. I do like the overall effect with the bricks in varying colours and that light-coloured mortar.1 point
-
I think you're being too self-critical. Gives it character! I doubt anyone but you will notice it once it's finished. Gauging brickwork is one of life's mysteries. Our brickies were nearly 1/2 brick out on the front elevation when they came to the upper floor windows. All the brickwork lines up though, so it was puzzling how it was out. The brickies blamed the timber frame. This is mm perfect, but I suppose the calculation of the gauge may have been out. It was easily remedied by dropping the frame opening by the same amount (fortunately the windows aren't in yet).1 point
-
I've not watched all of your videos, so sorry if you've mentioned this before, but what kind of mortar are you using? It looks a rather creamy colour. Is that the sand or the cement/lime? Or are you just using a dye?1 point
-
Prepare yourself for 8 mins of moaning1 point
-
Even in Germany, prices vary hugely, I have found out. What you can do however, is to refine your searching by searching for specific products using a price comparison website. Start with a known brand and product code. Then for example: make sure in Chrome you have the google translate plugin enabled and configured to translate from German to English go to a price comparison website such as idealo.de type in the brand and the product code (one number at a time) they will prompt you with the product you might be looking for - click on the prompt or just type the whole code in You will then see a display of all the various online plumbing suppliers. As discussed elsewhere ("I love megabad") some ship to the UK and some don't; some have better reputations than others but the point is, that once you know which suite (collection of components) you are going for, it becomes easier to pick a supplier (or two) who will do you the whole lot at good discounts. The other way you can use it is to navigate via their 'categories'. Example: you know you need a WC, and they have to be a certain size, but how to choose amongst the thousands available? Start off it Idealo's Plumbing and Fittings section: click on WCs (translation: Toilets LOL) looking very carefully, see if you can spot 'all filters' (you might have to try a couple of times) click and you then get a whole shedload of options that allows you to further filter, including by price (bottom of the screen) For example: seelct the filter 'less than 150 euro' select the filter 'wall mounted' click the button 'products show' ensure you are sorting 'price lowest first' and for example, you can see that the cheapest Duravit wall hung WC is 56.92 euro. (Nothing agaisnt Ideal Standard btw) Click on the WC and you can see that 56.92 is from MITI24; megabad are at 67.83 and skybad are at 80.75. Works for all kitchen and bathroom supplies!1 point


This leaderboard is set to London/GMT+01:00